An Exchange in Locard’s Own Words (Part 1)
Translated by Kathleen Brahney
Commissioned by McCrone Associates, Inc.
Edmond Locard
Doctor of Medicine, Professor of Law, Director of the Lyon Laboratory of Police Techniques,
Vice-President of the International Academy of Criminology
Manual of Police Techniques
Third Edition, Completely Revised and Augmented.
Paris: Payot, 16 Boulevard St. Germain, 1939
Part I: Traces of Impressions
Chapter III
It is impossible for the lawbreaker to act—above all with the intensity that a criminal act presupposes—without leaving traces of having been on the scene.* These traces are extremely diverse: one must keep in mind that, in each case, one might find different sorts of trace evidence. In addition to fingerprints—already treated in the preceding chapter—we will now consider the research methods and identification of the most frequently found kinds of marks.
-
- First of all, there are prints, that is to say, the marks left on surfaces of varying plasticity by diverse parts of the body or from miscellaneous objects. One might find handprints, prints from the sole of the foot, the lips, body prints, dental prints, prints from the gums or marks left by clothing, vehicles, animals, tools or objects. Among these categories, one is especially prized—namely the traces of fingerprints discussed in the previous chapter.
- In addition to prints, the investigator might find a wide range of additional trace evidence—objects left behind by the criminal (see Part II and III of this exchange). One might also have to analyze dust or evidence linked to a particular sort of crime, such as arson.
- It is important to differentiate between traces and stains. Both might be found in a single object, but must be considered from different points of view. Consider, for example, a bloody hand placed on a windowpane. Two orders of questions arise: 1) First, is this mark from the fingers or body of the suspect? 2) Does the substance (or “material”) consist of recently deposited human blood? The identification of the print is a study in form, analyzing the stain is a material study.
A. FACE PRINTS
These are very rare. There are three types:
-
- An individual has fallen on his face into fine sand or into another powdery substance. In this case, one makes a mold with reinforced plaster, as for a footprint.
- The face has made a mark on linen (as in the case of the Shroud of Turin.) One might find traces of a bloody human face on pillows, bolsters or sheets.
- One might find face prints on smooth surfaces, such as a sheet of paper, which can be revealed because of the secretion of sweat. This is called “natural photography.”
B. LIP PRINTS
One cannot consider the folds of the lips to be immutable, but modifications occur very slowly. One might have to identify lip prints in the following cases:
-
- When a letter has been signed with a lip print by someone whose lips were stained with cochineal (as in the case of the prostitutes).
- When a lip print can be lifted or revealed on the end of a cigarette, especially luxury cigarettes, which have a smooth paper end.
C. HAND PRINTS
A hand that is placed on an object can leave a print in which the papillary crests are not discernible. Nevertheless, such a print can be useful since it allows one to determine the exact dimensions of the hand, the position of its fold lines and other anomalies that might arise. Such prints might be found where fingerprints would never leave a mark—on human skin, clothing or underwear. One can also find such prints on walls, furniture and the ground. Such prints might be left by the victim or by the aggressor, as when the latter has received some sort of wound, or if contact with the victim has bloodied the attacker. One also encounters these types of prints on weapons and all kinds of objects—windowpanes, glasses, bottles, dishes, etc.
Normally these prints are bloody or grimy. They might be produced simply by the pressure on a malleable substance or by being “preserved” in dust.
In all cases, the prints must be photographed. If they are found in a soft substance, a cast can be made. In other cases—but only after the print has been photographed—one can try to make a transfer as has been described in the case of fingerprints.
D. SEAT PRINTS
One finds these kinds of print in sand, soft earth, snow and, above all, in the dust on benches. Seat prints can be identified by their dimensions. They can also aid in reconstituting the crime scene, notably when a culprit was waiting for his victim or when an accomplice is installed as a lookout. Oftentimes, seat prints are accompanied by prints from clothing.
E. COMPLETE BODY PRINTS
One finds total or nearly total body prints under the same conditions that apply to seat prints, that is, when a body has lain or was laid out on sand, soft earth, snow or on a dusty surface. In addition, one must take into consideration two special cases:
-
- Bed Linens: A body stretched out on a bed makes an impression that is quite apparent on the pillow, bolster and the mattress. It is easy to ascertain whether the bed was occupied by one or two persons. If one suspects that the bed, even an unmade one, has not been occupied, one will have to verify this by checking whether there has been contact with the bed sheets, and above all, the state of the top mattress.
- Dragging: When a criminal has carried off the body of a victim who was dying or already dead, either to throw it into a lake or river, or to transport it to a quarry, a ditch, or a well, or whether he stretches the body out on a road or a railroad track to make it look like an accident, or lastly, whether he wants to drag the body into a house and set fire to it, it is quite unusual for the perpetrator to have the strength to carry the victim on his shoulders or in his arms. In nearly all cases, he drags the body.
In earth or sand, dragging leaves two marks corresponding to the feet, since the murderer almost always holds the victim by the shoulders. The feet rub along the heel, and the body being dragged cuts into the footprints if the murderer walks in a straight line. Almost always, the bottom hem of the victim’s pants becomes part of the footprints. In the case of a female victim, the hem of the skirt or dress–unless the garment is very short–will erase the footprint slightly, but not completely because there is less pressure from the hem of a skirt or dress.
In grass, dragging leaves prints made when the heels of the shoes pull the grass, and signs left by friction from the clothing of the victim (the hem of the pant legs or the dress.)
In snow, no problems arise. The track is deep and cannot be mistaken. One will find two clear lines framed by the sweeping of the victim’s clothes.
If the criminal has dragged the victim by the feet, dragging leaves a wide track starting from the shoulders with indentations left by the head, which is jostled by the dragging.
F. FOOTPRINTS
One finds prints from shoes and from bare feet. Shoe prints take on the form of prints left in dust or in blood (sometimes even just in a humid spot) on a hard surface, sometimes in an indented form.
-
- PRINTS ON SMOOTH SURFACES: Generally, these are the only kinds of prints one finds in an apartment. Prints of rubber shoe heels on floorboards, mosaic tiles and other floor tiles are the most common. One also finds dusty shoe prints on papers left lying on the floor, on rugs, carpets or linoleum (prints on linoleum are especially good) and on chairs that the criminal might stand on to reach a shelf. At times, the print is merely the displacement of the pile or wool of a carpet. Likewise, in a garden or a field, the print may be nothing more than the ruffling of the surface of the grass. In all cases, one must photograph the print using a tripod with the centerpost reversed. If the object is transportable, after having photographed it in place, it should be taken up and wrapped with extreme precaution. Tracks on paper can be sprayed with a fixative containing gum Arabic, as one would do in spraying a charcoal drawing. On hard surfaces, after photographing the print, one can try to make a transfer onto photographic paper, whether with gelatin bromide or with citrate, as was described in the case of fingerprints. It will be optimal if the prints are visible in the metric photos of the crime scene.
- INDENTED PRINTS: There are often multiple prints found in earth or snow. The police or gendarmes will have taken great care in protecting these prints. The prints will be examined on site to determine the path of the criminal. Each print, even the fragments of prints, will be entered onto a metric photograph of the environs. All prints of various origins (the right and left feet of each individual) will be photographed separately, using a tripod with the centerpost reversed, after it has been determined that the prints are not those of witnesses or the police force. If there are several prints from the same origin, the best and most perfect will be selected; one might select several or all of the partial prints. After they have all been photographed, the next step is to make molds of them.
-
-
- Making molds in loose soil, dry mud or frozen ground: Using a soft brush, apply lacquer or shellac. If one does not have lacquer, sprinkle the print with oil from a paintbrush by striking it against the left forearm, as masons do when they are rough-casting. After the varnishing with shellac (which one should let dry for a half hour) or with the oil (in which case, proceed immediately), in a bowl or pan, prepare a mixture of very fine and very dry plaster of Paris and clean water. Mix this with your hands until it is a doughy consistency. Using a spoon, spread an initial layer on the print. Then put in something to reinforce the plaster – small pieces of wood or sticks, bits of rusty wire or thread. Let it harden. Lift up only after touching the plaster to see if it has warmed up. Then, using great care, lift up the cast and use a knife to remove any dirt that has stuck to it. Wrap it carefully.
- Making a mold in mud: Same method, but without the lacquer preparation.
- Making a mold in dust or fine sand: Do not use oil, which would ruin the bottom of the print by adhering to the particles and forming droplets. Varnish yields only mediocre results. Prepare a kind of plaster “milk” by mixing one spoonful of plaster of Paris with 250 grams of water. Using a spoon, carefully pour some of this “milk” onto the print. It will form a crust that will show the smallest details. On top of this crust, pour reinforced plaster as discussed above.
- Making a mold in snow: Put some fine, perfectly dry plaster of Paris in a sieve or a muslin bag and sprinkle it on the print. The plaster will absorb water from the snow and form a crust into which one can pour reinforced plaster, as described above. This method also has the advantage that one can use the snow to mix with the plaster.
- Galvanoplasty or Electrotyping: (Bertillon) A plaster mold, even a reinforced one, is always fragile. It is prudent to take a galvanoplastic (or electrotype) test of the print, by coating it with graphite. If one does not have the equipment for galvanoplasty, one can always make photographs that are the actual size of the molds or photograph them using the millimeter rule. That way, any losses or destruction of the molds becomes less serious. Never use the gelatin method (Hugoulin), which yields very bad results.
-
-
- IDENTIFYING FOOTPRINTS: First, one must acquire prints for comparison, and this must be done with great haste. If the shoes that have made the prints are worn for some time afterward, they will undergo changes that will make them unrecognizable. One can make the identification wither with the shoes themselves or with photographs or molds of the shoes. There is no need to make enlarged photographs—De Rechter even uses reduce-sized photographs. The latter method is much preferable, first of all because of the ease of comparison, and secondly as illustrations in the report. All enlarged photographs must be of exactly the same enlargement, or of actual size, using the millimeter rule as a control. It is also understood that for the purpose of comparison, one must compare molds with molds and secondary castings with secondary castings, or photographs with photographs, but one should never compare a shoe with a mold or with a photograph. With a shoe, one will therefore make comparisons with experimental prints and molds.
Points of Comparison:
- The dimensions—the total length of the print, the length of the heel, the maximum width of the sole, the maximum width of the heel, the width of the front rim of the heel, the angle of the back curve of the heel.
- Any deformations caused by wear along the sides, the back of the heel, etc.
- The type, position, dimension and number of nails in the shoe.
- For heelpieces and soles made of rubber, the type, brand and any signs of wear.
- For rope-soled sandals or socks—the details of the design or pattern.
It is useful to divide photographs into numbered fourths to permit ease of comparison; one can then number the points of comparison in the margins as one does for the characteristic points of a fingerprint. It is also good if the laboratory museum has a complete collection of models of shoe nails and complete samples of rubber heelpieces.
G. TOOTH MARKS
One finds tooth marks:
-
- In human skin (in murders or cases of rape.); the marks should be photographed
- In foodstuffs, especially in butter, thick crepes and fruit. One should make a mold of the tooth mark using fine plaster, using the same method as in taking footprints. In addition, one should enclose the object in a small box to keep the liquid plaster from leaking out.
If the bite mark is in fruit and is becoming deformed, one can restore the original freshness of the fruit by plunging it into a ½% solution of formalin. One can then make a mold using the following:
- 25 grams of Spermaceti [sperm whale oil],
- 25 grams of hard paraffin,
- 50 grams of talc
- and eosine [no specific quantity is listed. – Tr.], which is used to tint the mold pink.
The mixture should be made over a low fire; it liquefies rapidly in boiling water and solidifies very quickly when chilled. One can use this same mixture when making bite molds from cadavers.
Comparison prints can be taken by making the subject bite into modeling wax or into Hint’s paste, which is used by dentists yellow wax, resin and gutta-percha.) One can then make a secondary mold using plaster.
The only points of comparison for bites are the size, spacing and placement of the teeth. For molds of bite prints in soft substances, one should make photographic enlargements in two diameters, and one will compare the vertical rows of all the teeth and for which one will note the size and spacing, as one does for bands of spectral absorption.
H. FINGERNAIL MARKS
One finds fingernail marks:
-
- On human skin. Photograph these immediately before the wound become covered with a scab
- On walls, drapery, etc., and when the criminal has scaled a wall. Photograph these using the millimeter rule and note the distance of the prints from the ground to the top of the obstacle being climbed, to window bays, etc.
- On various objects handled by the criminal, on walls where he may have made scratches, etc.
These marks provide information about the length of the fingernails, their shape and about any anomalies present. Because fingernails grow quickly, comparisons must be made immediately with experimental marks made under identical conditions.
I. PRINTS MADE BY CLOTHING
-
- Cloth prints in dust: Very often, one encounters a mark left by the sleeve in the dust on top of a dresser or on a chest that has been broken into; one might also find the mark of a hat on the ground or on a piece of furniture; or marks left by shoes. Photograph these, enlarge using the millimeter rule. Compare with experimental marks made using the suspect’s clothing. These marks can also be taken by applying typewriter ink to the fabric and placing the fabric on a piece of blotting paper.
- Indented prints from cloth: These are found when the criminal has fallen into loose soil or sand, and a part of his body has left a mark. If the fabric has a fairly clear pattern, one can take a print of it. This is what happen in the case of corduroy. Make a mold using the same method used for footprints para. F.) Compare directly with the suspect’s clothing, or better yet, with experimental molds.
- Threads pulled out of clothing: One finds these on broken furniture, where walls have been scaled or at the scene of a struggle; one also finds them on the victim. The threads should be examined under a microscope to determine their origin. One should then make photographs using the microscope. One can then compare microphotographs with threads taken from the suspect’s clothing.
- Micro-chemical examination of threads: Threads or single fibers should be placed on a microscope plate; then a few drops of a fresh solution made as follows should be added:
- Potassium iodide – 1 gram
- Distilled water – 100 grams
- Iodine – as needed (No specific quantity is indicated, Tr.) Allow the solution to penetrate the thread; remove excess liquid by using a piece of white blotting paper pressed lightly against the filaments; then place a small cover plate on top. Next to the cover plate, place a freshly prepared drop of Vetillard reactive, made with the formula below. (In making the solution, take care to add the sulfuric acid slowly to keep the mixture from overheating):
- Pure Glycerin – 4 parts
- Distilled water – 2 parts
- Pure sulfuric acid – 6 parts
On the opposite side of the cover plate, place a small square of blotting paper. One can thus make the reactive pass through the preparation several times.
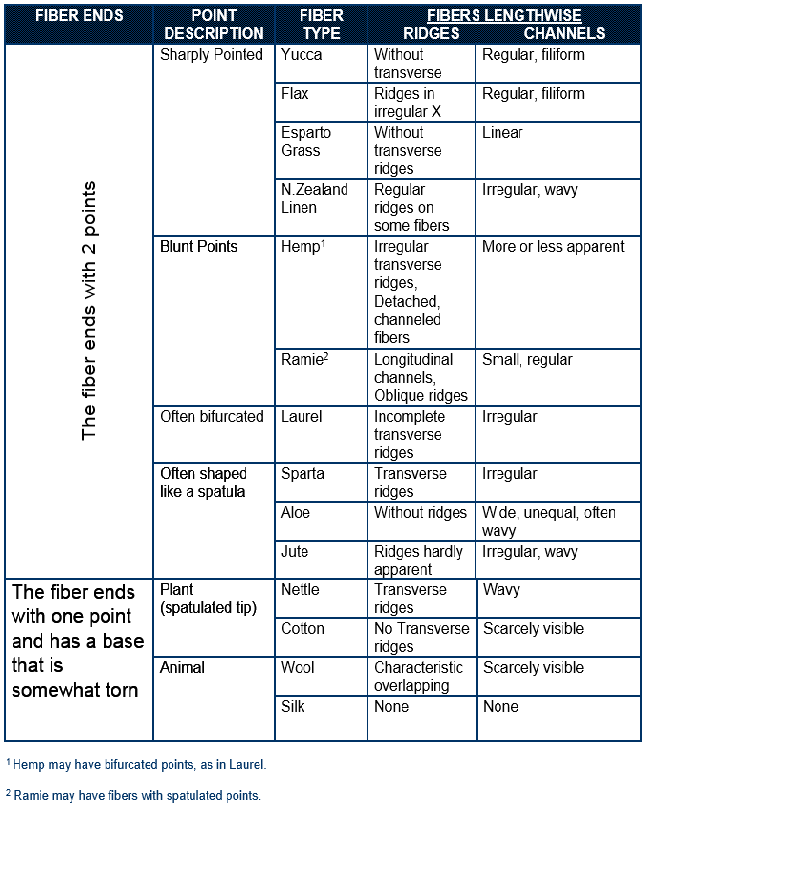
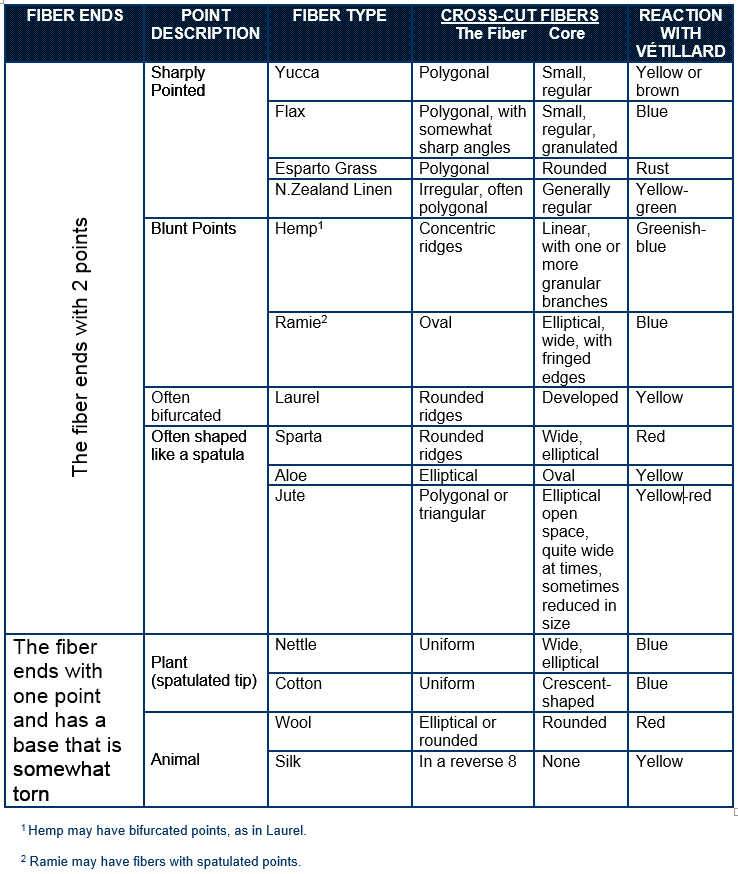
In diagnosing the various threads, one can use the following tables, established by Charles Manget (Table I).
Table IA: PART 1
Charles Manguet’s Table on Identifying Fibers
Charles Manguet’s Table on Identifying Fibers
Table IA: PART 2
Charles Manguet’s Table on Identifying Fibers
Charles Manguet’s Table on Identifying
Fibers
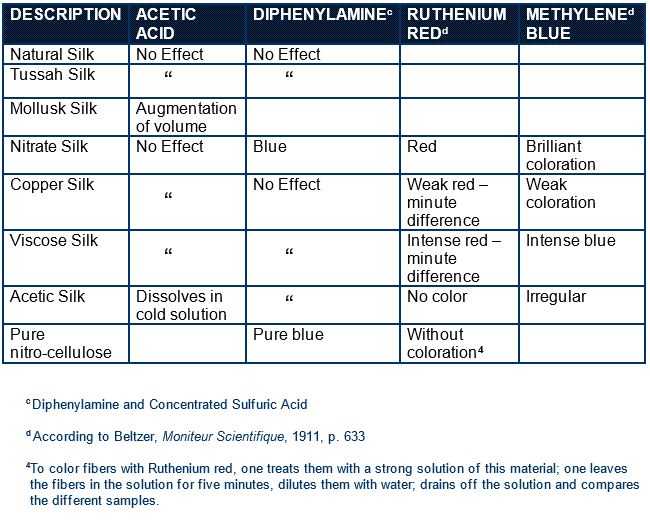
Table IB: PART 1
Charles Manguet’s Table on Fiber Reactions

Charles Manguet’s Table on Fiber Reactions
Table IB: PART 2
Charles Manguet’s Table on Fiber Reactions
Charles Manguet’s Table on Fiber Reactions
J. ANIMAL PRINTS
Research on animal prints is necessary in the following kinds of cases: The criminal has arrived on horseback or in a vehicle pulled by a horse, donkey, mule or oxen. He might be accompanied by a dog, or less often, by a cat, a monkey or a marmot, etc.
A theft may have been committed by an animal trained to steal—a dog or a monkey—or by an animal that steals for amusement, such as a magpie or a jay. A murder may have been committed by a ferocious animal, such as a wolf, a dog or a sow, etc. Sometimes damage to agricultural property is caused by animals, such as cats, weasels, polecats, foxes or dogs. Lastly, in the case of natural deaths, the cadaver may have been gnawed or even eaten by animals, such as rats, crows or cats.
Traces left by animals may include pawprints, tooth marks, hairs or feces.
- Papillary Ridges in Animal Prints—A certain number of animals possess front or back paws that leave prints made by the papillary ridges in the skin. There are the following types, listed in order of complexity:
- Random patterns – tortoise, parrot, kangaroo
- Reticulated patterns – lizard, the “ratel” [Translator’s note: a carnivore found in Asia and India, resembling a skunk, about 60 cm. in length.], and black bear
- Aligned patterns – badger, polecat, sable
- Papillary ridges with closed patterns – lemur, monkey, flying squirrel
- Papillary ridges with open patterns – chimpanzee
- While this order of complexity in terms of prints does not correspond to the gradual growth in complexity of other organs, such as the more complex folds of brain tissue, many mammals are less evolved, in terms of their paw prints, than are the animals with the simplest form of prints (the tortoise and the parrot.) Also, within a single group, such as the carnivores, one finds patterns or tendencies that are completely different. Dogs sometimes, although rarely, have papillary ridges; when found, dog prints present closed loops, bifurcations, the beginnings of lines, just as human prints do, although dog prints are rudimentary.
- Animal Footprints. One can determine the species by the form of the footprint (cf. dog and cat prints, etc.) The dimensions of the foot and the length of the stride determine the size of the animal.
Godefroy notes: “A dog’s print is marked by four phalanges or digits. The fifth, equal to the thumb, is atrophied and raised so that it cannot touch the ground. A front paw print can be distinguished from a rear paw print by examining the heel: the heel of the rear paw leaves a rounded print, whereas the heel of the front paw leaves a print that is roughly triangular. Moreover, the position of the phalanges of the left paw is not identical to that of the right paw. The smallest phalange of the right paw will always be on the right side, while that of the left paw will be on the left side. One will also note the degree which the nail has been worn down. Finally, in cases where the dog’s paw is furry, fine lines will be found in track left in soft soil or on a light background. This particularity is only observed in the case of certain heavy dogs or in young pedigreed dogs.”
- Bites. Make a mold and compare it as one would with human bite marks.
- Feces. In the past, hunters made great advances in the study of feces.
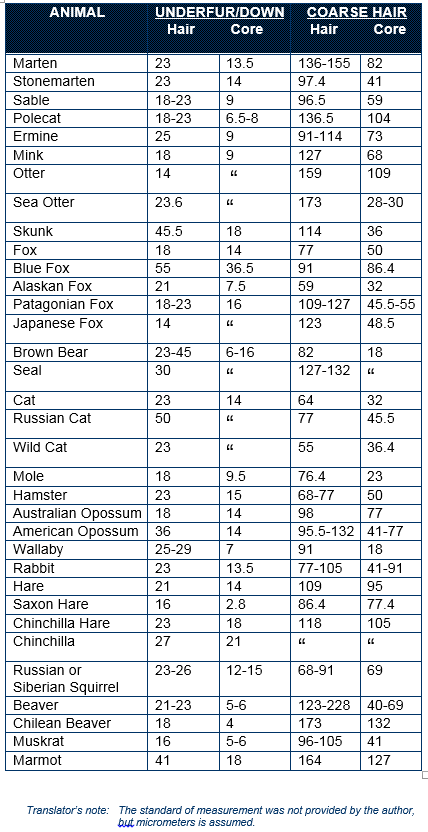
- Hairs. At the scene of a break-in, one might encounter hairs from living animals or from furs worn by the aggressor or by the victim. In paragraph N, one will find the diagnoses of human and animal hairs. This table, drawn up by Alessandro Solaro, indicates the diameters of hairs and of the core of various furs. This table allows one to clear up quite quickly a great number of early hypotheses presented by the evidence.
Table II: Alessandro Solaro’s Table on Animal Hair
*The boldface text is known, and frequently quoted, as Locard’s Exchange Principle.
Comments
add comment