How to Cleave, Polish, & Use KBr Crystals
Cleaving KBr Crystals: It is more convenient and less costly to cleave and polish KBr crystals in-house. A 25 x 25 x 4 mm crystal can be cleaved into ~48 crystals that measure 6 x 8 x 1 mm. Each crystal can be repolished ~6 times before it is too thin to work with. Cleaving a large KBr crystal into 48 smaller ones is done in stages. The large crystal is first cleaved in half, then the resulting smaller crystals should also be cleaved in half whenever it is possible. This results in clean cleavages because the pressure is distributed equally to both parts of the crystal. A suggested order of cuts is indicated in

When cleaving the crystal, the blade is aligned parallel to a cleavage plane. It touches the crystal only at Point A (see Figure 1). When the aligned blade is tapped smartly, it will break the crystal in half (see Figure 1).
The 48 small crystals may appear smooth, but they need to be polished to remove the fine topography of ridges and planes on the surface; these can be clearly seen in coaxial illumination. The fine ridges would interfere if liquids were to be analyzed or used in the IR preparation. Liquids tend to migrate along the base of a ridge on a freshly cut crystal face.
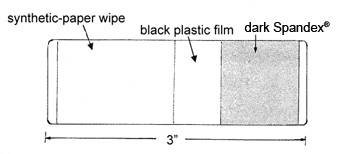
A polishing slide for the crystals can be made from a microscope slide as follows: the slide is covered with a 1” wide double-coated tape. A piece of dark, smooth, synthetic fabric about 0.5 mm thick is attached to one end. Unstretched smooth Spandex® fabrics are ~0.5 mm thick and work well. The remaining slide is coated with a strip of thin, black plastic and synthetic paper wipe (see Figure 2).
The crystals are polished on the Spandex fabric that has been moistened with cool water. The black plastic film is used to examine the crystal for cloudiness after polishing. It also prevents the moisture from migrating to the synthetic paper wipe. The wipe is used occasionally to dry the crystal immediately after polishing. This procedure will be illustrated in more detail in a moment.
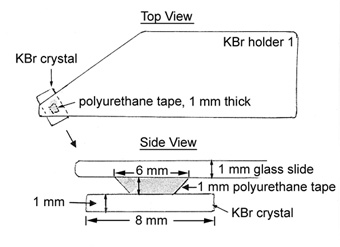
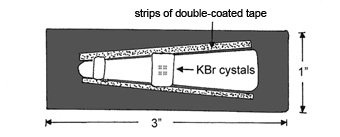
The KBr crystal holder for those tiny crystals can also be made from a microscope slide. One corner of the slide is broken off and a piece of polyurethane tape is attached to the remaining narrow end as shown in Figure 3.
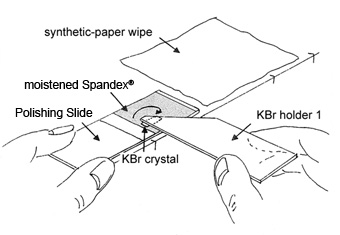
Polishing KBr Crystals: The Spandex fabric on the polishing slide is moistened with cool water and placed on the bench together with a piece of synthetic paper wipe. An unpolished KBr crystal is placed on the bench and picked up by the KBr crystal holder – 1. The crystal is rubbed for 2-3 seconds on the moist Spandex cloth, then immediately rubbed against the synthetic cotton wipe for 2-5 seconds. The crystal is removed from the polyurethane tape with forceps and the other side is similarly polished (see Figure 4).
The Spandex fabric should be rinsed with cool water after polishing 2-3 crystals. The polyurethane on the KBr crystal holder will eventually lose its tackiness and will no longer hold the KBr crystal securely. To regain the tackiness, it is rinsed with water, and cleaned with another piece of polyurethane. Eventually, it will have to be replaced.
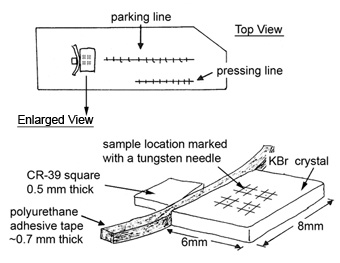
An IR preparation slide can be made from a microscope slide as follows: Draw a fine line (parking line) down the center and also toward the bottom (pressing line) of the slide. These two lines are divided with numbered, vertical divisions approximately every 5 mm. The slide can be cleaned and reused. To distinguish which side of the slide has the numbers, a small corner of the slide (upper right-hand corner) is scored and broken off. A polished KBr crystal and a number of 3 mm squares of CR-39* are attached to the sides of the slide of a 0.7 mm wide strip of polyurethane tape (see Figure 5).
A sample is placed along the parking line and characterized with the PLM. If it is soft, it can be placed on the KBr crystal and pressed with the CR-39 square. If it is hard, it is pressed with a glass wedge along the pressing line, then transferred to the KBr crystal.
The polyurethane tape will hold the KBr crystal firmly in place on the glass slide during sample preparation. The tape is used to clean needles and forceps as well. Since the preparation and characterization are done on one slide, there is less chance of losing a sample, especially a small sample.
Next, the KBr crystal with the samples is taken off the preparation slide, placed on a KBr holder 2, and submitted for IR analysis. A fresh KBr crystal is placed on the IR preparation slide.
* CR-39 (allyl diglycol carbonate). A 3” square piece of 0.5 mm thick plastic with instructions can be obtained free from McCrone Microscopes & Accessories.
The KBr crystal holder – 2 can be purchased from McCrone Microscopes & Accessories. It is made of blackened steel with a variable slit width, running lengthwise along the plate. It can hold many 5-15 mm KBr crystals with samples for IR analysis (see Figure 6).
Comments
add comment