Microscope Activities, 2: Characteristics of Microscope Objectives
In the past, Hooke College of Applied Sciences offered a microscopy workshop for middle school and high school science teachers. We thought that these basic microscope techniques would be of interest not only for science teachers, but also for homeschoolers and amateur microscopists. The activities were originally designed for a Boreal/Motic monocular microscope, but the Discussion and Task sections are transferable to most microscopes. You may complete these 36 activities in consecutive order as presented in the original classroom workshop, or skip around to those you find interesting or helpful. We hope you will find these online microscope activities valuable.
EXPERIMENT 2: Characteristics of Microscope Objectives
Goal
To become familiar with the various markings and numbers engraved on the microscope objectives.
Level
Basic
Materials Needed
Microscope
Procedure
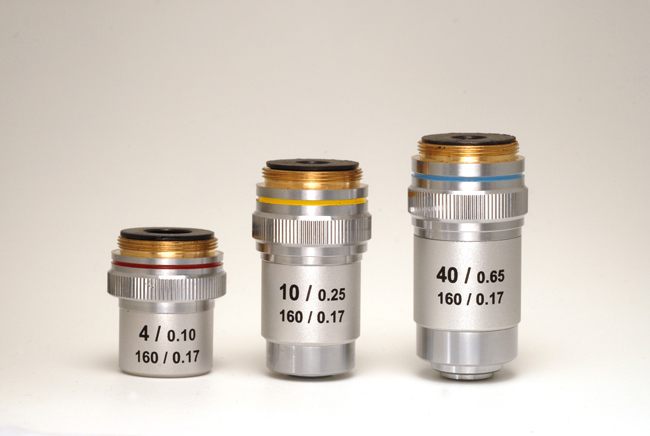
The Boreal/Motic microscope comes supplied with 4X, 10X, and 40X objectives; there is a fourth, plugged position in the rotating nosepiece for an optional 100X objective. Look at the numbers on the three objectives, and notice the color band associated with each objective. Each objective has two lines of numbers, and each line has two numbers separated by a slanted line. The numbers in the top line are all different for the three objectives; the lower line contains numbers that are the same for all three objectives (see Figure 2-1).

Discussion
The first number in the top line indicates the magnification of the objective, commonly indicated with an “X” (“times”). You have a 4X, 10X, and a 40X objective. Together with your 10X eyepiece, these objectives will supply final visual magnifications of 40X, 100X, and 400X. Notice the color bands associated with the objective magnification. The use of color for rapid recognition of magnification when the legend is not turned toward the user is a relatively recent trend in microscope manufacture, and does not appear on older objectives. The colors on your objectives are red (4X), yellow (10X), and blue (40X). Although these colors tend to be standardized between the different manufacturers, there may be exceptions noted (Tiyoda used red bands on all magnifications to indicate their phase contrast series). In addition to the red, yellow, and blue used on your 4X, 10X, and 40X, green is used to indicate the 20X, and black is used to indicate the 100X objective. Where both 40X and 60X objectives appear in a manufacturer’s line, 40X is indicated with a light blue color band, and 60X is indicated with a dark blue color band.
After the magnification on each objective, there is a slanted line followed by another number; this number indicates the numerical aperture of the objective, often abbreviated and referred to as NA. The 4X objective has a numerical aperture of 0.10, the 10X objective has a numerical aperture of 0.25, and the 40X objective has a numerical aperture of 0.65. The magnification and numerical aperture are usually designated together, as they are on your objectives: 4X/0.10, 10X/0.25, 40X/0.65, or, simply 4/0.10, 10/0.25, 40/0.65. The numerical aperture is an extremely important number – much more important than the magnification, because it is a measure of the angular diffracted-light-gathering ability of the objective, which, in turn, determines the resolving power of the objective. This is an advanced topic which will be dealt with in another Experiment. For the time being, it is enough to know that the higher the numerical aperture, the greater the resolving power of the objective. Note that you may have a choice of the same magnification objective, but different numerical aperture: 40/0.5, 40/0.65, 40/0.85, 40/0.9, 40/0.95, 40/1.0; all of these objectives provide exactly the same magnification, but the ability to resolve ever finer structure increases with increasing numerical aperture.
The second line of numbers on all three objectives is exactly the same: 160/0.17. The first number, 160, indicates the mechanical tube length, in millimeters, at which the objective was designed to be used. The mechanical tube length is defined as the actual measured physical distance between the lowest part of the nosepiece where the objective screws in, to the top of the eyetube where the eyepiece rests. Your objectives have been designed to be used with a mechanical tube length of 160 mm. Other manufacturers and other accessory systems may be designed for tube lengths of 170 mm, 185 mm, 215 mm, … even infinity. (See Experiment 4 on determining the mechanical tube length of your microscope.)
After the 160 mm and the slanted line engraved on the second line on your objective, there is the number 0.17. This number refers to the coverglass thickness, in millimeters, for which your objectives have been designed to produce an image of your specimen that is free of spherical aberration. This is another extremely important topic in critical microscopy that will be dealt with in more detail in another experiment (see Experiment 24 on determining coverglass thickness). Coverglasses designated with the number 1½ would be the ideal choice for use with your objectives.
Other important characteristics of your objectives include the free working distance, correction, and field flatness. These topics are covered in Microscope Activity Experiments 5, 12, and 13.
Task
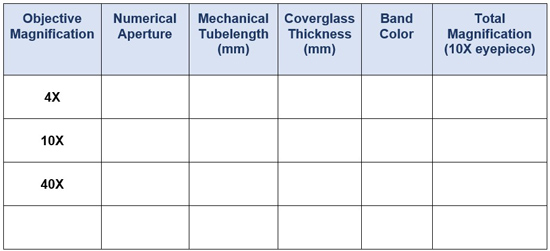
Make a table showing, for each objective, the objective magnification, numerical aperture, mechanical tubelength (mm), coverglass thickness (mm), color of band, and, finally, assuming continued use of your 10X eyepiece, the total magnification.
Perform the experiments to determine mechanical tubelength (Experiment 4), coverglass thickness (Experiment 24), true magnification (Experiment 10), and free working distance (Experiment 5) as soon as convenient.

Comments
add comment