A Simple Semi-Micro Combustion/Pyrolysis Apparatus For Use With Any Stereomicroscope
One of the typical unit operations in classical microchemical (and also semi-microchemical) work, as founded by Behrens, Emich and others, is the exposure of the test specimen to heat, if possible under different boundary conditions (e.g., in the presence or absence of air, other gases, liquids like water, solvents or strong mineral acids). For me it was desirable to watch the different effects during these operations with the aid of a stereomicroscope. With such an instrumental setup, you can study temperature dependent effects under a much broader range of conditions than, for instance, on the classical hotstages, attached to or part of a compound microscope. The major limitations are that magnifications are not that high, and that image distortions occur because of the convex surface(s) of the glass tube(s) of the combustion/pyrolysis oven.
Because, to my knowledge, no commercial equipment is currently available for this technique, I tried to build it myself from easily obtainable, inexpensive parts. Literature that I found most useful in the proper selection of materials and in the optimum design of the construction is cited in the general references section at the end of this paper.
The temperature range that is easily accessible with the described setup extends from room temperature up to approx. 600°C. That is sufficient for most of the usual microchemical work, including controlled ashing and pyrolysis. Higher temperatures are possible if some additional care is taken with a further optimized design of the little oven/incinerator.
The stereomicroscope that I use in my home shop is a “TECHNIVAL”, from the seventies of the last century, made by Carl Zeiss, Jena; see Figure 1 for a front view of this instrument, with a LOMO ring light illuminator attached to the front lens. Nice-to-have’s are: a transmitted light stand and a double-gooseneck fiber optic illuminator attached to the stereomicroscope (not shown in Figure 1).
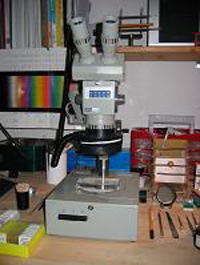
FIGURE 1
One advantage of this instrument is that its base plate is heavy, and sturdy enough to counterbalance the weight of the microscope even if it is swung out around the vertical axis to its “180 degrees opposite” resting position, enabling larger specimens and extra equipment to be placed under the front lens (see pictures below). This can be used to the great advantage of the investigator in the following experiments.
Things that are necessary in addition to the stereomicroscope are:
- A pencil, circular cross section
- A laboratory power supply, capable of delivering direct current, 0-24 Volts, up to 3 or 4 Amps, together with some cables, banana plugs and alligator clips
- Kanthal® wire, 0.5 mm diameter (or equivalent, like Nichrome®-wire)
- Pasteur pipettes, made of ordinary (“soft”) glass or made of borosilicate glass
- Fused silica (“quartz glass”) tubing, different diameters and lengths (to fit your needs), if you want to reach temperatures above 600°C
- Platinum wire, approx. 2 mm diameter
- A little horizontal resting stand for Pasteur pipettes, home-made from wooden latches and slats
- If you want: a thermocouple and electronic thermometer to measure the temperature characteristics of your home-made micro incinerator
The first thing to do is to make a heating coil from the Kanthal®/Nichrome® wire. I used a pencil of 7 mm diameter for coiling the wire around it, and then removed the pencil from the central “cavity”. A spiral coil is left behind, approximately 55 mm long, and with a mean spacing of 1.5 to 2 millimeters between the individual convolutions of the wire. The uniformity of these spacings between individual wire convolutions is of utmost importance if a uniform heat distribution in the oven is required.
In its easiest setup, the micro incinerator can be assembled as follows:
- Take an ordinary Pasteur pipette and loosely insert this in the central cavity of the wire coil. This has the advantage that Pasteur pipettes are so cheap that they may be used as single-use equipment−for every sample/every combustion a fresh one, so no extra care must be given to avoid contamination of the oven wall tubing as is the case with the fused silica apparatus described below.
- Fix the pipette with the wire coil in a suitable horizontal position on the home-made, wooden pipette stand and place it under the swung-out stereomicroscope.
- Using some cables, banana plugs and alligator clamps, connect the setup to the lab power supply (0-24 Volts and maximum 3 to 4 Amps direct current only).
- Insert the sample to be pyrolyzed or incinerated into the Pasteur pipette, with the help of some extra wires; the sample may be contained in little boats of fused silica, aluminum foil, platinum, tantalum or whatever you think is appropriate for the desired purpose of your experiments, or it may rest directly on the wall of the pipette tubing.
- Micro-samples can be placed on the end of a platinum wire, hammered flat on an anvil and punched with a punch maker or peening marker so that the pit can hold the sample. Be careful not to lose the particle(s) of interest because of possible vibrations of the wire!
- Adjust the proper illumination (transmitted light, incident light) for the stereomicroscope, focus on the sample and start heating the setup by turning up the voltage knob on the power supply. Observe the effects of temperature on your sample and/or collect combustion products (gaseous products, condensates, pyrolyzates, ash residues and so on).
With the above mentioned setup, a final temperature of 550 to 600°C is easily obtainable within one or two minutes of heating. This temperature is recommended in many official texts as an appropriate (or even mandatory) ashing temperature; see for instance the pharmacopeias of the Unites States and the European Union. Also, this temperature range represents the upper end for Pasteur pipettes made of ordinary (“soft”) glass, because at higher temperatures this type of glass starts to weaken and the tubing begins to deform by its own weight.
For a general view of this particular setup of the combustion oven, connected to the power supply and a thermocouple with meter attached, please refer to Figure 2. Figure 3 gives you a close-up view of this setup:
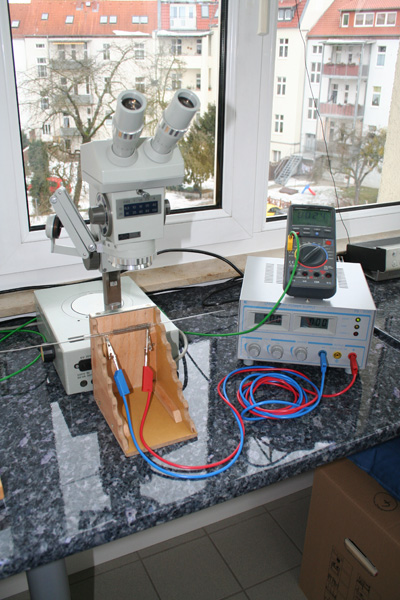
FIGURE 2
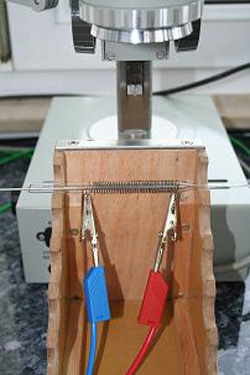
FIGURE 3
If you would like to build the semi-micro incinerator from fused silica tubing (to be able to reach even higher temperatures), it may be wise to give some statements first about the proper treatment of fused silica during the next steps:
Products made of fused silica, like rods and tubing, are sensitive to moisture and to alkaline materials, especially when hot. Presence of moisture and alkali can lead to premature recrystallization and results in brittleness of the material. As human skin is always “contaminated” with some moisture, sweat, grease and so on (“sebum”), be careful to remove all potential residues from handling the fused silica products with your unprotected hands before heating it up. Handy microscopists are familiar with these procedures from the handling instructions for light bulbs from halogen lamps, often made of fused silica. One way of doing so is to clean all surfaces with a very clean swab moistened with alcohol, wiping the surfaces off several times, and drying them. An additional measure to achieve this freedom from alkali contamination is the use of gloves during all manipulation steps.
Next, you should cut and adjust two pieces of fused silica tubing that suit your needs. In a former configuration of mine, the inner (central) tube had an inside diameter of 5 mm, a wall thickness of 0.5 mm and a length of 150 mm. On the outer wall of this central tube, the heating coil is fixed with some high temperature cement. I used the following mixture: approx. 1 part of highly alkaline sodium silicate solution (“water-glass”) and 2 parts of fine quartz dust, by weight, intimately mixed in a little crucible. During the fixation process of this cement, the heating coil must be held firmly on the tube by means of an external device such as a parallel vise. The cement needs at least one to two days of drying and hardening (test with a dissecting needle that it is hardened completely).
Over this central tube, a second, larger diameter and shorter length tube of fused silica is fixed. In my case, this one had an inner diameter of approx. 8 mm, a wall thickness of 1 mm and a length of 90 mm. This tube serves as a heat shield and additional support to hold the heating coil in place. Its length should be so adjusted that it fully protects the coil of heating wire, leaving only short ends of wire on both sides for the attachment of the alligator clips for power supply to the coil. On the outer tubing of this particular setup, there may be placed a reflecting mirror made of suitable metallic materials to reflect radiating energy back to the inside of the setup. Thin, folded sheets of platinum (if available, e.g. from no longer usable platinum crucibles before they are sent in for refusing…) are best suited for this.
Typical modifications that can be performed with either the first or the second setup of the incinerator are:
You can place a melting point capillary inside the incinerator, containing small amounts [mg range] of material for pyrolysis with the aim of collecting the pyrolyzate, following the instructions given in the works by McCrone and Delly [1] or Humecki [2]. To the left side of the combustion tube, you can attach a PVC hose for the supply of air or other gases. A convenient supply of a gentle stream of air can be achieved with the “poor” microscopist’s/microchemist’s means by using an air pump from aquarium supply shops that are sold there for the aeration of home aquaria. Other gases are a bit more difficult to obtain, but if you only need an inert stream of gas without Oxygen and moisture, some good tips for the generation of this by treatment of ordinary air to remove water vapor, carbon dioxide and Oxygen can be found in the older literature on preparative inorganic chemistry; see the work of Lux for reference. The remaining mixture of Nitrogen and noble gases (mainly Argon) will suffice most needs in the microchemist’s home shop.
On the right side of the setup, you can easily attach, for instance, a gas scrubber setup to detect gaseous combustion/pyrolysis products; you can place cold surfaces there to condensate/freeze out pyrolysis products; or you can attach gas detector tubes like those manufactured by “MSA Auer” or “Dräger AG” to quickly detect some special gases.
If you are in need of a very reliable combustion/transformation process of, say, organic materials in your oven, and you have to be sure that a quantitative transformation into well-defined reaction products is achieved, it is worthwhile to study the older literature on classical organic elemental microanalysis, e.g. Pregl-Roth.
Also, some improvements in the heating’s power supply and in temperature measurement can lead you to a programmed temperature incinerator.
Some suggestions about what else you can do with this little oven/incinerator:
- Heat particles, fibers, plastic chips, crystals, industrial contaminants et cetera in different atmospheres, combust them for instance in air, and detect the gaseous combustion products by classical wet-chemical tests (as described in textbooks of qualitative inorganic and organic analytical chemistry; see e. g. Cheronis et al.).
- Investigate the remaining residue (“ash”) by microscopical and/or microchemical means (for instance, elastomeric formulations for closures of pharmaceutical containers may contain a wide variety of fillers and reinforcement minerals that can be used with advantage to distinguish different formulations after controlled ashing; this procedure works exceptionally well also with micro traces, like little “splinters” or debris of these elastomers that can be found from time to time in injectables, tablets, capsules et cetera).
- Pyrolyze material and collect pyrolysis products after condensation on a cold surface, for instance for infrared spectrometry using a diamond golden gate ATR unit or an FT-IR-Microscope (when available).
- Make micro-sublimation experiments inside the tube or use micro-tube tests to detect the presence or absence of certain chemical elements or functional groups in your samples (see [3] for examples from the conservation sciences and from archaeometry).
- Use the platinum micro-spatula to investigate chemical reactions with small amounts of material under stereoscopic examination with controlled thermal treatment and under controlled gaseous surroundings.
- Use the oven setup for controlled heating of sealed capillaries when using microtechnique for work in such sealed tubes, as described by Emich, with the advantage that temperatures above 100°C (boiling water bath) are easily obtained with the oven.
In my opinion, it is also worthwhile to study the literature on pyrolysis gas chromatography, dealing with the investigation of organic/polymeric materials by controlled pyrolysis and gas chromatographic separation of the reaction products. In simple cases, a classical setup without chromatographic separation may also prove useful when detecting reaction products like HCl from the pyrolysis of PVC by wet-chemical micro methods (precipitation of AgCl from HNO3-acidified water, strongly acidic reaction of condensed water).
Some practical (and legal) advice, at last:
- The author does not take any responsibility with respect to the use of the equipment in the way described here; you are solely at your own risk when using equipment of this type in this manner
- Because of the risk of electric shock, never use higher voltages than 24 Volts direct current to heat up the wire-coil of the little oven!
- The combustion/pyrolysis oven, combined with the stereomicroscope as described herein, is intended for a hobbyist’s use, not for use in a professional surrounding/analytical laboratory et cetera
Equipment and Materials Used
- Digital photographs made with CANON EOS 350D digital, objective: Canon Zoom Lens EF-S 18-55 mm; 1:3.5-5.6 II, copyright for all photographs: Jan Burmeister, 2010
- Stereomicroscope “TECHNIVAL”, made by Carl Zeiss, Jena, Germany
- Laboratory power supply PS-303 D, Conrad Electronic, Germany
- Electronic digital thermometer “VOLTCRAFT M-3860M” with mantled temperature probe 0625 1189-41, (thermocouple NiCr-Ni), Conrad Electronic, Germany
Cited References
- McCrone, Walter C. and Delly, John G. The Particle Atlas. Volume I: Principles and Techniques. Edition Two, Ann Arbor Science Publishers Inc., Ann Arbor 1973.
- Humecki, Howard J. Microsample Preparation Techniques. In: Humecki, Howard J. (Ed.): Practical Guide to Infrared Microspectroscopy. Marcel Dekker, New York/Basel, 1995.
- Schramm, Hans-Peter and Hering, Bernd. Historische Malmaterialien und ihre Identifizierung. Ravensburger Buchverlag, Ravensburg 1995 (reprint of the edition published in 1988 by VEB Deutscher Verlag der Wissenschaften, Berlin).
General References and Reading Suggestions
Behrens, Heinrich. A Manual of Microchemical Analysis, Macmillan, London/New York 1894.
Behrens, Heinrich. Anleitung zur Mikrochemischen Analyse. Voss, Hamburg/Leipzig 1899.
Benedetti-Pichler, A. A. Identification of Materials via Physical Properties, Chemical Tests, and Microscopy. Academic Press, New York, and Springer Verlag, Vienna, 1964.
Cheronis, Nicholas D.; Entrikin, John B.; Hodnett, Ernest M. Semimicro Qualitative Organic Analysis. 3rd Edition, Interscience Publishers, New York/London/Sydney 1965.
Emich, Friedrich. Lehrbuch der Mikrochemie. J. F. Bergmann, Wiesbaden 1911.
The European Pharmacopoeia, 6th Edition, European Directorate for the Quality of Medicines & Health Care, Strasbourg, 2007 ff (see, e.g., chapter 3.2.9 on the pyrolysis of rubber closures for the purpose of rubber identification via IR spectrum of the pyrolysate).
Humecki, Howard J. (Ed.). Practical Guide to Infrared Microspectroscopy. Marcel Dekker, New York/Basel, 1995
Lieb, H.; Benedetti-Pichler, A. A. Mikrochemische Analyse. Essay in: Berl-Lunge: Chemisch-technische Untersuchungsmethoden. Julius Springer, 8th Edition, Berlin 1931, Vol. 1, pages 1120 – 1211.
Lux, Hermann. Anorganisch-chemische Experimentierkunst. 3rd edition, Johann Ambrosius Barth, Leipzig 1970.
Pregl-Roth. Quantitative Organische Mikroanalyse. 7th Edition, Springer, Wien (Vienna) 1958.
The United States Pharmacopeia (USP 32 – NF 27), The United States Pharmacopeial Convention, Rockville (MD) 2009 (see, e. g., General Chapter <381> Elastomeric Closures for Injections).
Comments
add comment