A Bad Moon Rising and Other Strange Microscope Problems

As the Halloween season is upon us with this latest issue of Nanographia, I thought it would be fitting to call attention to some truly evil problems that can plague your microscope. This is not a post about how to achieve good Köhler illumination with your microscope—there are plenty of those (good and bad) available online. With that said, knowing how to achieve Köhler illumination can help you get out of the weeds and track down a solution when you experience some of the microscope problems described below. As it turns out, the unusual problems that people have reported to us over the years are actually more common than you might expect.
Recently, one of our students was working on a project and had been experiencing some blurriness/out-of-focus “junk” in their field of view. The student asked if I could take a quick look to see if maybe I could fix the problem. In looking through the eyepieces, I could make out some blurry object clearly not in the same focal plane as the specimen, and the blurry object didn’t move when I rotated the microscope stage. Thinking that the offending object might be in a different focal plane from the specimen, I pushed the Bertrand lens into the light path, revealing a long, curled, black object resting inside the 40X objective back focal plane.

I removed the 40X objective from the nosepiece and pulled out the unknown object with a pair of forceps. Upon returning the objective to the nosepiece the student asked, “How did you know to do that?” My response at the time was something like, “I don’t know, it just seemed liked checking the back focal plane of the objective was a good place to start.” I’m sure that answer was not very helpful to the student; however, upon further reflection, I think the solution came to me by having a solid understanding of Köhler illumination and lots of experience fixing problems with customer and student microscopes over the years. By the way, the offending object was a very small black plastic turning. How in the world does something like that suddenly appear in what seems to be a sealed system? I don’t know, it just does.
With years of experience these microscope problems become common, although they seem unusual to our customers and students who are experiencing them for the first time. When I started working at The McCrone Group nearly 25 years ago as a technical sales representative, I frequently answered calls from customers who were experiencing a specific problem with their polarized light microscope. Conversations would often start with the customer saying, “Hey, something weird has happened to my microscope.” In beginning to solve their problem, I would start with the basics like, “Is the microscope plugged in? Is there light coming out of the base of the microscope?” Then I would systematically move the conversation from the microscope’s lamp housing up to the other parts of the microscope, usually solving the problem well before reaching the eyepieces.
With students who are attending our polarized light microscopy courses, we intentionally introduce some of these challenging microscope problems. Every evening after the students leave for the day, gremlins—otherwise known as Hooke College instructors—upset the classroom microscopes and have the students sort out the problems the next morning. What a great way to start the day! But seriously, we would rather have the students experience some of these common problems in a controlled environment, rather than see them for the first time six months down the road in their labs.
Many of the problems described below usually arise after the microscope has been transported somewhere, either down the hall, to another building, to a trade show, etc. For this post, our discussion is limited to microscope problems that occur while someone has been actively using their microscope, or after someone has responsibly packed or shipped a microscope and then reassembled it.
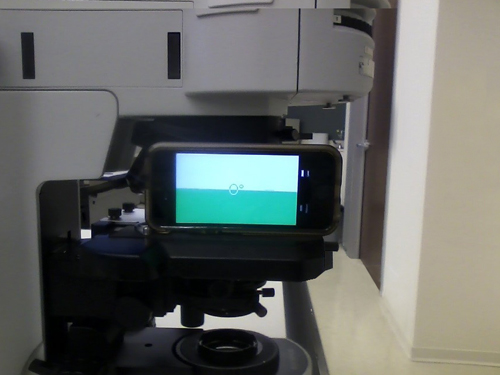
Let’s start with probably the most common problem—it’s the title of this piece: “A Bad Moon Rising.” Clients often describe the image they are seeing through their microscope as a “crescent-moon-shaped thing” in their field of view. This moon-like image comes about when one of your microscope accessories is ever so slightly introduced into the light path, such as a compensator, analyzer, Bertrand lens, etc.
As helpful and essential as these lighting accessories are, they can present the most common problems to the microscope user. That’s because in order to use these lighting accessories, filters, etc., they have to be introduced into the light path. This is where an unintended bump of one of these accessories slightly pushes it into the microscope’s light path (or moves it slightly out), and with so many possible entry points, chances are that you or someone else will accidentally move one of these accessories partially into the field of view of your microscope.
The problems described below are illustrated using the Olympus BX line of microscopes but are common to other brands of microscopes equipped with similar accessories. For the most part, we will limit this discussion to transmitted light microscopy.
A Bad Moon Rising
In reviewing all of the polarized light accessories that are available on our student microscopes at the Hooke College I came up with roughly seven. I divided them into two categories, bumped-in and bumped-out. In other words, can the accessory be easily bumped-in to the light path or bumped-out? Easy enough. I have included photomicrographs of each example.
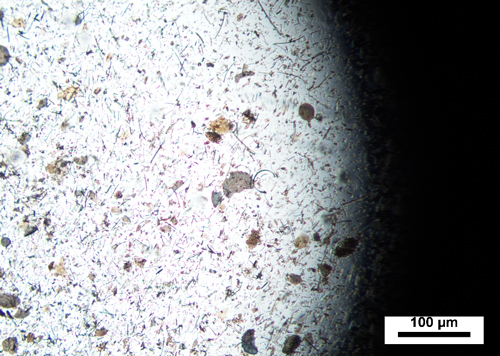
Bumped-In: Light Path Selector Knob on the Trinocular Head
This is by far the most common occurrence of a bad moon rising. For users who are right-handed, simply reaching for something on a shelf above your microscope can lead to you bumping this accessory into the light path. On the Olympus BX51, it is located on the right-hand side of the trinocular head. It is also common to have this selector knob pushed all the way in when shipping the microscope, which diverts all of the light from the trinocular head to the eyepieces, not the camera. Many times when you go to reassemble the microscope you’ll ask yourself, “Is the camera working?” Yes, most likely the camera is working. Just pull the selector knob to the middle position and you should see an image in both eyepieces and on your monitor.
Note: I have included blue arrows to help indicate the direction, in the above example the “moon” will move from east to west.
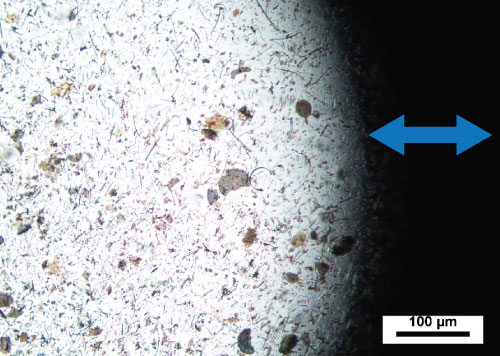
Bumped-In: The Rotating Analyzer
For all of the polarized light users out there, this might be considered the identical twin to the problem described above. Located in the same area on the right-hand side of the microscope, the rotating analyzer can easily be bumped into the light path.

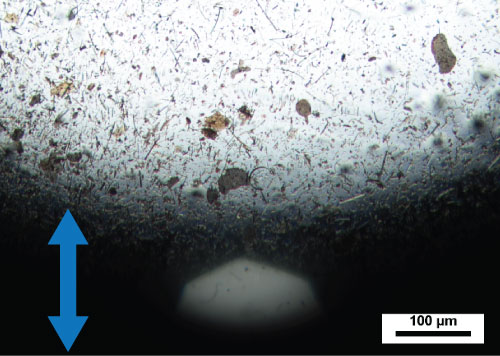
Bumped-In: The Bertrand Lens
Below is an image of the Bertrand lens partially inserted into the light path. This is also very easy to do since the selector plunger sits right in front of the microscope just below the trinocular head. Notice that you can see the image of the substage condenser diaphragm at the bottom of this image, which you would expect since the Bertrand lens allows you to see the back focal plane of the microscope. The Bertrand lens selector knob is located ninety degrees from the selector knobs described in the previous two examples, therefore the “moon” appears to move north-south.
Bumped-In: The Compensator
If you have a polarized light microscope, you will definitely have some kind of compensator that can be introduced into the light path. On the Olympus BX51, this accessory is moved into the light path 45 degrees to the sample. In the photomicrograph below, you can see that the leading edge of the compensator, which is straight, not curved, does not produce the same moon-like shape as the previously discussed accessories did.

Bumped-Out: The Rotating Nosepiece
Sometimes when you are installing a different nosepiece on your microscope, you can ever-so-slightly move the objective out of its seated position. In other words, it is not quite clicked into the proper position. The kind of image seen below depends on which way you slightly rotate the objective out of position. In this case, I rotated the nosepiece slightly counterclockwise.

Bumped-Out: The Top Lens of the Condenser
This is an easy one to do especially if you have removed the microscope’s stage. It’s easy to just graze the top lens of your condenser with the stage, moving it partially out of the light path. I have also seen aftermarket condenser top lenses that were installed to create greater working distance for hotstage use have a kind of top-heavy effect on the lens arm mechanism. This makes the top lens of the substage condenser prone to occasionally moving itself out of the light path. Fortunately, the top lens in those cases will fall completely out of the light path sacrificing the numerical aperture of the substage condenser, but usually not causing the image of the specimen to be obscured.
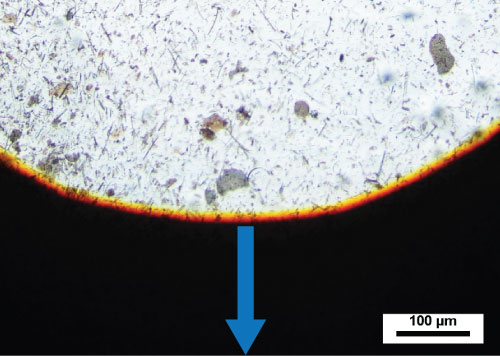
Note: You may have noticed that in the two above examples there is a yellow to orange halo displayed at the intersection of the field of view and the dark area. This is the image of the field diaphragm which had been placed just outside the objective’s field of view (good Köhler illumination).
Stranger Things
The rest of this post is sort of a troubleshooting guide for things that happen to your microscope usually after it has been moved, disassembled, shipped, or all of the above. In describing each problem below, I have organized them similar to what you would find in Olympus’ Troubleshooting Guide, which lists out in the format Problem – Cause – Remedy.
Maxed-out Voltage Indicator
When your voltage indicator lights on your microscope go up to the maximum output, which for the Olympus BX51 is 12, this usually means that your light bulb has burned out and needs to be replaced. However, there are a number of other things that can make the voltage indicator lights go up to the maximum level.
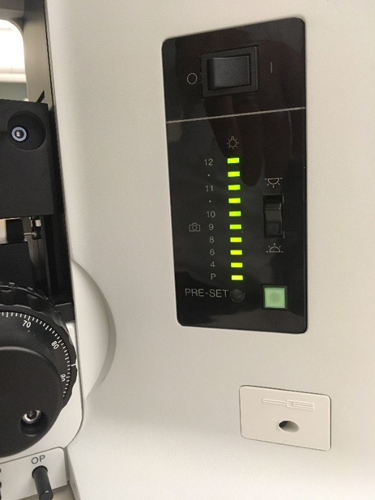
Problem: No light emanates from the base of the microscope although you have just changed the bulb in the microscope lamp housing.
Cause: You may have inadvertently selected the reflected light lamp housing. There is a little rocker switch on the BX51 that allows you to easily switch between the transmitted and reflected light lamp housings. It is very easy to accidentally bump this switch into the reflected light setting. Notice the two drawings/symbols just above and below the rocker switch: the bottom one indicates transmitted light, while the top indicates reflected light.

Those same two drawings that indicating the selected light source also appear on the back of the microscope frame, which brings us to another truly evil problem. During reassembly of the microscope, someone may plug the transmitted lamp housing cord into the plug designated for reflected light.

Remedy: First check the bulb and make sure your transmitted light lamp housing is working. If there is not any light coming out from the base of the microscope, make sure that the transmitted light lamp housing has been selected on both the rocker switch near the voltage indicator lights, and the transmitted light lamp housing is plugged into the proper source in the back of the microscope. What further complicates this problem is that you can get light coming out of the base of the microscope (transmitted light) if you have selected the reflected light setting on the rocker switch and have plugged the transmitted light lamp housing into the reflected light plug on the back of the microscope. The microscope will default to a transmitted light setting. The best way to understand this one is for you to try it yourself and see what happens.
Taped Optics
For anyone who that has moved or shipped a microscope, preserving the integrity of the optics is probably their number one concern. A quick and easy way to protect the optics from dust or from being scratched is to cover them with transparent tape, the kind you would find on your office desk.
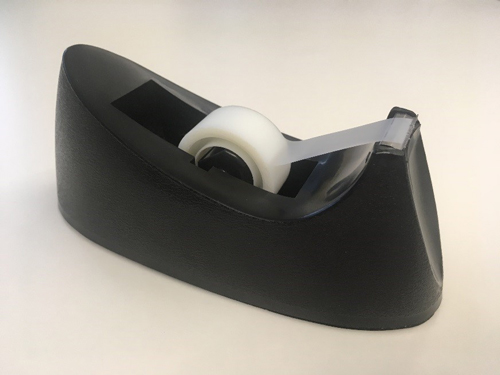
Upon reassembling the microscope, you can easily see where the pieces of tape have been placed, and you remove them one by one as you reassemble the microscope. One spot that is often forgotten is the underside of the trinocular head.

I have fallen prey to this on a few occasions. In fact, just last year one of our adjunct instructors wanted to use Hoffman modulation contrast in their course and was wondering if I could set up the system. Having used Hoffman when it was still commercially available, I thought sure, no problem. As I sat there trying to get an image, the only thing I could see was diffuse light coming through the eyepieces. After twenty minutes or so, I decided to disassemble the microscope to see how my image was being obscured. That’s when I saw the nicely taped underside of the trinocular head.
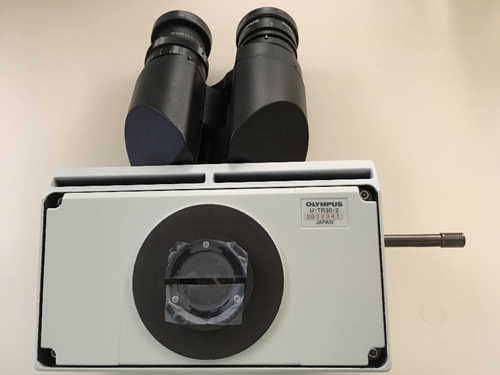
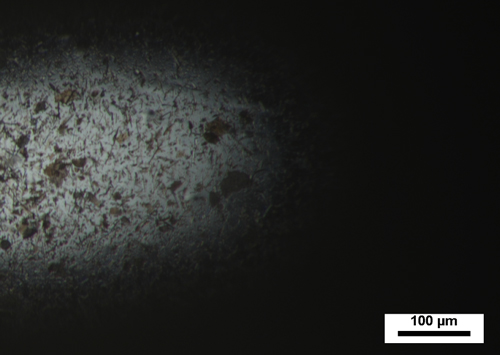
The thing with taped optics is that you do get some light coming through the microscope and up to the eyepieces. If you’re lucky, a small part of the image of the specimen might make its way through a portion of the optics that were not fully taped. In the image below, I deliberately left the middle of the trinocular head clear, without any tape, so that some of the image of the specimen would show through.
Problem: You can’t focus the specimen or there is only a partial field of view available.
Cause: Transparent office tape has been placed on one of the optical surfaces of the microscope.
Remedy: Remove the tape from the optics.
A Bit Off-Kilter (Microscope Stage)
Problem: In making this switch between a circular rotating polarized light stage and a square mechanical stage, there is a chance that the pin, which seats the square mechanical stage to the dovetail on the stage bracket, does not fully go into the dovetail. It gets hung-up on the upper portion of the stage bracket. When this happens, the square stage will be ever so slightly on an angle, three degrees, to be exact.

This will cause all sorts of problems when trying to achieve Köhler Illumination, especially at higher magnifications. At lower magnifications this problem is not as apparent, yet you know that something is not quite right. A few telltale signs at low magnification are that you can’t focus the field diaphragm by moving the condenser up and down; a significant part of your image, usually at the periphery, will be out of focus; and you may notice some vignetting in the field of view.
Problem: You cannot achieve Köhler illumination.
Cause: The stage pin that fits into the dovetail on the mechanical stage bracket isn’t seated properly into the stage bracket dovetail.
Remedy: Move to the side of the microscope, stand about three feet away, and look at the stage. You will notice that it is on a slight angle. Just back out the stage set screw a bit and you will feel and see the stage drop down into its proper location.
The Inverted Microscope Slide Preparation
This is a truly evil problem. I fell victim to it (again) not that long ago. It all starts when you or someone else has made a microscope preparation where the sample and coverglass are on one side of the microscope slide, but the microscope slide label has been placed on the opposite side of the slide. You may ask, how does this happen? I don’t know, it just does.
The beauty of this problem is that you can totally focus on the specimen at lower magnifications, say, 10X. As you increase the magnification to 20X, you will notice that something is not quite right. However, when you rotate in the 40X objective, you won’t be able to focus on the specimen because all of your working distance (the distance between the end of your objective and the microscope slide) has disappeared. If you try to focus using the 40X objective with an inverted preparation, you may begin to hear a slight crunching sound and eventually the awful snap of your slide breaking as you drive the 40X objective right through the preparation. If you’re lucky, before getting to this point you might notice that the slide is not lying flat on your microscope stage, giving you a seesaw or teeter-totter effect as you go to move the slide with your fingers.

Problem: You can’t seem to focus your specimen, especially at higher magnifications.
Cause: The sample is on the opposite side of the microscope slide label.
Remedy: Place a new label on the same side as the slide preparation.
Deliberate Practice
In your spare time, go through your microscope and deliberately engage some of the accessories partially into the light path. Over time, you will begin to recognize these problems more readily and solve them quickly, enabling you to move on to the work at hand. By knowing the (bumped) ins and outs of your system, you can confidently take control of your microscope, and having a good understanding of Köhler illumination is key.
I want to thank all of our customers who have challenged us to fix their microscope problems over the years. Even after seeing the same problems multiple times, I still sometimes have to sit back and think about what might be going on before a possible fix to the problem comes to mind.
The next time you see a bad moon rising in your microscope, it doesn’t have to mean that there is trouble on the way. Just sit back and have a quick think about what might be going on and turn to your old friend Köhler illumination to help light the way. After that, if you can’t figure things out, you can always give us a call: 630-887-7100.
Comments
add comment