Making A Clamshell Case of Hardened Styrofoam for the Beginner Microscope
Introduction
In recent years, good quality beginner microscopes have appeared reasonably priced in the marketplace (generally $50-$150 US on Ebay). An excellent example is the Chinese-made Amscope, model M158-2L. These monocular microscopes are solidly constructed of metal, use standard optics, are battery-operated with dual LED light sources for transmitted and above-stage illumination, and have practical focal adjustment knobs. They make sturdy, affordable, and light-weight introductory microscopes suitable for children. The author has used these to teach beginning microscopy to children as young as four or five years old, and the instruments are fit for classroom work up to the junior-high and high-school level.
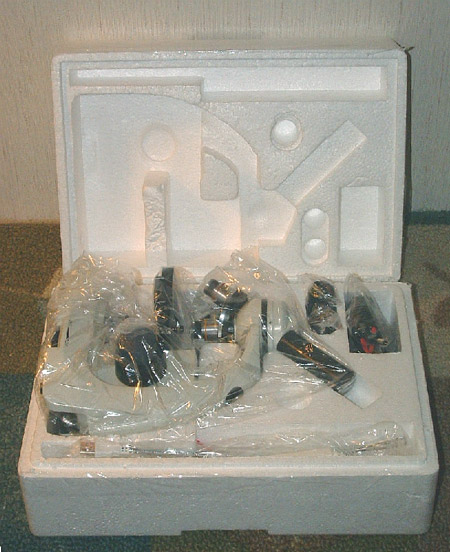
But storage and transportation are still required for these microscopes, and at this point in time, to my knowledge, custom cases are not provided by manufacturers other than the fragile styrofoam boxes they are shipped in. Figure 1 shows one example of such a styrofoam shipping box with the microscope inside. This article outlines a way to turn these styrofoam shipping boxes into sturdy, lightweight containers for easy transport and storage. The procedure is basically to provide a “clamshell” hard coating to the outside and inside of the styrofoam shipping box – a box that is already custom-designed to fit the exact shape of the microscope. No special skills or materials are needed for this project, and the author has made more than a dozen of these clamshell cases for the microscopes he uses for teaching microscopy to K-2 children (to be discussed in a separate article).

Materials:
- Styrofoam shipping container
- Durham’s® Rock Hard Water Putty
- Elmer’s® glue
- Fiberglass mesh screening
- All Purpose Foam Coat (by Hot Wire)
- Bounce (for All Purpose Foam Coat)
- Dark brown latex paint (“Espresso” by Rust-Oleum®)
- Almond-color flat latex paint
- Replacement luggage handle
- Segments of scrap wood (as described in Procedure text)
- 1” nylon strapping
- Velcro® fasteners: 1” self-sticking
- Paint brush, scissors, X-Acto® knife, sandpaper
Procedure
Outside Coatings
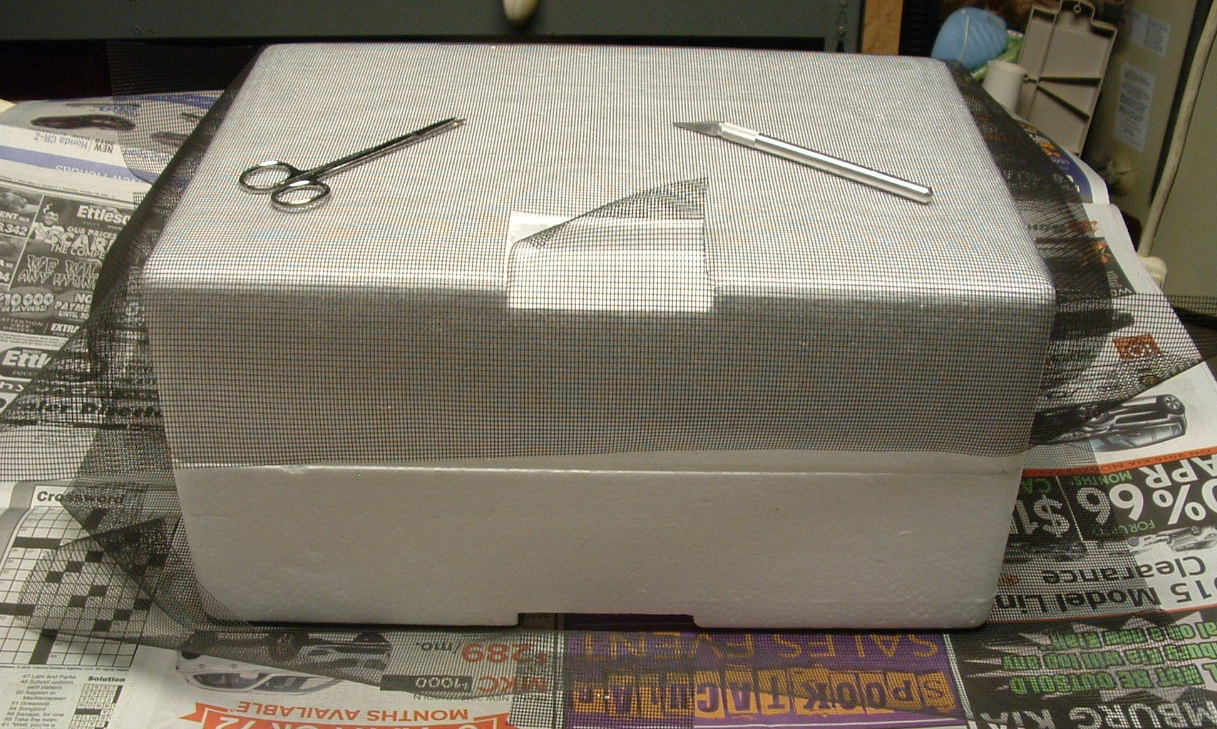
Providing a hard outer coating to a styrofoam box may prevent dents and punctures, but will not provide overall strength to prevent it from brittle cracking or even breaking into pieces if dropped or banged. So the first step is to provide a sturdy supportive underlayment. This is accomplished by shaping basic fiberglass screening material to be embedded in the hardshell coating materials. The fiberglass mesh is the kind used for window covering to protect homes from flying insects. Figure. 2 shows a box in this step of the process. The basic idea is to cut a 2 ft by 3 ft segment of screening with a scissors so that it fits neatly over both the top and bottom halves of the box, in one continuous sheet, with cut ends meeting at the opening front edge of the box (on one of the long sides—the one nearest to the nosepiece of the microscope). Cuts are made at the edges so that they can be folded over and tucked in for added corner support.

Next, Durham’s Water Putty powder is mixed in 3 to 1 proportion with water to a consistency roughly thicker than paint but slightly thinner than pancake batter. I have found that ¾ cup of Durham’s powder mixed with ¼ cup of water provides enough for the first box coating, and for greater adhesive power I have added about 1/8 cup of Elmer’s glue mixed in with the ¼ cup of water before adding it to the powder. A wooden spatula like a popsicle stick works well to mix the materials in a disposable plastic bowl (I use an empty margarine container), and the final mixture should be thoroughly mixed to a consistency as free of small lumps as possible.
From this point on you have to work quickly before the water putty mix hardens—you have about 10-15 minutes. Using an ordinary brush, paint the mix directly on the box on all sides before applying the nylon mesh, and be sure that there are no blank spots lacking the putty mix covering. If there is any mix left, spread it on top of the nylon mesh, particularly at the edges, and make sure the nylon mesh is spread firmly and evenly in place without wrinkles or bubbles. But do not aim at perfect smoothness everywhere, particularly not of edges, because the second coat and final trimming and sanding will generally provide an acceptable outside appearance.
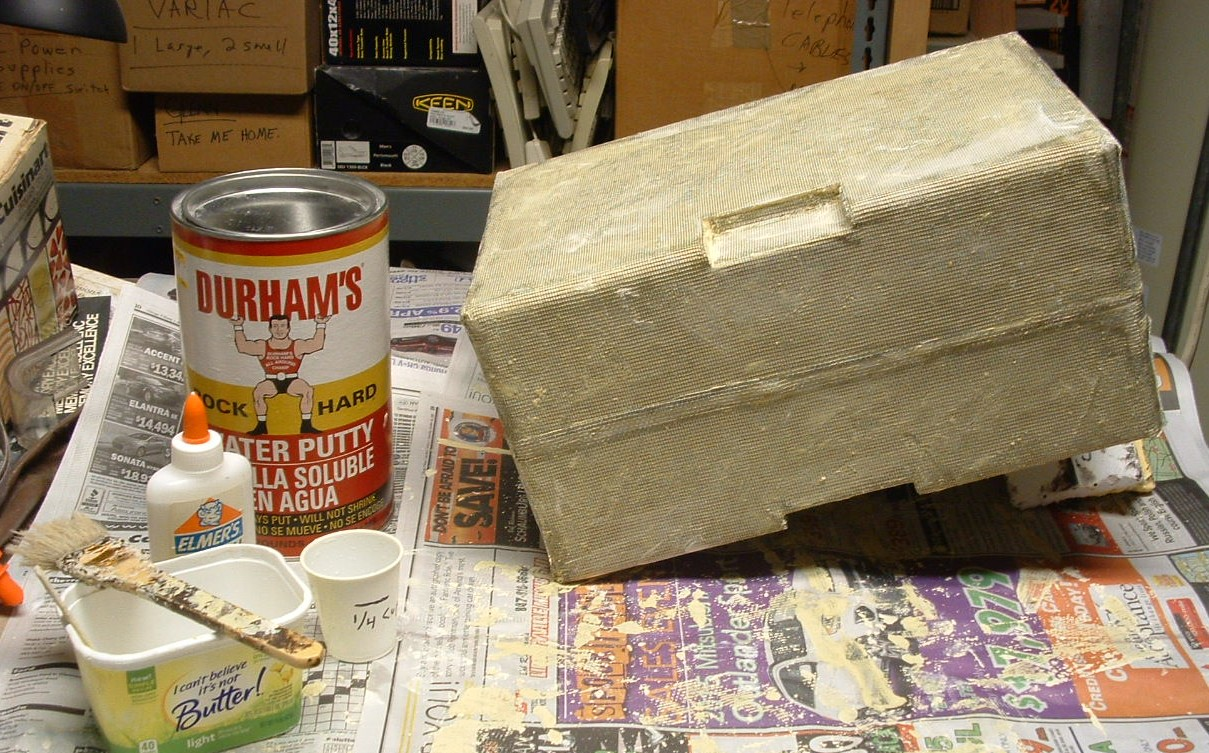
Leave the first coat harden overnight before applying the second coating. I have found that it helps to rest one end of the flat side of the box on the edge of a support block of some sort to elevate it. This helps to maximized the exposure of the box in air to assist drying. It also helps to flip the box once during the drying process, which prevents the resting edge from sticking to whatever you have chosen as a surface protection for your workspace (I use newspaper). The result at this point is shown in Figure. 3. After the box has dried overnight, a second coating of the Durham’s water putty mix is necessary both to make it completely rigid and smooth on the outside, and to fill in all the crevices, interstices, cracks, and corners and such from the original coating. Care is necessary here to insure a relatively lump-free and continuous coating, but I have not made any attempt to make it perfectly smooth. The final result retains an irregular appearance similar to a leather coating, which is pleasing in itself. Allow this second coating to completely dry overnight. If done correctly, the next day the surface of the box is “rock hard” to the touch, and tapping with a fingernail will not dent it in the slightest.

At this point the edges of the box will probably have to be freed up carefully with a sharp knife of some sort, separating all but the back spine of the box, which should still have a continuous coating of nylon mesh covering both bottom and top half of the box. That mesh on the spine provides a “hinge” so that the box halves will open and still be held together on one edge. Once the three other edges are freed up with a knife, the box can be slowly and carefully opened, breaking the hardened coating on the small portion of the nylon hinge, the particles of which can then be simply brushed away.
Inside Coating
In order to also protect the fragile styrofoam on the inside of the box while yet protecting the microscope itself against contacting a very hard surface like the one on the outside of the box, I have used a second product for that inside coating. Model-makers use an All Purpose Foam Coat from Hot Wire for making scenery for model train displays and such, and adding a liquid they sell called Bounce gives a surface a minimal flexibility so that after slight pressure on a surface it will return to its original shape, like a rubberized coating.
So before proceeding to the next step on the outside of the box, a coating of the All Purpose Foam Coat with Bounce should be applied to the entire inside of the box. The coating is prepared similarly to the way the Durham’s Water Putty was—by mixing the powder with the liquid to a consistency similar to the outside coating, but perhaps slightly thinner. The proportions recommended by the manufacturer are slightly different—calling for three parts of powder to two parts of liquid Bounce. In my experience the consistency of this mix is too thick, so I have added a slight amount of water to it to bring it to a proper consistency for applying with a paintbrush. I have also found that no matter how thoroughly mixed, it is never completely free of tiny lumps, which seems to be a limitation of the material as supplied by the manufacturer. A single coating is sufficient to do the job.
Sanding the Outside Coating, and Painting Preparations
Before applying latex paint to these surfaces it is necessary to sand the outside surfaces and edges to relative (but not perfect) smoothness. Trimming excess on exposed edges and smoothing flat surfaces can be accomplished with a small scissors and hand-sanding with sandpaper. But again, do not aim at perfection—just “good enough.” After all, this is styrofoam—not fine wood! A certain amount of surface irregularity adds to the overall “leather” look of the box.
It is helpful to use a small sanding block for this purpose, and I have found the kind of disposable wood-sanding block that has an outside wrapping of sandpaper around an inside sponge works very well. This step may require some touching up at corners or edges, with a very small amounts of the Durham’s Water Putty mixture applied here and there for an overall pleasant appearance. The inside of the box does not require sanding, other than at the very outer edges where the top meets the bottom half of the box.
One further detail is necessary before painting the box. For ease of handling and portability, a luggage handle will be screwed into the top of the box as a final step after all else is finished. But the screws need to have something more solid than styrofoam to keep them properly anchored. Therefore I have found a solution to this problem by gluing small blocks of wood inside the case, in positions where the handle-screws must go. This step is shown in the detail picture of Figure 4. The wood should be just thick enough for the wood-type screw to grip well without cracking the wood itself, and it should be on the top end of the “thicker” half of the styrofoam box. The wood is glued to the styrofoam with Elmer’s glue and gently held in place with C-clamps until dry and solid. This step should be performed after the first inside coating but before final inside painting.

Painting and Final Steps
After sanding the outside and gluing the wood inside the box, painting can be started. For the outside I use two coats of Rust-Oleum “Espresso,” a dark brown latex paint, followed by one coat of almond-colored flat latex paint on the inside. Even after drying, the inside paint does not seem to affect the flexibility of the inside coating (which remains slightly flexible to the touch, relative to the hardness of the outside). Color choices are completely optional, of course, but I have found this pairing of dark brown and lighter almond color to be pleasing and a nice contrast.
Next, the luggage handle is affixed with wood screws to the top of the case, with caution to pre-drill a very thin and shallow “starter” hole in the wood with an electric drill, in the exact position where the wood handle braces are glued in. The craftsman must also be careful not to tighten the screws down too tightly, because they will start to collapse the inner styrofoam layer between the outer clamshell coating and the wooden braces inside the box.
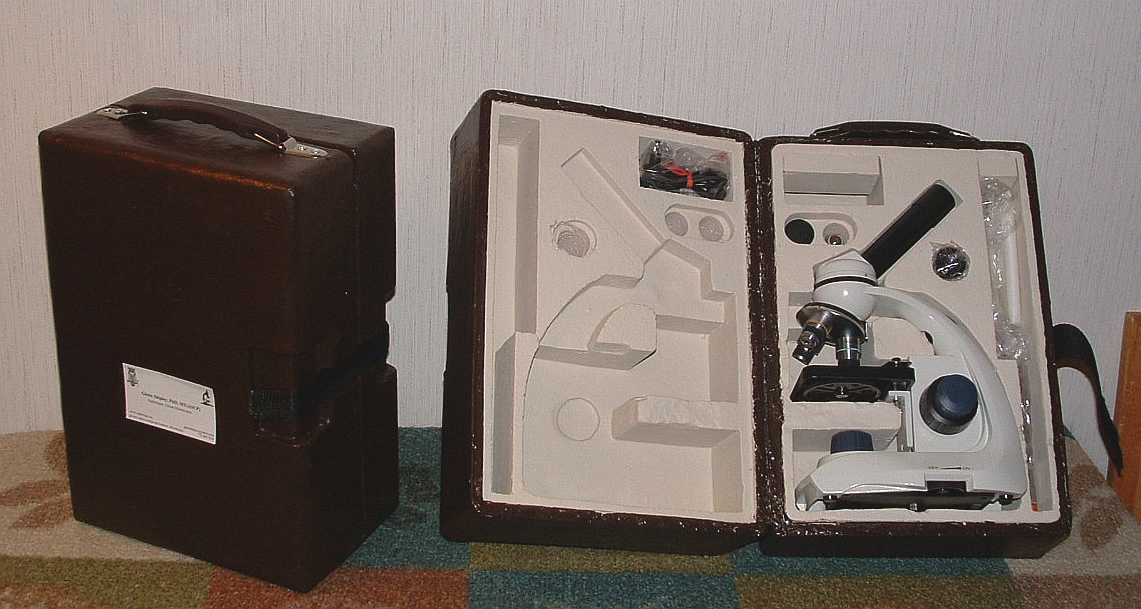
Finally, a black nylon strap is attached to the middle area on the front and back halves of the box, as displayed in the final product shown in Figure 5. To do a number of these boxes, I bought a roll of black one inch nylon strapping, and cut it into roughly seven-inch segments. To keep the end threads from unravelling, I dip them into polyurethane varnish to a depth of about ½ inch, and let them dry completely. The self-stick velcro patches are positioned so that the harder plastic part is on the surface of the box, and the softer felt-type part is glued to the nylon strap. It helps if the bottom half is wrapped around the back of the box for better adhesion, so that when the user opens the box the bottom portion of the strap stays in position.

Discussion: Some Variations, Suggestions, and an Unsolved Problem
These “clamshell” boxes are exceptionally strong and light-weight, and will serve for storage, transport, and protection of the microscopes for years to come. However, not all beginner microscopes come with these custom styrofoam boxes to begin with—for example the My First Lab™ microscope, some of which are sold with store containers that are little more than a thin cardboard box with inner thicker cardboard loosely shaped to the microscope itself. I have not come up with a plan yet about completely customizing or building a carrying case for them.
I have also experimented with various shapes for the nylon mesh covering. The figures illustrated here show a later design using a single 2 x 3 foot sheet of fiberglass to enclose the entire box. In an earlier version, the top and bottom halves of the case were covered separately for the first coating of water putty, and then a sheet of nylon was cut to the dimensions of what became the “hinge” part of the back edge of the case, and affixed with the second coating of water putty. A second experimental design left a flap of the nylon for the top half just long enough to cover the back spine of the lower half and serve as a hinge; then, after drying, closing the box and covering both halves with the second coating. But as a final design, I settled on covering the entire box—top and bottom—with a single sheet of nylon mesh, with the back “hinge” edge formed from the middle of the nylon sheet. The outer water putty coating is then applied to the entire, closed box. This reduces the number of outer covering steps to two, and if done carefully works very well to both protect and hinge top and bottom halves of the clamshell box; but some edge-trimming and touch-up is generally needed before final painting.
An unresolved problem is that after completing the clamshell case I have sometimes found there is a small gap between front and back segments, where the two halves of the box come together. This is a slightly incomplete closure, and I have tried various rubberized insulation solutions—all somewhat unsatisfactory. Overall this is not a significant problem, but a better edge-seal would be preferable for long term storage and protection against the elements in transferring them from one location to the next.
Conclusion
This article has described a simple DIY remedy to the problem of storage and transportation of beginner microscopes, utilizing the styrofoam shipping box and a simple, easy coating method with materials readily found in most hardware or home-repair centers. This “clamshell” microscope case takes but a few hours to construct (over a period of several days for drying, of course), and will take a fair amount of abuse. It should last for quite a few years, and provide adequate protection for the microscope.
You may contact the author at glennshipley@gmail.com. Kindly put “Clamshell Microscope Case article” in the subject line.
Comments
add comment