Making and Using Micro Cover Glass Squares
June 22, 2018
Presenter: Josephine Mueller
Micro cover glass squares make life with microscopic particles significantly easier. During this short webinar, learn the advantages of using a micro cover glass in your analysis. You will learn how to properly scribe, cut, and wash full-sized cover glass to make multiple micro cover glass for regular use. Techniques for different particle preparations and observations using the micro cover glass are shown.
Transcript
Charles Zona (CZ): Good afternoon and welcome to another McCrone Group webinar. My name is Charles Zona and today we welcome Josie Mueller. Josie is going to talk to us about Making and Using Micro Cover Glass Squares. But before we get started, I would like to give you a bit of Josie’s background. Josie works as a cleanroom microscopist at McCrone Associates. As part of the cleanroom team, she collects and manipulates samples of small particles and other materials and prepares them for analysis. As a graduate of North Central College’s Chemical Microscopy program, Josie also has experience in a wide variety of microscopical analytical methods and instrumentation. Before working full-time for the McCrone Group, Josie was a lab assistant at McCrone Associates, where she made and washed the micro cover glasses for use in the laboratory. This webinar is being recorded and will be available on The McCrone Group website under the webinars tab. And now, I will hand the program over to Josie.
Josie Mueller (JM): Thank you for the introduction, Charles. Good afternoon everyone, and thank you for taking the time out of your busy schedules to join us today. I’m going to talk about the process of making mini cover glass and their many uses. If you have any questions, please do not hesitate to leave them in your comment boxes and I will answer as many as I possibly can at the end. So, let’s get started.
Today I am going to start by discussing the different materials we use here at McCrone Associates, but these can be adjusted to fit your individual needs and access you have to these items. We will then discuss how to set up your microscope area to give you the best results. I will show some images and describe how we score a larger cover glass and wash the smaller pieces to yield the resultant micro cover glass slips of the size desired. There are advantages and disadvantages to both the large and the micro cover glass that will be discussed, and then I’ll finish up with a variety of uses we may have for these freshly made micro cover glass.
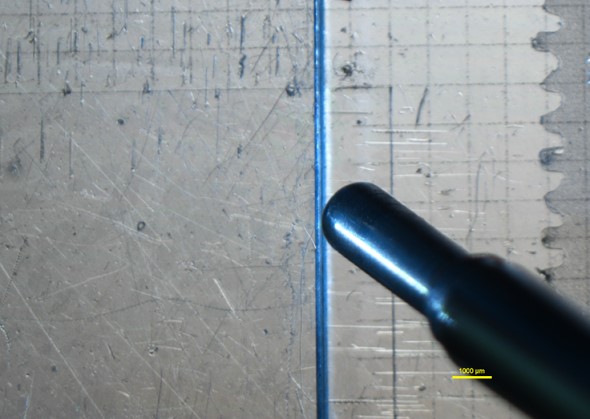
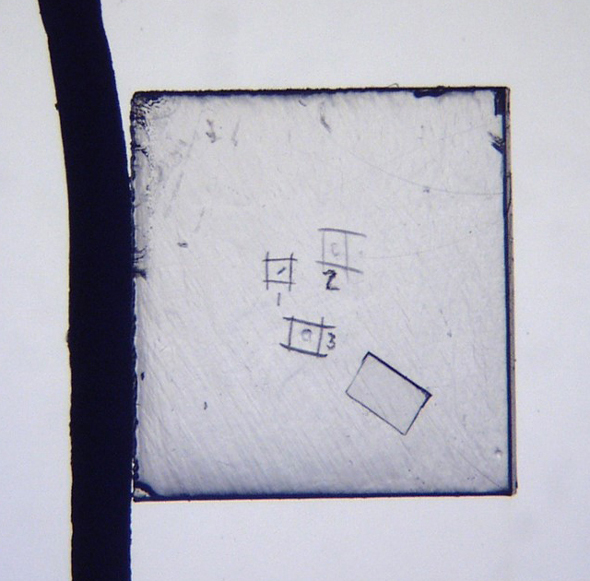
So here we have a list of the items used throughout this whole process here at McCrone. First is the stereomicroscope, and the purpose of the stereomicroscope is for more accurate and precise sizing of the micro cover glass. In order for them to be picked up by the forceps at the end, the edges have to be straight and smooth, so this ‘scope is highly recommended, and here at McCrone it’s essential, because typically we use sizes between 1 and 8 mm2, so we have to be able to pick them up with the forceps. We use a small diamond scribe, shown next, and we do not apply very much pressure to the large cover glass. We have a glass block, sized 2” × 3” × ¼”, with a Mylar film grid on top of it. These grid lines are each 1 mm apart. A smaller glass block can be used, but for our purposes here, our plastic rulers are the perfect fit that they reach end to end both ways across the glass block, so this helps us assure that they’re being held straight.
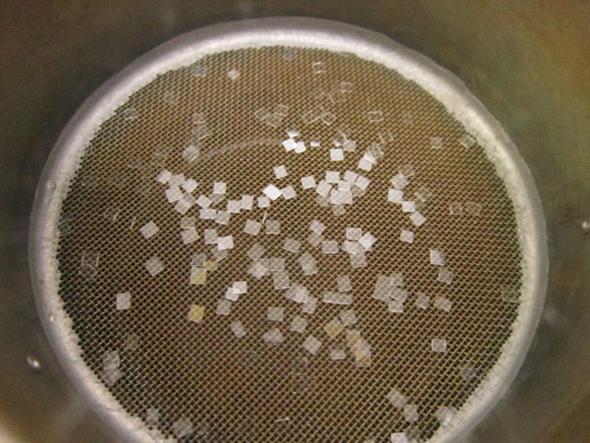
I would like to emphasize our use of plastic rulers to line up the scribe; if metal rulers were to be used, this would dull the scribe over time, as it unavoidably would hit the side of the ruler on occasion. The ballpoint pen or rod is then used to gently roll the secured scored cover glass in order to gently break it apart into the smaller desired sizes without snapping pieces off. Finally, for the purpose of washing the micro cover glass, we use a USA Standard Testing Sieve #40 or #60 because the cover glass do not fall through the sieve, while the smaller flakes or chips will be washed away, so as long as your sieve has a small enough mesh, the micro cover glass should stay on top. As a special note, throughout this whole process, all the materials and final products should be handled with gloved hands.
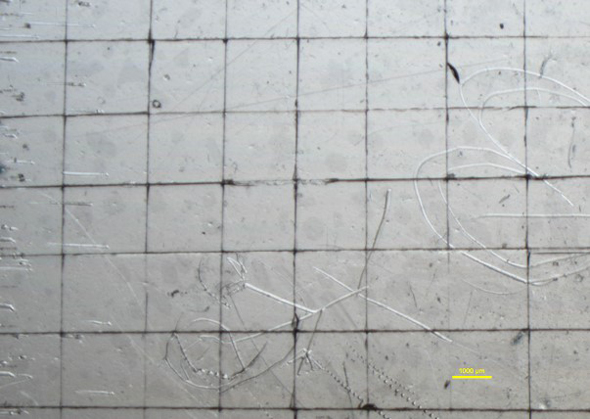
Now our first step in setting up our tools and microscope would be to get our grid ready. The Mylar film is not gridded in the center area exactly the size of our large cover glass, so we can see where we have, and have not, scored yet. We need to place a single piece of plastic wrap (which can be smaller than the block, but needs to be larger than the cover glass) on the glass block, and then place a large cover glass directly in the center. We use the size 22 mm × 40 mm, but any original-sized glass cover glass can be used depending on what you have access to. The plastic wrap helps hold the cover glass in place while scoring, and it keeps the already-cut squares in one area because they won’t start pinging off of it; they’re stuck a little bit to that plastic wrap. We use two different rulers for scoring here at McCrone: one two inches long for our vertical lines, and one three inches long for our horizontal lines—and these can be held against the ends of the glass block to keep the rulers in a straight line and ensure our score lines are straight. This helps us ensure that all of our cover glass are square and not funky shaped.
From there, we can begin to score our cover glass with the diamond scribe. We score across the entire cover glass on the long side first. The grid lines are each 1 mm apart, so we can use this to determine how large or small our cover glass are that we are making. When scoring, we want to hold the scribe not quite at 90°, but pretty close. If the scribe is on too much of an angle, the pressure is going to cause the glass to break unevenly and jagged, and it might actually cause damage to the scribe, as well, because it will be constantly driven into the glass block.
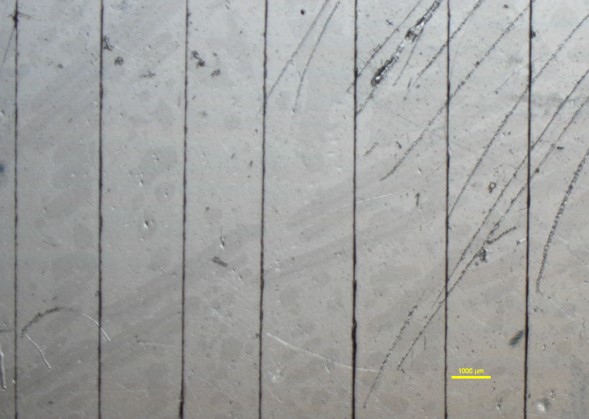
Once you have completed this in one direction, rotate the block 90° and repeat this process in the opposite direction. Try to keep the spacing the same distance as you had in the first orientation in order to create those clean squares, unless, for your purposes, you might need a rectangle or something like that, then you can adjust the sizing to whatever your needs are. Once you have scored in both directions, you should have a fully-marked cover glass ready to break. Now we make one size from each large cover glass, so we would make a whole sheet of, say, 2 mm squares, and a separate sheet of 4 mm squares. This way, we can keep them apart, and during the cleaning process, we can clean each size individually and place it in appropriately-marked boxes, so if someone goes to grab this box, they know exactly what size they’ll be getting out of it.
Now that you have a fully-scribed cover glass, we need to add an additional piece of plastic wrap to the top of your stack. It will be easier to remove these if you keep the edges of the two plastic pieces offset from one another, otherwise you might find they will stick together very well, and you might need a microscope to find these edges to separate, which still does not always work.
Gently remove the plastic wrap sandwich from the glass block, and begin to slowly roll it around a glass rod or a ball point pen, as pictured. If you have scored larger micro cover glass, you will want to use a larger roller to prevent the squares from snapping off somewhere other than their scribed lines. The rolls do not have to be very tight; just roll them enough that the scored lines snap evenly and you’re left with a full sheet of micro cover glass. These micro cover glass are now trapped between the two plastic wrap pieces until they are peeled apart, so at this point, you can either place them to the side for later washing when you need them, or you can jump right in and wash them right away. But I’m going to do that—I’m going to jump right in and discuss the washing procedure.
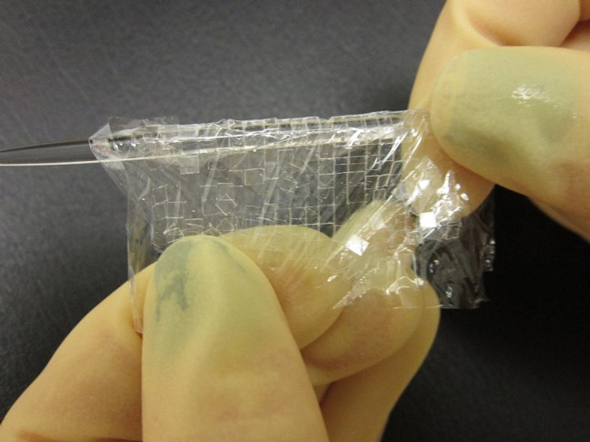
Now that we need to clean our micro cover glass squares, we use forceps and work over a sieve to separate the two layers of plastic wrap and allow the micro cover glass squares to fall into the sieve. I only wash the equivalent of one large cover glass at a time because they need room to spread out and not stick to each other, and it is important for us here to keep the different sizes separate. These then need to have a gentle stream of particle-free water run over them, and they need to be allowed to soak and rinse multiple times. This should wash away any small fragments of glass or other contaminants and leave you with clean micro cover glass. After a few rinses, make sure the micro cover glass are lying flat on the bottom of the sieve, and not on top of each another. One easy way to do this is to fill the sieve with water by placing it in another container that has a sealed bottom (instead of openings), and allow the squares to float. Then, as you slowly allow the water to flow out the bottom, the squares should be floating down in an even layer until they reach the bottom. If one or two are on top of each other, you can either use forceps to move them off of each other, or wait until they dry and dispose of them. Once flat, you can place the sieve in an oven at low temperatures, or just allow them to dry in the open air. If you see some pieces of jagged glass shards, chunks that did not break right, or cover glass that are stuck together, you can remove these with your forceps and discard them appropriately. This should leave you with only the best micro cover glass for placement in the clean boxes for anybody to use.

Now that you have all of these beautiful, freshly-washed micro cover glass squares, you might be thinking, “Well this is great, but when should I use these, and when should I use something larger?” Here you’ll see just a general list I put together for some items where certain cover glass sizes might be better than others. When you’re working with a large item, such as a hair or a fiber, or something you just need to view at a very low magnification, then the larger cover glass, such as this top image, will be more beneficial because more of the object will fit beneath it.
Take hairs for example: they have roots, and tips, and scales, which might need to be viewed together, and it’s easier to have them all housed under one cover glass, as opposed to splitting them up among multiple micro cover glass. Or, if you have a sample consisting of a variety of different particles where you need to observe a size distribution, more area is needed to make an observation consistent with the entire sample. Perhaps the micro cover glass only holds 50 particles, but the sample requires an observation of 500 before an accurate decision can be made regarding the size distribution.
Larger particles would also pose a problem under micro cover glass, because the micro cover glass is no longer large enough to hold that particle in place, so you need that larger cover glass.
Now on the other hand, if there is a single particle smaller than 50 µm, the micro cover glass is a better option. It will keep that particle in one location and make it easier to locate. Looking for a 10 µm particle under an 18mm2 cover glass would take up a lot of time and be difficult to continually relocate. If that same 10 µm particle is under a 2 mm2 micro cover glass, like the bottom image, it greatly narrows the search region making it easier to spot and relocate that particle without taking up too much time. Or, if the particle needs to be washed, it’s easier under the micro cover glass, because not as much liquid is needed and you can better watch the particle to ensure it does not wash away—even at the highest magnifications.
Now, we can see there are many other advantages to using the micro cover glass instead of the full-sized cover glass. These micro cover glass are able to be customized to the specific needs of a project because they are made in any size. As mentioned before, here at McCrone Associates, scientists typically use sizes anywhere between 1 and 8 mm2. Their small size helps them stay very clean compared to the full size cover glass, and once they are dry, they will not stick to one another. The square edges make them very easy to pick up right out of the box, with forceps, and begin using them right away. Another advantage would include the ability to show multiple particle preparations on a single glass slide. This saves time because the slide can be placed on a microscope stage and just rotated or slid sideways to view the next sample, instead of taking the time to switch out the slides; it makes it easier to compare different preps under the microscope, as well. Along these same lines, the size of the micro cover glass make switching out liquids a smooth process, too.
Now I’d like to show you some more specific uses that might help further explain how the micro cover glass can be valuable to your work.
So to start it off, we will just talk about the simple uses, such as using the micro cover glass as a particle marker, or for keeping the particle in one location; these are some pluses to using the micro cover glass. Pictured here is a full glass slide with a single small particle in the center. Below it, there is an 18 mm2 full-size cover glass with that same particle—still pretty hard to see. If you’re trying to move quickly and identify multiple particles, you need a way to narrow down your search field, so by placing a 2 mm2 micro cover glass, the particle can be found very quickly because that search region has now been narrowed to a very small area. This will help keep the particle in a single location, especially while changing liquids so it does not move around. The small size allows very little liquid underneath, and it aids in keeping the particle from floating out of view at those high magnifications. As the samples are pressed out using the micro cover glass, there is also better depth of field and you can see the textures better, which makes it good for photomicrography, as well.
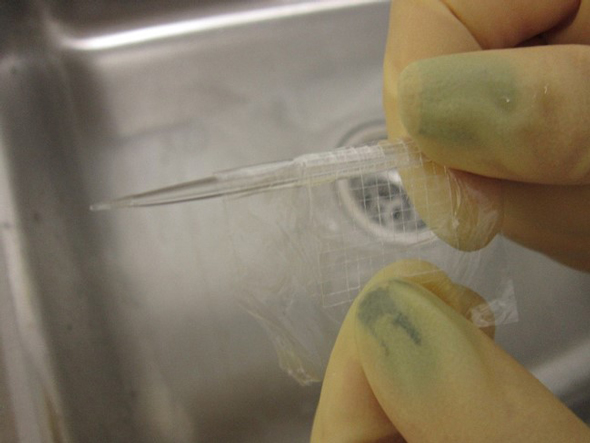
As mentioned on the previous slide, micro cover glass have a variety of applications for liquids and washing particles. When prepping samples for analysis by polarized light microscopy, the samples are often mounted in a refractive index liquid. The micro cover glass make it easy to switch out these liquids when determining the sample’s refractive index. Here we would use a tungsten needle, such as in the left image, to move a drop of liquid to the micro cover glass. A cleanroom wipe is placed on the other side to wick out the existing liquid and pull in the new liquid. This can be effective over and over again without losing your particle.
The image on the right demonstrates the same thing happening with a dye. The dye is being pulled out using a wipe, while water is being pulled in by the capillary action. This works well for washing particles while they’re under the micro cover glass and requires a smaller sample size, overall, because you can use the same particle with different liquids over and over again without having to prep a whole new particle each time.
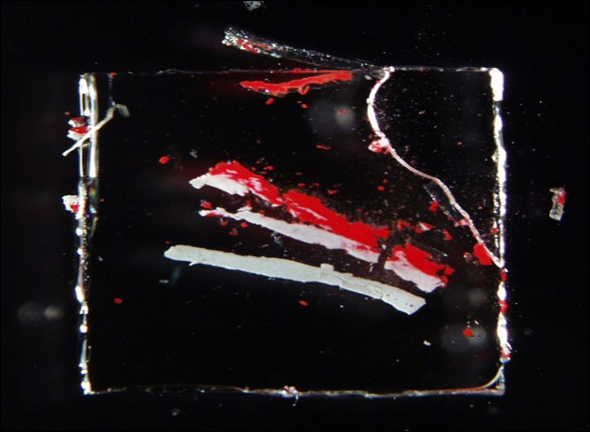
Finally, other uses include pressing out the sample and separating layers using the micro cover glass. A common application for the micro cover glass is using one to flatten a sample. For a KBr prep, like the left image, this is important because the sample has to be thin enough for the FTIR instrument. The different samples can be placed on a KBr crystal and squished flat as you drag a micro cover glass across it. These are also useful when there is a sample with elastomeric properties because this flattening process can often remove some of those properties. This allows these samples to be observed for their texture, and they’re now thin enough for imaging and instrument analysis.
An additional use to these micro cover glass would be their ability to squish a sample in a way that would separate the layers. A great application for this would be a sample of paint: whether it is paint from a wall or paint from a car, the paint will always have multiple layers. By using the micro cover glass to squish and spread the paint, such as the right image, each individual layer can be analyzed and identified individually. To do this, you would simply place the micro cover glass on a cross section of a paint piece, press down, and gently drag the cover glass to one side leaving a streak of different layers as it goes.
So as you can see, with a simple production and washing process, these micro cover glass can be customized to whatever size you might need to analyze whatever samples you might have in your own labs.
I would like to thank you all for listening to this webinar. I hope you found it interesting and helpful and that you can use some of these techniques in your own laboratories. If you have any questions that come up later on, please do not hesitate to send me an email and I will be happy to answer them for you. Thank you, I hope you all have a wonderful day.
CZ: Ok, thanks Josie. That was pretty interesting stuff, and thanks again to everyone attending today’s webinar. If you have any questions, please go ahead and type them into the questions field; we’ll answer them as they come in. We actually had one come in during your presentation from Kristie: What if I don’t have a diamond scribe? Are there alternatives?”
JM: Alright. Well, Kristie, there really aren’t any alternatives for this process. So the diamond scribes are the only ones found that work for making the micro cover glass. You can purchase them through McMaster if you don’t have them, or even just purchase the little refills, because those work as well. Part of the big advantage of these micro cover glass is your ability to pick them up with forceps by the edges without them sticking to each other or causing problems, but the edges have to be very smooth for this to work. So if you are using a different scribe, such as a tungsten carbide scribe, we find here that the edges become very jagged and broken and then you can no longer easily pick up just one. It would be much harder to scribe and prevent that glass from breaking all over the place if you are not using the diamond.
CZ: Ok, and McMaster, that is McMaster-Carr, right? They are a huge outfit and have a catalog with all sorts of tools and such on their website, so if you go to their website, I’m sure you can find that pretty easily. Emily had a question: “Are these currently available for sale?”
JM: Right now no, these aren’t for sale, you have to make them and wash them yourself, but we can keep you posted. In the future, if something does change and they come up for sale, we can let you know.
CZ: That might be something we would want to do in the future. Now another question from Robert: “Does it matter how thick the cover glass is?”
JM: Well, for the scribing purposes, the thickness does not affect how well it’s scribed or not, but thickness really matters for your observations with optical microscopes. So for using these microscopes in microscopy, it is pretty much essential to have the No. 1.5 thickness cover glass, which is what we use. They’re about 0.17 mm thick, because that is the optimal thickness for the objectives of these ‘scopes. If you’re using a scope that has an objective with a numerical aperture that might be lower than 0.4, then thickness isn’t quite as necessary. It’s just better to use the 0.17 mm; it’s the most common, most available, but you also should not substitute something like plastic for the glass either. So even if it scribes nicely, for your observations you want that certain thickness of the cover glass.
CZ: Great, I think that might actually do it for the questions, Josie. If there are any others that roll in here Josie can contact you offline via email. I would like to thank Josie again for such an interesting and useful presentation. And thanks again to everyone for joining us today. Be sure to join us next month when our presenter will be Dalia Yablon of SurfaceChar. Dalia will be talking about the most popular measurements with atomic force microscopy. We hope to see you then, thanks.
Comments
add comment