Microscope Activities, 3: Focusing the Microscope
In the past, Hooke College of Applied Sciences offered a microscopy workshop for middle school and high school science teachers. We thought that these basic microscope techniques would be of interest not only for science teachers, but also for homeschoolers and amateur microscopists. The activities were originally designed for a Boreal/Motic monocular microscope, but the Discussion and Task sections are transferable to most microscopes. You may complete these 36 activities in consecutive order as presented in the original classroom workshop, or skip around to those you find interesting or helpful. We hope you will find these online microscope activities valuable.
EXPERIMENT 3: Focusing the Microscope
Goal
To become familiar with the coarse adjustment and fine adjustment controls.
Level
Basic
Materials needed
Sewing threads of three different colors
Procedure
Locate the large knurled knob located near the base of the upright pillar of the microscope stand; this is the coarse focus adjustment control (Figure 3-1). Being careful to rotate the 4X objective into place, rotate this large knob toward you, and away…and notice which way the stage moves, up or down, as you rotate toward you and away; this will be important to know when working with objectives that have very small free working distance.
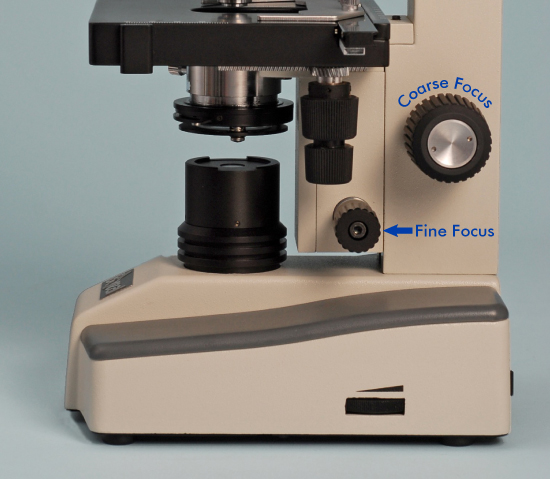
Locate the small knurled knob near the base of the stage support, lower and to the front of the coarse focus. Rotate this knob toward you and away. It will now be more difficult to determine which way to turn to make the stage move down (higher plane of focus; farther away from the specimen) and move up (lower plane of focus; closer to the specimen). Turn the fine focus many times in the same direction until you are confident that you know which way is UP (i.e., lower stage; higher plane than specimen); this will be vital information for refractive index determination.
Discussion
There is a matter of technique that you should be familiar with that will mark you as a critical user of the microscope, and that is to note that the fine focus operates over the course of a screw thread; it displays good technique to always operate your microscope with the fine adjustment in the center region of the thread – this is so that you will not find yourself at the end of the thread, just when you need to focus a bit more when using high magnification objectives. To find the center of the threaded portion, rotate your fine adjustment knob in one direction, and continue to rotate it until you come to a stop at one end of the thread; you will also be able to see the direction that the fine adjustment is going while you are turning. Now, start rotating the fine adjustment knob in the opposite direction, counting the number of turns (or “half” turns), until you come to a stop at the other end of the threads. Divide the total number of turns for the complete traverse by 2. Turn the fine adjustment back by that number of turns, and you will be approximately in the center of travel. Get in the habit of having your fine adjustment in this region, and you will never find yourself running out of focus adjustment.
Now prepare a specimen slide by placing a drop of water in the center of a clean slide. Cut a short length (~10 mm) of each of three different colored sewing threads, and record the order of color as you cross them over in the drop of water. Add a #1½ coverglass on top. Ideally, you should exchange your slide preparation with your lab partner, because your task will be to determine which is the topmost color, which the lowest, and which is intermediate. Start by rotating your 10X objective into place, and looking from the side at stage level, turn the coarse focus knob so as to bring the coverglass of the sample very close to the front lens of the objective.
Now look in the eyepiece and, using the coarse focus knob, rotate to lower the stage while you watch for the sample to come into focus. Never focus the stage UP toward the objective while looking in the eyepiece! If you do so, and you are using objectives with free working distance of less than 1 mm, and you miss the plane of focus, you will smash and shatter the slide sample, and damage the front lens of the objective.
If you miss the focus, which will more likely happen with the 40X objective, DO NOT focus UP! Start over, looking from stage level to bring the specimen and objective close together; then look in the eyepiece, and focus the stage DOWN carefully. Experienced users of the microscope usually dispense with the mechanical stage, preferring to manipulate the slide “freehand”; this allows keeping the sample moving slightly, while focusing, which makes it easier to spot the plane of focus.
On some microscopes, the coarse focus adjustment knobs may be grasped with both hands and rotated in opposite directions to adjust the tension. Also, many microscope fine adjustments are graduated, usually in 2 μm intervals, so that depth measurements may be made. The fine adjustment on the Boreal/Motic microscope is not graduated, but in Experiment 14 we will learn how to graduate the ridges on the fine adjustment knob so that we can make depth measurements.
Task
Switch over to the 40X objective, and carefully bring the colored threads into focus. Now, knowing which way to turn the fine focus knob to raise or lower the stage, determine and record which color thread is on top, which on bottom, and which in the middle. Check your answer with your lab partner who prepared the sample. Skill in this task is vital for refractive index determination, which you will perform in a later experiment.
- Color of Top thread:
- Color of Middle thread:
- Color of Bottom thread:
Hint: Don’t remove the sample and leave your 40X objective in place; get into the habit of leaving your microscope with the 10X objective in place when not in use; i.e., one with more free working distance (see Experiment 5 on determining free working distance).
Comments
add comment