Microscope Activities, 18: Photomicrography
In the past, Hooke College of Applied Sciences offered a microscopy workshop for middle school and high school science teachers. We thought that these basic microscope techniques would be of interest not only for science teachers, but also for homeschoolers and amateur microscopists. The activities were originally designed for a Boreal/Motic monocular microscope, but the Discussion and Task sections are transferable to most microscopes. You may complete these 36 activities in consecutive order as presented in the original classroom workshop, or skip around to those you find interesting or helpful. We hope you will find these online microscope activities valuable.
EXPERIMENT 18: Photomicrography Using Film, Digital, and Cell Phone Cameras
Goal
To make a permanent record of a microscopical field of view using any film or digital camera, or cell phone with photo capability.
Level
Basic-Intermediate
Materials Needed
Any kind of film camera, digital camera, or cell phone with photo capability. Optional: Table tripod
Procedure/Discussion
Using your 10X objective, focus on a stained tissue section, colorful sample, or sample viewed by polarized light (Experiment 15), or by Rheinberg illumination (Experiment 17).
You will recall the location of the eyepoint from Experiment #6; this will become important in a moment.
You will also recall that we were able to project an image of our specimen onto a piece of paper when we were determining true magnification (Experiment 10).
Photomicrography is nothing more than a special form of microprojection; the only difference is that instead of projecting an image of your specimen onto a piece of paper in a darkened room, you project the image onto a piece of film, or onto a chip, or onto whatever the recording medium is. In fact, you could arrange your microscope so as to project the image of your specimen onto a wall or tabletop (Experiment 30), where you can draw it, or place at that point a Polaroid film holder, and make a photo directly onto the positive paper without needing a camera at all!
Film Camera
You may make a photomicrograph with any camera. Suppose we start with a typical 35 mm film camera……there are two major types, SLRs (Single Lens Reflex), and rangefinders. SLRs have a built-in mirror behind the lens that reflects the image up to a viewing screen for focusing and composition, and is removed from the light path just before the exposure is made. SLRs usually have removable lenses, and photomicrographic adapters are made that can attach any SLR to any microscope. Focus and composition are accomplished with the aid of the view finder and hinged mirror. Recording an image with this kind of camera in either automatic or manual mode usually offers no problems.
Rangefinder Camera
Rangefinder cameras, on the other hand, especially those without a rangefinder actually built in, such as the Rollie 35, are another matter. Let’s consider the worse case—no rangefinder point-and-shoot. Figure 18-1 illustrates a suggested setup to make a photomicrograph with a 35 mm camera without built-in rangefinder.

Notice, first of all, that we have placed the Boreal/Motic microscope on its back; it can be placed on a book or board or edge of the lab bench if necessary to free the controls at the bottom rear of the instrument.
Focus on your specimen visually, looking down into your inclined bodytube.
Next, mount the camera onto a table tripod, and arrange it so that the non-removable camera lens is as close to the eyepiece as possible, as shown in Figure 18-1.
Now, there are three critical factors to be considered:
- If the camera lens is not brought close to the eyepiece, the photomicrograph will be vignetted; that is, the result will be a round, or partially round image on the film—which, itself is not bad, since that is the shape of the field of view, but in order to fill the entire film plane, the diaphragm inside the camera lens needs to be in the plane of the eyepoint! Remember where the eyepoint was located? That’s why you have to use high-eyepoint eyepieces, and get the camera lens as close to the eyepiece as possible.
- What about the setting of the aperture diaphragm inside the camera lens? It will vignette the image if it is closed down, so open the aperture diaphragm in the camera lens fully.
- What about the distance setting on the camera? When you use the microscope properly, you don’t really look at the specimen plane; you look through it out to infinity. The microscope optics are designed to have image-forming rays exit the eyepiece parallel. When your own eye is focused at infinity, the parallel rays from the eyepiece will be brought to focus onto your retina by your own eye lens. To mimic these same conditions with the camera, you have to first focus your specimen visually, and then set the camera lens distance to ∞ (infinity) in order to make in-focus photomicrographs.
So remember:
- Focus sample visually;
- Fully open camera aperture diaphragm;
- Set distance to infinity; bring camera lens as close to eyepiece as possible.
Then the only unknown will be the shutter speed, which can be determined by trial and error, or by using an automatic shutter speed mode, if one is available.
Digital Camera
Any digital camera can be used to make a photomicrograph. Review the principle of using a film camera, above, because most of the principles apply to digital cameras. Figure 18-2 illustrates the use of a Nikon COOLPIX 990 (Nikon discontinued their COOLPIX camera line in 2006).
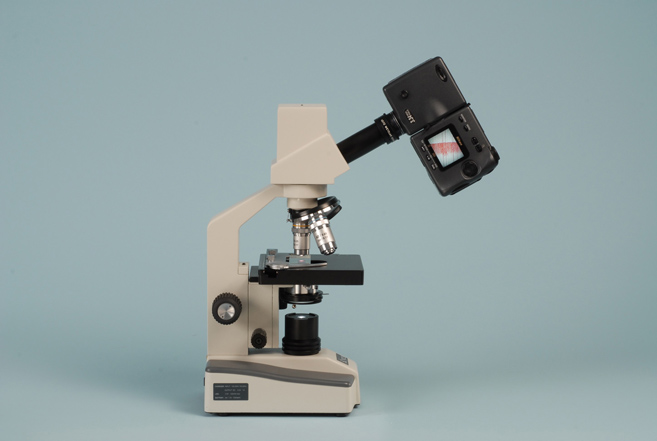
The camera can be supported on a table tripod, as described for the film camera, but this time we are using the microscope upright. Here, we are making use of a fortuitous circumstance: the female filter thread on the front of the Nikon 990 camera lens is 28 mm in diameter. As it happens, there is a 10X 18 mm field of view number eyepiece made by Leitz that has a screw-on rubber eyecup; the male thread of the eyepiece is also 28 mm, and can be screwed directly into the filter threads on the front of the camera’s lens, making the whole unit self-supporting when the Boreal/Motic eyepiece is removed and substituted with the Leitz eyepiece/camera combination.
As illustrated in Figure 18-2, the sample image can be focused and composed by looking at the camera’s built-in viewing screen. Exposures can be made automatically and instantly evaluated, or manual override may be selected.
Photomicrographs may be made with the aid of a cell phone with photo capability. The camera phone may even be hand-held, with the camera’s lens at the eyepoint position (Figure 18-3). Any fault with vignetting or exposure can be evaluated and corrected immediately.

Task
Make photomicrographs using a film camera, digital camera, instant film camera, point-and-shoot camera, or camera phone, using the principles described in the Procedure/Discussion section above.
Teacher’s Note
The Boreal/Motic microscope has optional software available that will allow direct connection of the microscope to a laptop or other computer. The Boreal/Motic microscope has a built-in digital camera in the chimney extension above the prism housing. The specimen image may be viewed, manipulated, and captured using the computer monitor, keyboard, and proprietary software package.
Comments
add comment