Microscope Activities, 29: Drawing Microscopic Specimens
In the past, Hooke College of Applied Sciences offered a microscopy workshop for middle school and high school science teachers. We thought that these basic microscope techniques would be of interest not only for science teachers, but also for homeschoolers and amateur microscopists. The activities were originally designed for a Boreal/Motic monocular microscope, but the Discussion and Task sections are transferable to most microscopes. You may complete these 36 activities in consecutive order as presented in the original classroom workshop, or skip around to those you find interesting or helpful. We hope you will find these online microscope activities valuable.
EXPERIMENT 29: Drawing Microscopic Specimens
Goal
To make drawings of specimens that you see in the microscope.
Level
Basic – Intermediate
Materials Needed
Pencil, pen, and watercolors; optional: eyepiece grid graticule (reticle), commercial drawing aids, or homemade camera lucida.
Procedure
Read the Discussion below, and select any method to make drawings of specimens that you see in the microscope.
Discussion
Drawings of microscopic specimens are often more desirable than photomicrographs of the same specimen, because drawings allow one to include features from several fields of view, or different depths into one composite. Pedagogically, it has traditionally been believed that having to personally record every single detail in an image obliges one to focus the concentration on the finer aspects of morphology. Also, traditionally, such drawings were made freehand; laboratory notebooks often had text on one page, and a series of blank circles on the other page in which students were to draw the microscopical field of view; colored pencils or watercolors were optionally called for (it was a requirement for future biomedical illustrators). As youngsters, we were taught to keep both eyes open, with one eye over the monocular eyepiece, and the other eye on our drawing paper lying alongside the microscope—that way we would not lose sight of the specimen—especially if it were moving!
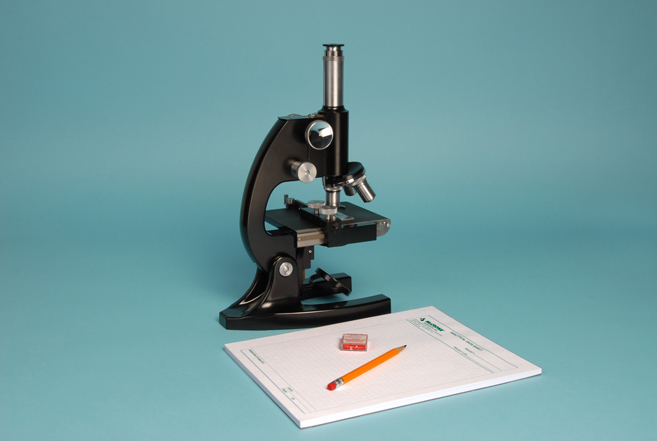
Not everybody is skilled in making freehand drawings, in which case the set-up in Figure 29-1 could be used. First of all, the drawing paper is gridded with light lines. Secondly, the little plastic box on the drawing pad contains an eyepiece graticule with a grid pattern, such as a Whipple disc used to measure and count organisms in water sample analysis. It is easier for unskilled people to make more accurate drawings with this combination, because they only have to draw what they see within one small square of the eyepiece grid, and draw that within a corresponding square of the drawing paper grid.
For the gridded graticule and gridded drawing paper technique to be successful, there are two considerations to be dealt with:
- The eyepiece has to be of the focusing kind; that is, the upper eye lens has to be adjustable in height—either through push-pull fit , or through helical focusing—so that users with different visual acuity can be accommodated.
- The graticule has to be ordered to fit the eyepiece. The graticules come in several diameters, including 16 mm, 17 mm, 18 mm, 19 mm, 20 mm, 21 mm……etc. So, the user has to remove the upper eyelens out of the eyepiece of the Huyghenian type, or unscrew the lower graticule shelf out of the eyepiece of the Ramsden type, and measure the diameter across the eyepiece diaphragm or across the micrometer disc holder so that the correct diameter graticule can be ordered.
Freehand drawing and drawing with the aid of a gridded graticule are by far the most used techniques for making drawings of microscopic specimens. Antoni van Leewenhoek made freehand drawings of specimens that he included in letters to the Royal Society—that was ~350 years ago!
For hundreds of years, artists, in making drawings, have often made use of some sort of camera lucida. A camera lucida is an instrument that by means of a prism, beam splitter, or mirror causes a virtual image of an object to appear as if projected upon the drawing surface so that an outline may be traced (see the references at the end for more on the camera lucida and drawing, and Experiment #31 for the virtual image).
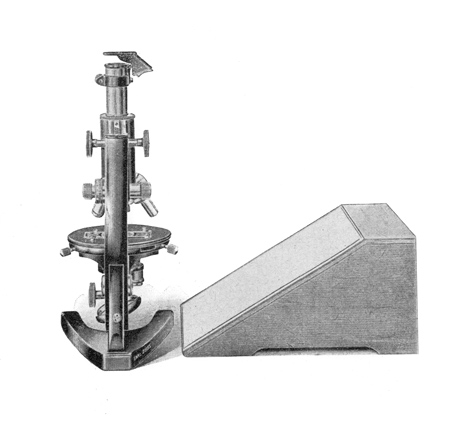
Figure 29-2 shows a camera lucida designed by Professor Ernst Abbe of Zeiss, and reported in the Journal of the Royal Microscopical Society of 1882, unfortunately with an incorrect diagram. Just above the eyepiece in Figure 29-2 there is a right-angle prism with a fully-silvered hypotenuse (the slanted, or inclined face of a right angle prism), except for a 2.8 mm diameter clear portion; another right angle prism is cemented to the silvered hypotenuse, forming a cube. This combination enables direct observation of the specimen through the clear portion.
An arm extends from the body, carrying a mirror set at 45°, which reflects the drawing paper to the cube and is seen by the periphery of the eye pupil, along with the specimen. The Unitron model of the Abbe camera lucida shown in Figure 29-2 also has neutral density filters that can be swung into the light path to adjust the degree of brightness between the microscope image and the drawing paper. The Abbe camera lucida provides an undistorted and correctly oriented drawing made with a vertical body tube; if the microscope is inclined, the drawing board must be made parallel with the microscope stage.
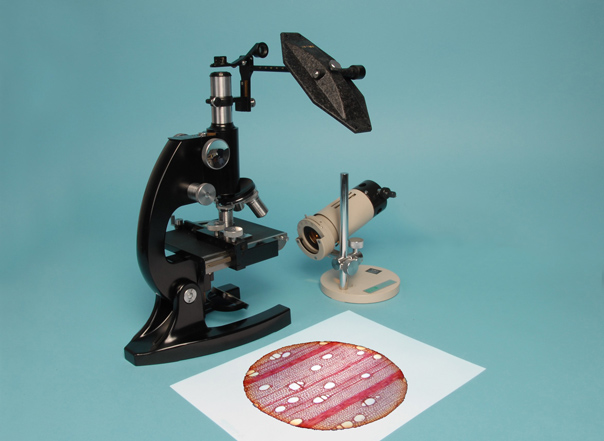
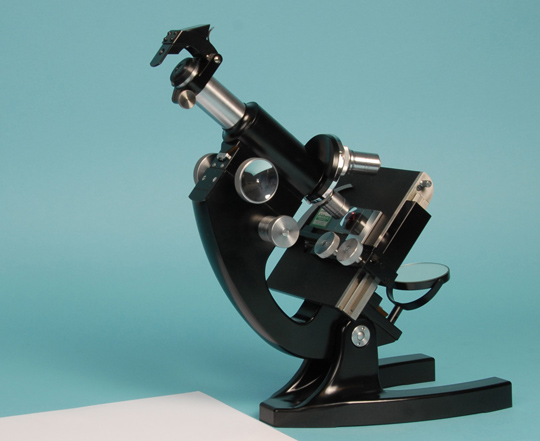
Camille S. Nachet, a Parisian optician in the early 19th century, designed a camera lucida for microscopes that incorporated a rhomboid prism. Zeiss and Leitz both made drawing aids using rhomboid prisms of similar type. Figure 29-3 is an illustration of a Zeiss upright monocular microscope with a rhomboid prism type drawing attachment in use; to avoid distortion of the resulting image, the drawing board must be arranged at an angle. Figure 29-4 shows the same kind of drawing attachment in use, but with the microscope inclined, and the drawing paper flat on the table beneath the rhomboid prism; the amount of light on the drawing surface and in the microscope have to be adjusted to achieve the optimum balance so that both the specimen and the drawing surface result in the best composite image for drawing.
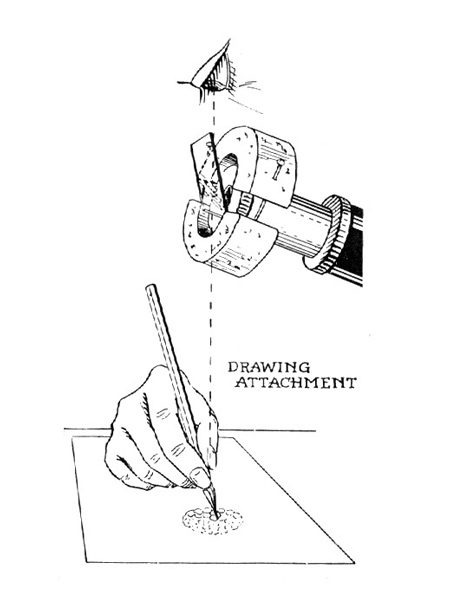
All of the drawing aids thus far described cost money, and have to be located if not already available. Over 70 years ago Oscar Richards described how to make a simple microscope camera lucida for just a few cents in his booklet, Exploring the World with the Microscope (see reading at the end of this experiment). Oscar Richards’ camera lucida is shown in Figure 29-5, a drawing from his book; the drawing aid is made from a microscope coverglass wedged in a cork holder that encircles the upper end of the eyepiece. By this arrangement, the microscope image is partially reflected off of the coverglass, and up into the eye, which, at the same time, sees through the coverglass to the drawing surface below.
Task
Make drawings of microscopic specimens using one or more of the methods described in this experiment. In addition to the drawing device described here, drawings can be made through use of projection devices (See Experiment #30).
Suggested Further Reading
Hammond, John H. and Austin, Jill (1987). The Camera Lucida in Art and Science. Adam Hilger, Bristol. 201 p.
Mueller, Justus (1935). A Manual of Drawing for Science Students. Farrar & Rinehart, New York. 122 p.
This was the classic drawing book recommended by Oscar Richards in Exploring the World with the Microscope (1938); copies can still be obtained via online used book dealers.
Nelms, Henning (1957, 1964, 1981) Thinking with a Pencil. Ten Speed Press, Berkeley, CA. 347 p.
Richards, Oscar W., in collaboration with Gilbert, Alfred C. (1938). Exploring the World with the Microscope. The A. C. Gilbert Company, New Haven, Connecticut. 115 p.
This manual was available for at least two decades, sometimes with a different title on the front cover, including Microscope: Manual of Instructions; Fun with the Microscope; and How to Use Your Gilbert Microscope.
Comments
add comment