Microscope Activities, 30: Microprojection
In the past, Hooke College of Applied Sciences offered a microscopy workshop for middle school and high school science teachers. We thought that these basic microscope techniques would be of interest not only for science teachers, but also for homeschoolers and amateur microscopists. The activities were originally designed for a Boreal/Motic monocular microscope, but the Discussion and Task sections are transferable to most microscopes. You may complete these 36 activities in consecutive order as presented in the original classroom workshop, or skip around to those you find interesting or helpful. We hope you will find these online microscope activities valuable.
EXPERIMENT 30: Microprojection
Goal
To become familiar with some of the ways that microscopic specimens can be projected, so as to allow group viewing and discussion.
Level
Basic
Materials Needed
Commercially available microprojection eyepieces, or any inexpensive right angle prism.
Procedure
Read the Discussion, and project microscopic specimens for group viewing; the room will need to be darkened somewhat.
Discussion
Figure 30-1 is an illustration of a relatively inexpensive microprojection eyepiece. Actually, the device, which simply slips right over any eyepiece, contains only a right angle prism. Its function is nothing more than to change the direction of light rays exiting the microscope from straight up into the user’s eye, to 90° to the side. The slip-on microprojection device can be rotated around the eyepiece freely, so that any azimuth may be chosen for directing the final image. Just holding a compact mirror at a 45° angle over the eyepiece will accomplish the same thing!
Much light is lost in projecting at any distance, so strong, intense light sources are needed; often a 35-mm projector is used as a light source if the microscope’s built-in, or separate light source is too weak.
Generally, low-power eyepieces are used in conjunction with the projecting prism, because additional magnification comes about through increasing the projection distance. The magnification of the projected image equals the microscope’s magnification only at 10 inches (250 mm)—See Experiment #10. One has to be very careful so as not to exceed the maximum useful magnification (MUM), which is defined as 1000 x NA; i.e., one-thousand times the numerical aperture of the objective in use. For example, a 10X achromatic objective typically has a numerical aperture of 0.25. Therefore, the MUM of that 10X objective is 1000 x 0.25 or 250X. With a 10X eyepiece, the microscope magnification is 100X at 10 inches, and 200X at 20 inches, so that MUM is reached already at about 2 feet (24 inches); projection at longer distances results in empty magnification, where no more detail is revealed, only larger fuzzy images. For this reason, very low magnification eyepieces tend to be used in microprojection, and the room is darkened.

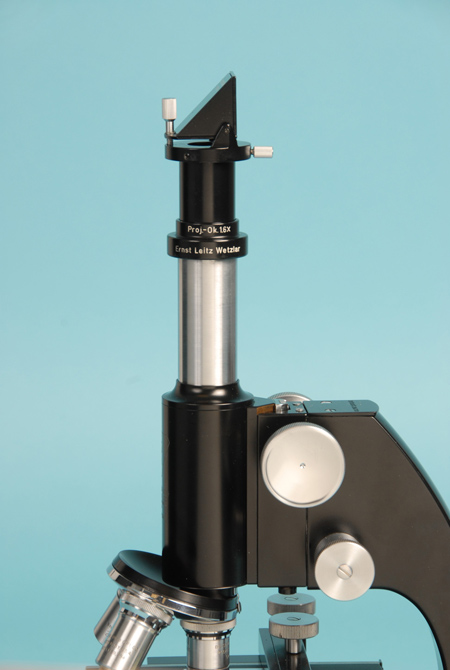
Figure 30-2 shows a somewhat more versatile Leitz microprojection eyepiece. Note that instead of an ordinary eyepiece being used, a special 1.6X low magnification projection eyepiece is being used, in conjunction with a clamp-on right angle prism. The knurled knob extending out to the right is the locking screw that secures the prism to the projection eyepiece. The knurled knob that is sticking up at the back of the prism allows the projection prism to be tilted, so as to make small adjustments in the height of the projected image.

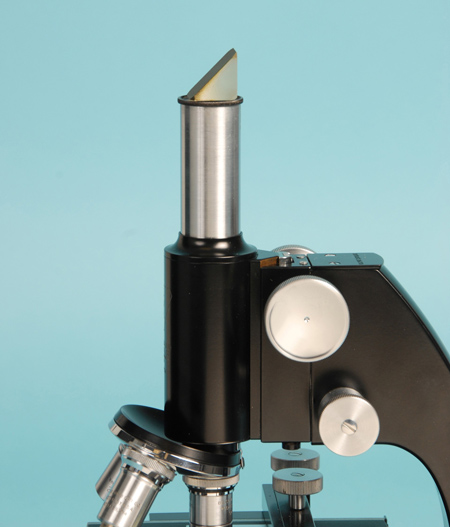
Again, as with commercial drawing devices, these microprojection prisms need to be at hand, or purchased. Figure 30-3 illustrates the answer to the cost problem. Sitting directly on the eyelens of a low power eyepiece is a right angle prism; the size of the prism is not critical—as long as it completely covers the eyelens—and it does not matter if the prism is silvered on the hypotenuse or not—although a silvered hypotenuse is much more efficient in projecting bright images. Finally, the prism does not have to be in perfect condition. There are many science and optical surplus stores—online and physical stores—that sell less-than-perfect prisms; those with chips, for example. The prism shown in Figure 30-3 was selected from a tray full of chipped prisms selling for 25 cents to one dollar.

Notice that if the microscope is inclined to horizontal position, the prisms can be rotated to make the projected image go straight down, so that if the microscope is placed on a box or stack of books, the image may be projected down onto a desk or white paper for small group viewing and discussion, or can be used to trace the image onto a drawing board.
Task
Obtain a commercial microprojection eyepiece, and project microscopic specimens in a darkened room. If a commercial microprojection eyepiece is not available, purchase an inexpensive right angle prism, and project images (a couple of suggested sources for new and used surplus prisms include The Surplus Shed, and American Science and Surplus; for new prisms try Edmund Scientific).
Comments
add comment