Microscope Activities, 32: Immersion Objectives
In the past, Hooke College of Applied Sciences offered a microscopy workshop for middle school and high school science teachers. We thought that these basic microscope techniques would be of interest not only for science teachers, but also for homeschoolers and amateur microscopists. The activities were originally designed for a Boreal/Motic monocular microscope, but the Discussion and Task sections are transferable to most microscopes. You may complete these 36 activities in consecutive order as presented in the original classroom workshop, or skip around to those you find interesting or helpful. We hope you will find these online microscope activities valuable.
EXPERIMENT 32: Immersion Objectives
Goal
To learn how and why to use immersion objectives
Level
Intermediate-Advanced
Materials Needed
Oil immersion objective and/or water immersion objective and/or glycerin immersion objective. Immersion oil; de-ionzed distilled water; glycerin; xylene (or other cleaning solvent); lens paper; microscope slide specimens.
Procedure/Discussion
What is an immersion objective?
The vast majority of microscope objectives are used “dry”; that is, there is no liquid of any kind between the front lens of the objective and the top of the specimen coverglass; air is the (dry) medium. The refractive index of air is nD25°C=1.00. An immersion objective is one that requires the use of some specified liquid between the objective front lens and the specimen slide, and, usually, between the top of the substage condenser lens and the bottom of the slide; that is, the objective is “immersed” in the specified immersion medium so as to exclude and replace all air from between the objective front lens and coverglass on the specimen, and from between the substage condenser top lens and the bottom of the slide.
How do I know if I have an immersion objective?
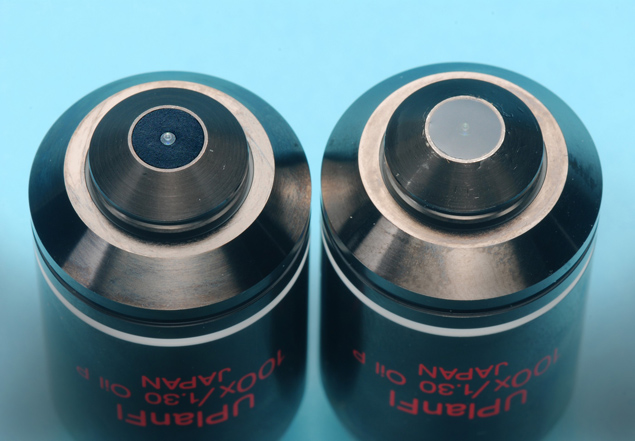
It will be engraved right on the objective. For example, Figure 32-1 shows four objectives which require the use of oil to work properly—not any oil, but one made specifically for use with oil immersion objectives; this oil will have a refractive index of about nD25°C=1.515. That refractive index is essentially identical to the refractive index of the glass that makes up the objective’s front lens. Note that the Olympus objective to the far left in Figure 32-1 specifies “Oil”, right after the magnification (100X) and the numerical aperture (1.30); the “P” means that the objective is suitable for use on a polarizing microscope, where the objectives are required to be strain-free.
The second-from-left Leitz objective specifies “Oel” (German; oel = oil) as the immersion medium; the front lens of this objective also needs to be dipped in a drop of oil placed on top of the specimen coverglass. This 25X objective is also specifically designed to work with ultraviolet light for UV fluorescence (“Fluoresz”) procedures.
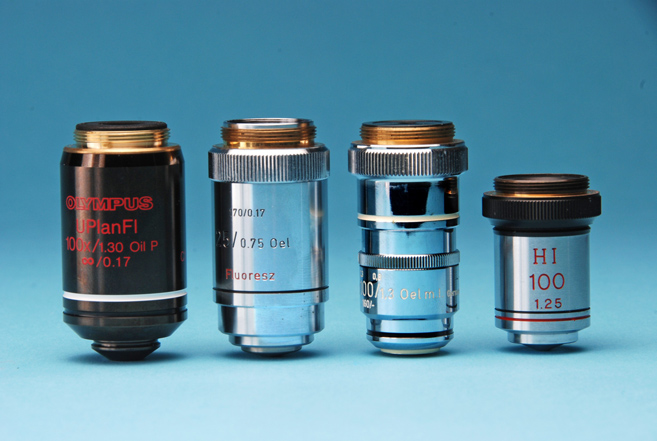
It is not only 100X objectives that are made to be used immersed, as the above 25X example shows; objective magnification may be anything from 10X….on up.
The third objective, a Zeiss oil immersion objective, also specifies “Oel” (= oil) as the immersion medium.
Some older objectives indicate their requirement for oil immersion through the engraved letters “HI” which stands for “homogeneous immersion”, as indicated on the far-right objective in Figure 32-1. It is called “homogeneous” because the refractive index of the substage condenser lens, oil, slide, mounting medium, coverglass, oil, and front lens of the objective are all the same value, ~1.515, i.e. homogeneous.
But oil is not the only immersion medium. Figure 32-2 illustrates four immersion objectives that require deionized distilled water as their immersion medium. The Bausch & Lomb objective at the far left has the word “WATER” engraved on it; a drop of water must be placed on top of the coverglass and this objective’s front lens dipped into the water drop so that no air remains between the front lens and the coverglass. The refractive index of water is nD25°C=1.33.
The second objective—a Nikon—also says specifically that “water” is required as its immersion medium.
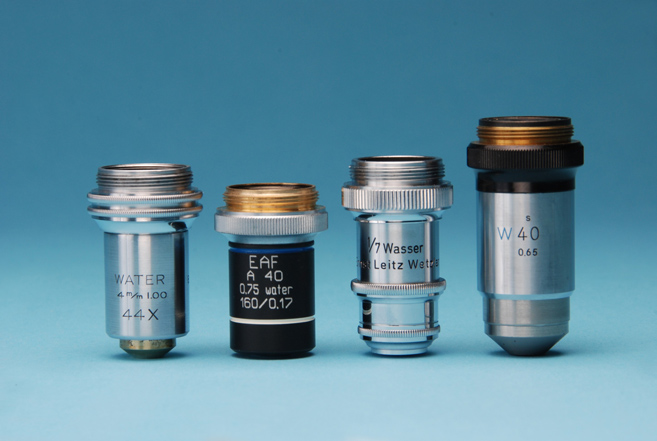
The Leitz objective, third from left, is engraved “Wasser” (German; Wasser = water); again, to indicate water immersion.
The tall objective at the far right simply has engraved on it a light-blue “W” to indicate that it must be immersed in water for effective use.
In addition to oil immersion and water immersion objectives, some immersion objectives are designed to be used with either water or oil; they are engraved “Oel + Wasser”, or something similar.
Still other objectives are designed to be used with glycerin (glycerine; glycerol) as their immersion medium; they will be engraved with the word “glycerin” or, sometimes, simply “glyc”. The refractive index of glycerin is nD25°C=1.47.
A few very special objectives have been designed to use either oil or water or glycerin!
Sometimes a different oil is specified as the immersion medium, such as Sandalwood oil, which is specified for use with Bausch & Lomb objectives made specifically for use with ultraviolet light.
Very high numerical aperture objectives—those with numerical aperture values of 1.6—require the use of monobromonaphthalene; others are made for immersion in methylene iodide.
Historically, the classic immersion oil was Cedarwood oil (Cedar Wood oil; Cedern-Oel, Cedernoel; Ol.ligni.Cedri). The problem with the use of cedarwood oil is that it hardens rather quickly, so that if the user forgets to clean the oil off after use, it hardens, and is then very difficult to remove; it can’t be left on the objective front lens because image degradation will be severe. Modern “Immersion oil” is a synthetic “non-drying” product, whose cleaning may be delayed, because it will not harden—although it is a good idea to get into the habit of cleaning the oil off promptly after each use; xylene (xylol) is the traditional solvent for cleaning off immersion oil.
Figure 32-3 illustrates a variety of containers used for cedarwood oil; most of them have a glass rod dropper incorporated into their stopper to aid in the application of a single drop of immersion medium. The first glass-stopper bottle fits in a turned wooden container (far left). The fourth bottle from the left fits inside of the black metal container lying left of it; the container is the same size as an objective storage container, so it fits in the microscope’s wooden carrying case in the same compartments meant to store the objectives in their containers. Xylene is the cleaning solvent for all of these oils. (Figure 32-3 far right).
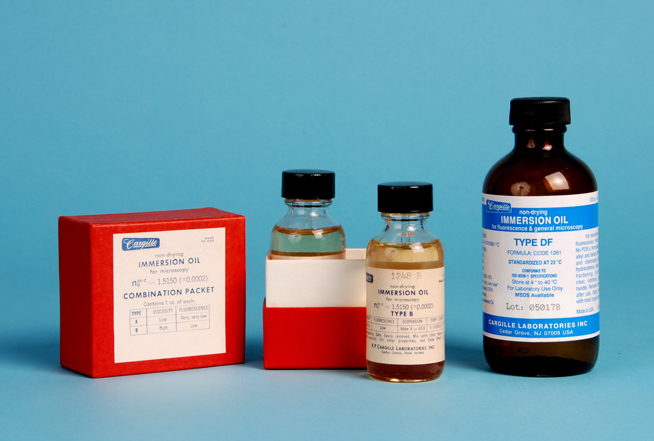
Figure 32-4 illustrates a variety of more modern immersion oils and their containers with applicators. At far left is an objective-storage-case-sized immersion oil container with toothpick-like wood applicator; this container is also meant to be stored in the microscope’s travel case.
-
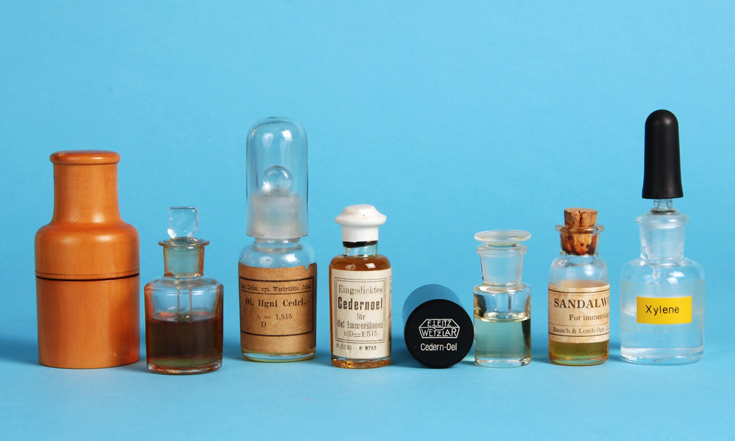
Figure 32-3. Various containers used for cedarwood and sandalwood oil. -
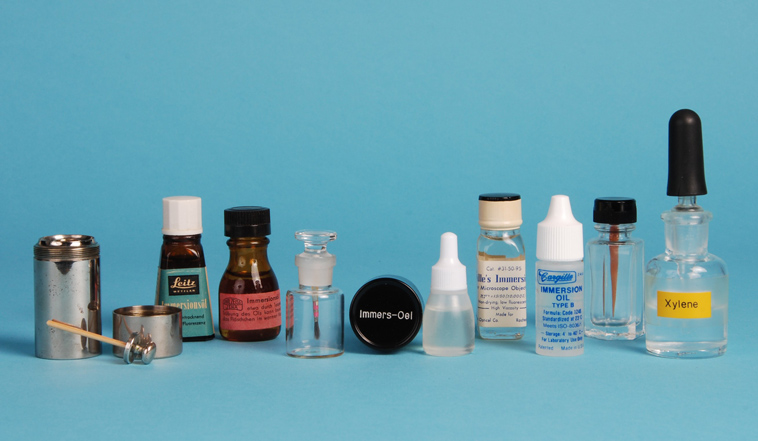
Figure 32-4. Various immersion oils.
Next, a Leitz immersion oil bottle and a Zeiss immersion oil bottle of small size are designed for travel purposes. The empty immersion oil bottle uses a paint brush type of oil applicator (this was designed to avoid hard contact between a glass rod and the objective front lens, but, unfortunately, the brush tends to entrap air, which deteriorates the image). The plastic squeeze bottles are convenient for travel and use, but must be used with care to avoid expelling and entrapping air in the oil. A conventional Cargille ¼-oz immersion oil bottle is shown. And last is an empty immersion oil bottle that uses a plastic, bone, or ivory applicator. Again, xylene is the cleaning solvent for these synthetic immersion oils.
A clever and convenient immersion oil bottle is the Zeiss style made by T. C. Wheaton Company, shown in Figures 32-5 and 32-6. It is a three-part bottle that holds both immersion oil and xylene for clean-up! In Figure 32-5 the amber glass portion holds immersion oil; the brass handle, which also acts as a cap for the oil well, has an applicator attached that is made from hollow glass tubing (closed at the application end) with a wavy spring wire internally to keep it from being rigid (to reduce contact damage). When work is finished, and it’s time to clean up, the amber glass well itself is removed (Figure 32-6), and now acts as an applicator for xylene, which is stored in the clear glass vessel. This is a very convenient arrangement, especially for use in hematology and bacteriology, where oil immersion is used frequently or constantly.
-
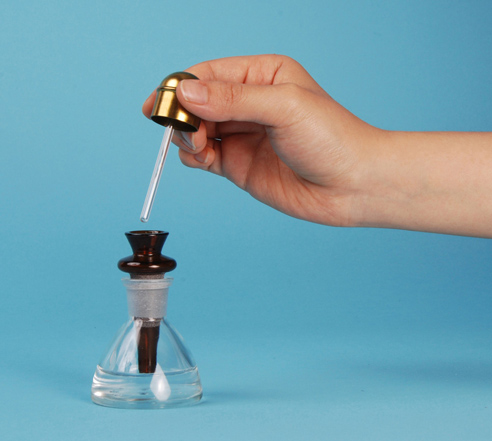
Figure 32-5. A three-part bottle for immersion oil and xylene. -
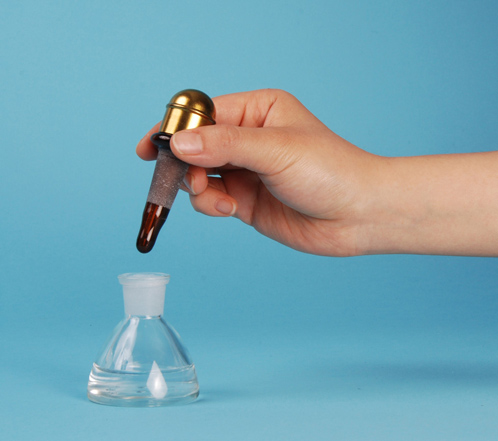
Figure 32-6. Removing the amber-colored immersion oil section.
Synthetic immersion oils come in a number of types and viscosities. Figure 32-7 (left) shows a Cargille two-bottle set of immersion oils that have the same refractive index, but differ in viscosity—this set has the Type A Low Viscosity and the Type B High Viscosity. The higher viscosity oil is used with long-working distance objectives and substage condensers, and when the microscope is inclined. There is also Very High Viscosity oil available for use when microscopes are used horizontally, as is the case in many metallographs. These oils also differ as to their degree of fluorescence in ultraviolet light. The Type DF immersion oil, shown at far-right in Figure 32-7, has very low fluorescence; there is also “fluorescence-free” immersion oil made specifically for ultraviolet fluorescence oil immersion objectives.
Oil Immersion Substage Condensers
Oil immersion objectives—or any immersion objective—that has a numerical aperture of 1.00 or greater (1.20, 1.25, 1.32, 1.4, etc.) must be used in conjunction with an oil immersion substage condenser if maximum resolution is to be achieved.
How do I know if I have an immersion substage condenser?
Any substage condenser designed for immersion work will have a designated numerical aperture of 1.00 or greater—usually greater. Figure 32-8 illustrates three oil immersion substage condensers. Note that the Zeiss condenser at the far left is designated “achr.ap.1.4” (achromatic, aplanatic, numerical aperture 1.4.) [There is also a “0.32”, which means that the top lens of this condenser may be unscrewed and removed when using objectives of low numerical aperture, but then it is no longer immersed in oil to the bottom of the slide.]
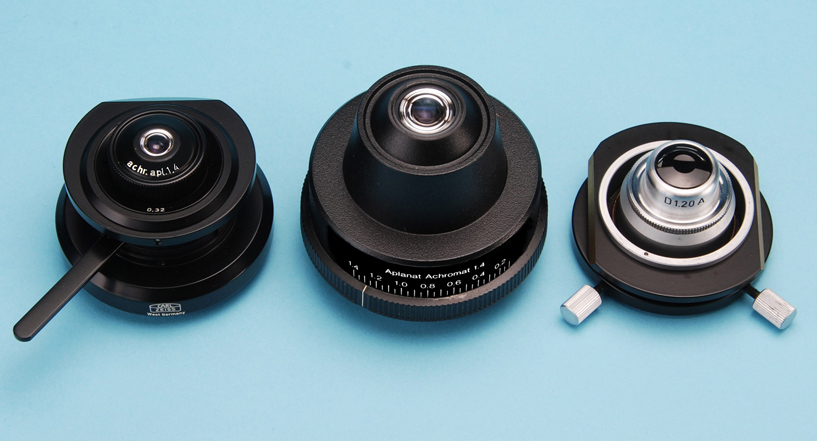
The Olympus oil immersion condenser in the middle is designated “Aplanat Achromat 1.4” [the scale of numbers below that designation indicates the specific, working, actual numerical aperture, depending on the setting of the aperture diaphragm; notice the aperture diaphragm has been opened to a numerical aperture setting of about 1.275. The numerical aperture engraved on the top or side of the substage condenser is the maximum possible capability; the aperture diaphragm setting equals this maximum when adjusted to be wide open; any setting less reduces the numerical aperture and, thus, the resolving power.
The first two immersion substage condensers described thus far are designed for transmitted brightfield illumination. The Leitz immersion substage condenser shown at the far right in Figure 32-8 is designed for transmitted darkfield illumination—very popular for work with bacteria. It is engraved with “D 1.20A” meaning it is a darkfield condenser, and the “1.20A” indicates that its numerical aperture is 1.20. Darkfield substage condensers do not have a built-in aperture diaphragm; they are designed to provide illumination from very large, oblique angles, and are intended to be used with objectives of matching numerical aperture, or those with a funnel stop, (a funnel-shaped metal tube that, when placed inside the back of the objective, reduces its internal diameter, and, therefore, it’s numerical aperture) or built-in iris diaphragm to reduce high NA (e.g. 1.4) down to the 1.20 required by the condenser.
Another characteristic of immersion substage condensers in general is the fact that they all have a kind of moat or circular trough built into them to catch and hold excess immersion oil that may spill down from the top lens. Look at Figure 32-8 again, and locate these moats.
How to use an immersion system: Step-by-step procedure for setting up and using an immersion objective and immersion substage condenser.
We will describe the set up of an oil immersion system; the procedure is the same for water, glycerin, and other immersion media. Refer to Figures 32-9 through 32-14.
- Select and install on the microscope an oil immersion objective (in this example, a Zeiss 100X objective with 1.3 NA, and built-in iris diaphragm to adjust numerical aperture down to 0.8).
- Select and install on the microscope an oil immersion substage condenser (in this example NA 1.4).
- Select a specimen, and focus on it, using any low or medium magnification objective to locate a specific structure. Using, say, a 40X-63X objective, center the structure of interest that you wish to examine using oil immersion.
- Now, remove the slide from the mechanical stage, lower the substage condenser very slightly, and rotate the nosepiece to a position midway between your 40X-63X objective and oil immersion objective (or, alternatively, rotate the 100X immersion objective into position in its locked-up mode. Some immersion objectives, such as the one being used here, retract, or telescope upward into their body, and can be locked in the upper position with a slight rotation of the lower part of the objective).
- Place a drop of immersion oil on the top lens of the substage condenser (Figure 32-9). If your immersion objective has a concave front lens, you may also place a small drop of oil on this front lens.
- Replace the microscope slide specimen, and carefully raise the substage condenser until the oil makes contact with the bottom of the slide; this can be detected by a flash of light that occurs when oil contact is made (Figure 32-10).
- Place a drop of immersion oil on top of the coverglass (Figure 32-11).
Either lower the retracted immersion objective front lens into the oil, or rotate the non-retractable oil immersion objective into place (a small drop of oil on the objective front lens to begin with makes this transition easy) – Figure 32-12 and Figure 32-13. - With both substage condenser and objective now oiled to the specimen slide, touch up the focus of the 100X objective, if necessary, using the microscope fine focus knob, and then check for focus of the field diaphragm, by closing down the iris temporarily, and focusing on it with the substage condenser control knob. (Figure 32-14).
You are now ready to examine your specimen at the highest magnification, using your aperture diaphragm setting to control resolution, contrast, and depth of field.
-
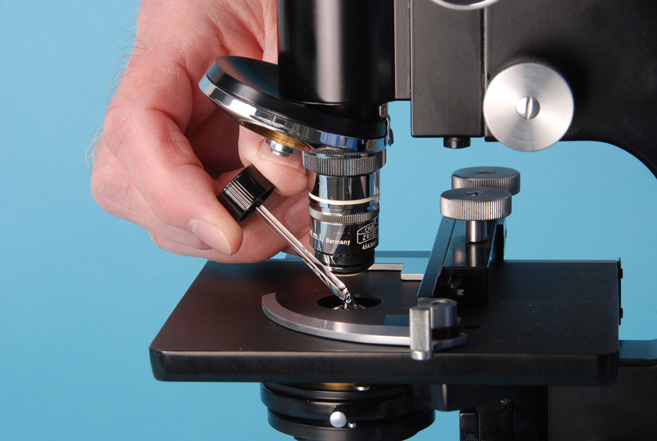
Figure 32-9. Place a drop of immersion oil on the top lens of the substage condenser. -
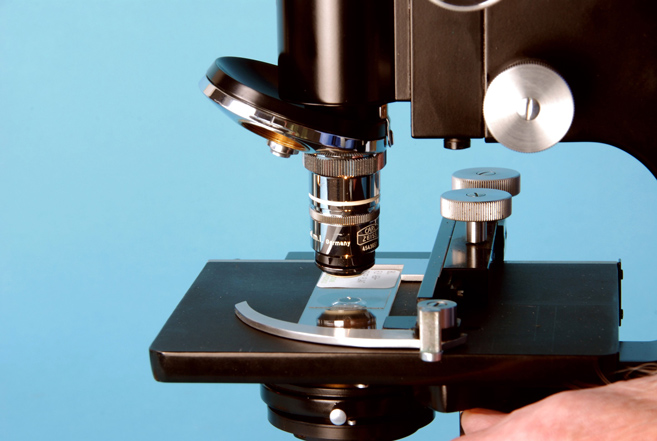
Figure 32-10. Raise the substage condenser until the oil makes contact with the bottom of the slide. -

Figure 32-11. Place a drop of immersion oil on top of the coverglass. -
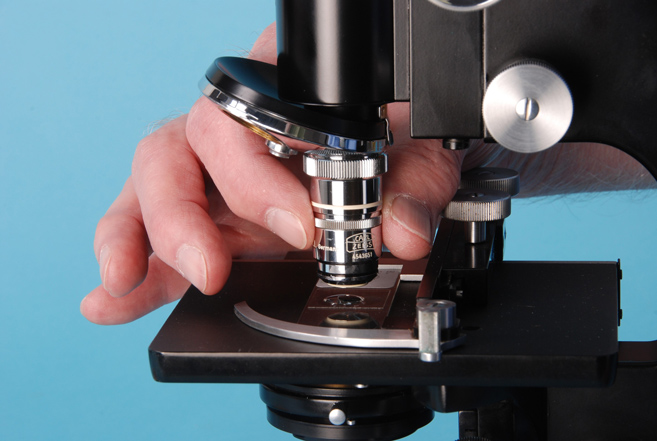
Figure 32-12. lower or rotate the immersion objective until the front lens makes contact with the oil. -
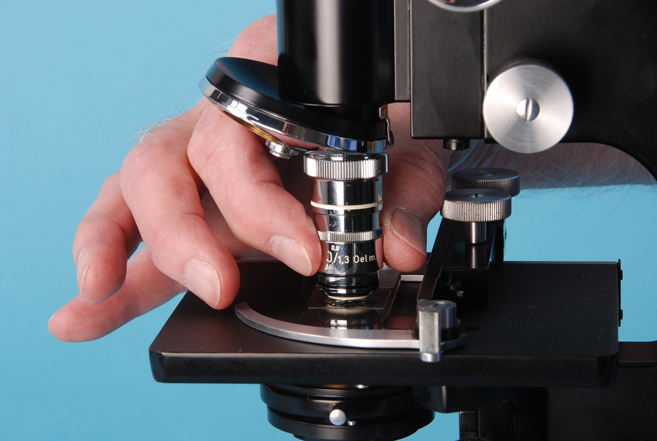
Figure 32-13. The front lens of the immersion objective must make contact with the oil. -
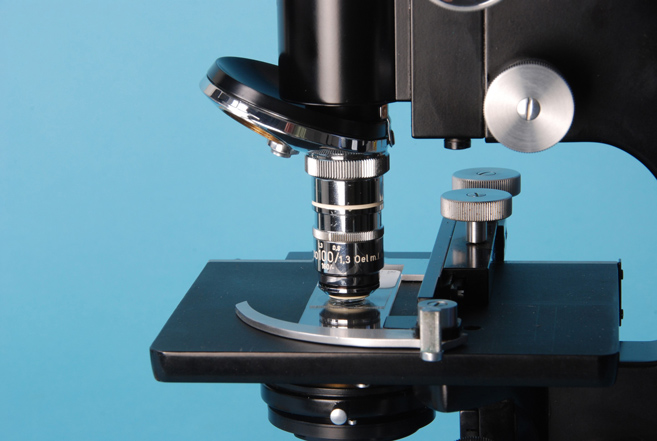
Figure 32-14. After fine-tuning your focus, you are ready to examine your specimen.
How to use an immersion system using an immersion objective, but non-immersion dry substage condenser; Classical Method.
Many microscopes are supplied with oil immersion objectives of high numerical aperture (e.g. 1.2, 1.25, 1.3, 1.4), but non-immersion, dry condensers, with maximum numerical aperture of 0.9; such is the case with most polarizing microscopes, and most intermediate to advanced level student microscopes. Can such a combination still be used? For that matter, cleaning up after using an oil immersion condenser is messy; can I use the oil immersion condenser dry, and only oil the objective? The answer is Yes; however, it must be recognized that the resolving power of the system will be significantly reduced; the magnification will be obtained, but ability to resolve the finest structures will be lost. Nevertheless, this use of oil immersion objective and dry substage condenser is, by far, the most common practice in the real world.
Here, step by step, is the classical method of using a non-retractable oil immersion objective with a dry condenser:
- Select a specimen, and focus on it using the high dry objective (typically 40X-60X); move the object of interest to the center of the field of view.
- Raise the microscope tube (or lower the stage) by means of the coarse adjustment knob, enough to leave ample space above the slide, and swing the oil immersion objective into position.
- Place a small drop of immersion oil on the coverglass over the spot under examination, being careful not to disturb the slide.
- Lower the microscope body or nosepiece (American Optical Company), or raise the stage until the objective just touches the oil drop (this is best done by observing from the side with the eyes at stage level, using the coarse adjustment knob).
- Raise the tube (or lower the stage) just a trifle, being careful not to break oil contact.
Look in the eyepiece, and slowly and steadily lower the tube (or raise the stage) using the coarse focus knob until the outlines of the specimen begin to appear. Then, switch to the fine focus to complete the focusing of the specimen. For very tiny specimens, such as bacteria, larger inclusions or coarser materials may be used as landmarks. A handy aid to finding the correct plane of focus, is to keep the slide moving very slightly with one hand, while lowering focus with the other; any resistance whatsoever indicates that contact has been made with the coverglass, and it is best to start over again. It is well to develop the skill of using oil immersion to gain the benefits of high resolution. Many modern microscopes have adjustments to lock the stage travel at any selected point, so that objectives never come in contact with the coverglass. Not everybody will develop the skills necessary to use oil immersion without damaging slides somewhere along the way—especially mounts of bacteria and of blood films.
Cautions
Some specimens are too thick for oil immersion work. The free working distance (FWD) of high magnification oil immersion objectives is very small—a fraction of a millimeter, and it may not be possible to focus down through thick specimens, especially if thick coverglasses and excess mounting medium have been used. Attempts to force the focus down through thick specimens will result in cracking or breaking of the specimen slide and damage to the objective front lens. Manufacturers try to reduce this possibility by making the front lens assembly “spring mounted”, i.e., the front lens assembly will retract up into the objective body—for a short distance. Use only the fine focus knob when using oil immersion objectives, and be aware of no change in image focus when the fine adjustment knob is rotated—it is a sign that the front of the objective has contacted the coverglass.
If you locate the specimen plane, but the image is extremely fuzzy or constantly changing, it means that you have air bubbles entrapped in the oil that are acting like negative lenses of very low refractive index. You can check for air bubbles in the oil by examining the objective back focal plane, either by
- removing an eyepiece, and looking down the bodytube
- inserting the Bertrand lens of a polarizing microscope
- using a phrase contrast telescope
- examine the eyepoint with a pocket magnifier
If you have air bubbles in the oil, start the oiling all over again.
It is best to parfocalize oil immersion obectives to the other objectives on the nosepiece by using shims. Otherwise, you will be tempted to make initial oil contact of the objective to the slide using the coarse focus knob—this will usually result in missing the very narrow plane of focus, and smashing the slide and specimen, or a fruitless and vain attempt to approach the plane of focus through countless turns of the fine adjustment until the extreme of travel of the fine focus is hit—all indications of inexperienced users. Be careful if using the coarse focus in the Classical Method.
DO use a coverglass when using immersion objectives if they are so designated as engraved on the objective with their proper design thickness.
DO NOT substitute mineral oil, glycerin, silicone oil, or any other oily substance for proper immersion oil made specifically for the purpose; the refractive index, dispersion (change of refractive index with wavelength), and other optical properties will not be a design match, and will result in degraded images.
Be careful when going back to lower magnification “high dry” objectives not to drag them through the oil drop left on the coverglass.
DO remember to clean off the immersion oil from your objective, substage condenser, and both top and bottom of your specimen slide.
Figure 32-15 (right) shows an objective which was not cleaned of its oil; on the left is the appearance of the front lens cleaned properly, using xylene and lens paper. Even “non-drying” immersion oils will dry somewhat and leave a sticky residue on the front lens. Lower magnification objectives dragged through oil without noticing will result in useless images when next used, and may need to be sent back to the factory for repair if oil leaks in behind the front lens.
DO replace old bottles of synthetic immersion oil with new bottles, as many, if not most, immersion oils in the past contained polychlorinated biphenyls (PCBs).
HINTS
When setting up Köhler illumination with 100X oil immersion objectives, it sometimes happens that you cannot see the field diaphragm imaged in the field of view because the iris does not close down far enough. If that is the case, temporarily de-center the field diaphragm to bring it into view, focus on it with the substage condenser, and then restore the centering.
To determine the correct substage condenser height when using brightfield and darkfield immersion condensers, a frosted slide or slide with frosted end is temporarily substituted for the specimen slide.
Many darkfield immersion substage condensers are very sensitive to correct slide thickness. These immersion condensers will be engraved with the optimum slide thickness; for example “slide 1.20 mm.”
When examining smears, such as blood films, sputum specimens, or bacterial smears that occupy a large area of the slide and use larger coverglasses (e.g. 20 mm x 40 mm), oil from between the bottom of the slide and the top of the substage condenser is smeared onto the stage when the slide is moved a distance larger than the stage opening. This is why most microscopes have a removable circular stage plate insert. The stage plate is removed, the condenser is oiled, and the large-area specimen slide is inserted into, and gripped by, the mechanical stage. Large areas can now be examined without smearing oil onto the stage.
Cleaning oil immersion objectives and condensers
Oil is traditionally cleaned off of objectives and condensers using xylene and a good quality of lens paper. Optical glass is softer than regular bottle glass, and anti-reflection coatings of magnesium fluoride are very thin and delicate. Using facial tissue, especially without a solvent, will scratch these surfaces. In the past—and with older microscope objectives—there was a specific warning NOT to use alcohol to clean off immersion oil, because the lens cements were soluble in alcohol. Modern objectives are almost all cemented with the new UV-curing adhesives, so that alcohol or alcohol-containing lens-cleaning solution can be used; it is best to contact the manufacturer of your immersion objective to learn the recommended solvent. This is a vital point, and there may be differences between manufacturers, or even differences for the same manufacturer that apply to different age objectives; here are a few examples.
Leitz
Here are quotations from the Leitz publication “Instructions for the ORTHOLUX Microscope” (512-76/Engl., X1/68/AX/L): “After the end of observation all optical surfaces in contact with immersion oil must be carefully cleaned. A soft rag moistened with xylene is suitable for this purpose. Alcohol or spirit must never be used for cleaning the objectives” (page 9). From the Maintenance and Care of the Microscope section: “Dust on glass surfaces is removed with a fine, dry sable brush, blowing gently across the glass surface while applying the brush. If the dirt resists this treatment, a well-washed piece of linen or chamois leather moistened with a little distilled water is used. If even this has no effect, benzene or xylene is recommended. On no account should spirit or alcohol be used….Oil immersion objectives must be cleaned after use to prevent the oil from drying on the glass surfaces. The front lens should therefore be wiped clean immediately with a piece of soft chamois leather. If necessary a little xylene should be used, but never spirit or alcohol”.
Zeiss
Zeiss used to insert a small, folded piece of paper inside the objective storage case of every flat-field and oil immersion objective. This little note, written in German, French, Spanish, and English, reads: “Plano objectives have a concave front element. We suggest to cleanse it from time to time using a small stick (match, Q-tip, etc.) covered with cotton. As a cleanser we recommend chloroform or ether, but not alcohol. Checking the surface may be done with a magnifier.”
Current practice is to not recommend chloroform or ether—not because they are not excellent solvents that evaporate quickly, but because ether—especially old ether that has not been stored properly—can form explosive peroxides, and chloroform has been found to be a carcinogen. Even xylene may be considered harmful.
Olympus
An Olympus headquarter’s representative recently said, “I used to wipe the lens with a dry lens tissue and leave it at that, because the immersion oils are non drying. A common lab procedure is to wipe them with xylene”. In the Olympus B-Max Microscope Guide to Cleaning and Adjustment, the recommended cleaning solution is: “Cleaning Solution: 7 parts of ether and 3 parts of ethyl alcohol. The mixture ratio depends on room temperature and humidity. When the humidity is high, the ratio can be changed to 8 parts of ether and 2 parts of ethyl alcohol.”
Another current Olympus Microscope Cleaning Materials list recommends five suitable cleaning solutions:
- ProSat 850 presoaked Isopropyl Alcohol Wipes (purchased through outside vendors: VWR Scientific.
- Hexamethyldisiloxan and Ethanol “HyperClean:” Olympus Catalog # OT1871.
- Isopropyl alcohol (Isopropanol or IPA) 70% / 30% with de-ionized water.
- Methyl alcohol (Methanol) 70% / 30% with de-ionized water.
- Ethyl alcohol (Ethanol) 70% / 30% with de-ionized water.
Non-recommended cleaning solvents on the part of all manufacturers include:
- Methyl ethyl ketone (MEK).
- Dimethyl ketone (Acetone).
For more information, and another perspective on the use of cleaning solvents, see http://micro.magnet.fsu.edu/primer/anatomy/cleaning.html.
Water Immersion Objectives
Water immersion objectives are popular because they are easy to use; there is no cleaning; just touch absorbent paper to the water drop and you are ready to change magnification. The ease of using water immersion over oil immersion comes at a price though: water immersion objectives have about 10% less resolving power than oil immersion objectives because of refractive index differences. Water immersion objectives have a maximum numerical aperture of 1.25 for use with water nD25°C=1.33; oil immersion objectives typically have numerical apertures of 1.25-1.40 for use with immersion oil (nD25°C=1.52).
Task
After reading the above Procedure and Discussion, practice using an oil immersion objective with and without using an oil immersion condenser.
Comments
add comment