MIcroscope Activities, 4: Mechanical Tube Length Determination
In the past, Hooke College of Applied Sciences offered a microscopy workshop for middle school and high school science teachers. We thought that these basic microscope techniques would be of interest not only for science teachers, but also for homeschoolers and amateur microscopists. The activities were originally designed for a Boreal/Motic monocular microscope, but the Discussion and Task sections are transferable to most microscopes. You may complete these 36 activities in consecutive order as presented in the original classroom workshop, or skip around to those you find interesting or helpful. We hope you will find these online microscope activities valuable.
EXPERIMENT 4: Mechanical Tube Length Determination
Goal
To measure the actual physical distance between the flat on the nosepiece where the objective screws in, to the top of the bodytube where the eyepiece rests.
Level
Basic
Materials Needed
Metric ruler
Procedure
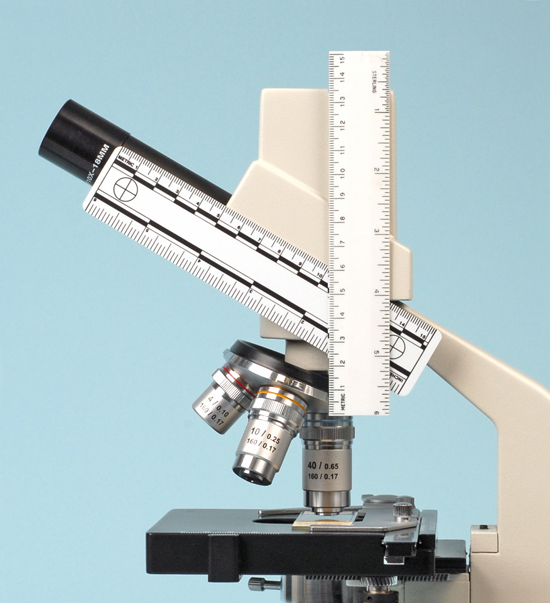
With an upright monocular microscope, hold a metric ruler parallel to the body tube. Carefully align the zero fiducial mark of the ruler right where the objective screws into the nosepiece (or, remove the objective, and measure from the lowest part of the nosepiece). Note the reading on the ruler at the highest point of the bodytube where the eyepiece settles (or, remove the eyepiece, and measure to the top of the tube). The total distance will be the mechanical tube length, in millimeters.
Your Boreal/Motic microscope has an inclined bodytube, so that you will have to take two readings – the vertical component, and the inclined component; or, use two rulers (Figure 4-1).

Discussion
The figure shows that the Boreal/Motic microscope has a 60 mm vertical component, and a 100 mm inclined component, for a total mechanical tube length of 160 mm. This number corresponds to the “160” engraved on the objectives, and it means that no spherical aberration will be introduced into the final image due to incorrect tube length.
You could take these objectives off of the microscope, and use them on any other microscope that also has a mechanical tube length of 160 mm. Note, however, that if you screw these objectives into the nosepiece of an older Leitz microscope, for example, the quality of your final image will not be as good, because the mechanical tube length of the older Leitz microscopes is 170 mm. Microscopes intended for use with epi-illumination (top light; vertically incident light) need a longer tube length so that reflection elements can be used to get light down through the objective for viewing opaque specimens. Objectives for these longer tube lengths will have the number 185 mm, or 215 mm, or ∞ (infinity) engraved on them. Similarly, if these kinds of objectives are screwed into the Boreal/Motic microscope nosepiece, the final image will again be of poor quality, due to the spherical aberration introduced by incorrect tube length.
It is important to note here that critical microscopists often prefer much older microscope stands, using newer objectives, because many microscopes in the past were not supplied with fixed tube lengths, but were supplied with a graduated drawtube. The body tube was telescoping—the eyepiece tube component sliding within the body tube’s tube component, so that any tube length between about 145 mm and 190 mm or so could be set; and the sliding drawtube was graduated in millimeters. The advantage of an adjustable tube length is twofold: 1) it allows objectives of different manufacturers and different tube length correction to be used on the same stand; 2) more importantly, the tube length can be continuously changed, while critically evaluating the image, so as to deliberately introduce a spherical aberration that is of equal magnitude, but opposite sign, to counteract and neutralize the spherical aberration introduced by the slide preparation that is made using a too thin or too thick coverglass, and/or too much mounting medium above the specimen. This is advanced practice, and will be discussed more in Experiment 24 on determining coverglass thickness, and in Experiment 28 on the graduated drawtube.
Comments
add comment