Using a Solar Microscope — Some DIY Required
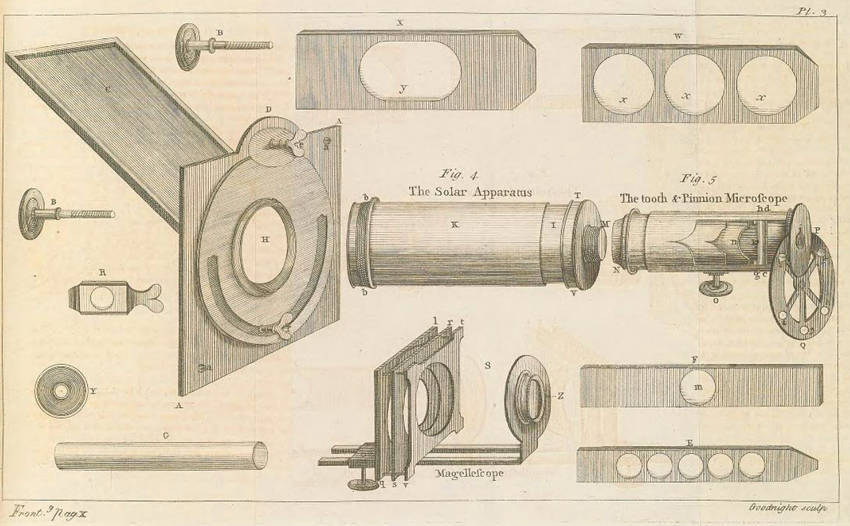
As the name suggests, a solar microscope uses the sun as its light source. The illustration below shows how the solar microscope differs from traditional light microscopes. To set up the solar microscope, one starts by cutting an opening in a wooden window shutter and passing the solar microscope’s rectangular mirror through to the outside. The mirror is adjusted to reflect the sun’s rays, directing them through the solar microscope, and ultimately, projecting a microscopical image into a darkened room, and onto a screen for viewing.

There are several solar microscopes in the Brooks Collection of Antique Microscopes, and we thought it would be fun to set one up and use it. The setup looked easy enough, but, as we turned to the literature, many questions arose: Does the shutter need to be solid? Or will a louvered version work? How large should the opening through the shutter be? And what shape? Circular, square, or rectangular? Armed with modern publications and a few older classic textbooks on the subject, we set out to set up one of the solar microscopes.
The Microscope Made Easy?
Peter Heering has published several accounts of setting up and using a solar microscope. His article, “The enlightened microscope: re-enactment and analysis of projections with eighteenth-century solar microscopes” seemed like a good place for us to start. Heering explains how he went about demonstrating one of the solar microscopes housed at the Deutshes Museum in Munich:
“…all windows in the room were shuttered, except one in which a board was placed so that the solar microscope could be inserted…At the beginning of the experiment the instrument, minus the microscope, was placed in the shutter.”
As detailed as Heering’s account is, he never mentions the specifics of how to attach the solar microscope to the shutter, or how big the opening should be for the mirror to pass through. Heering does reference Henry Baker’s classic The Microscope Made Easy, which contains a good deal of information about the solar microscope’s use, including Chapter VI: “The Solar or Camera Obscura Microscope.” Bakers’ treatment of the solar microscope, while comprehensive, glosses over the part where one attaches the solar microscope to the window shutter.

Earlier solar microscopes were attached to a square piece of mahogany wood as in the illustration above, and then secured to a wooden window shutter. Our assumption is that this piece of mahogany came with the purchase of the solar microscope. Below is Baker’s description of how to attach this version of the solar microscope to a wooden window shutter:
“A square wooden frame, thro’ which two long screws pass…wherein a hole is made for its reception…A circular hole is made in the middle of this frame, to receive a piece of wood…Then putting the Lookinglass, G, through a hole in your window shutter…”
Baker did answer one of our questions; the opening to be made in the shutter should be round, but he never mentions the diameter.
Next, we turned to George Adams’ classic text Micrographia Illustrata, where more specifics about the diameter of the opening are discussed. Also, Adams’ solar microscope design replaced the piece of mahogany with a solid brass plate:
“Make a round hole in the window shutter, about 4 and 1-8th inches diameter; to which apply the square plate A-A, fig. 4. with the circular part D uppermost, then mark the places of the two holes a-a with a small black lead pencil, and bore them through the shutter of a size sufficient to let the milled headed screws B-B pass freely through them, which entering the holes a-a, will hold the plate fast to the inside of the window shutter; the looking-glass C, being first put through the hole, will remain on the outside of the window, the sash or casement being first thrown open.”
The solar microscope we chose for our demonstration was designed by Marie-François-Antoine Kruines, in Paris, c1850, and like the Adams solar microscope, has a solid brass mounting plate.


Our next step was to find a south-facing window with access to the outside, but working in a modern office building does not lend itself well to throwing open a window and capturing the rays of the sun, not to mention there isn’t a window shutter to be had. The only option was to simulate an environment that would allow us to use the solar microscope as it was intended, so we began by fabricating our own wooden window shutter.
Measure Twice, Cut Once
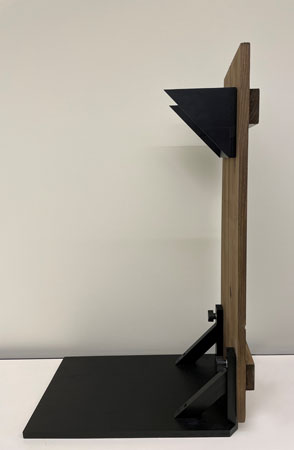
Our fabricated shutter measured 12-1/2” x 36” and would later double as a display stand for the Kruines solar microscope. In the sideview below, you can see that the shutter has a wooden support-foot, which acts as a counterbalance to the mass of the solar microscope. There is also a smaller wooden platform at the top of the shutter, designed to hold an illuminator.
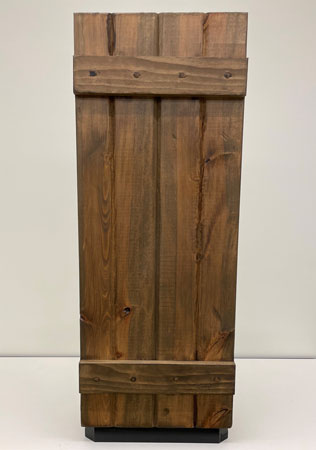
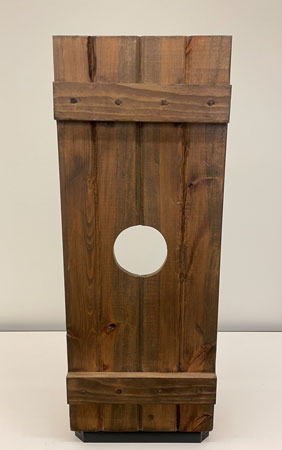
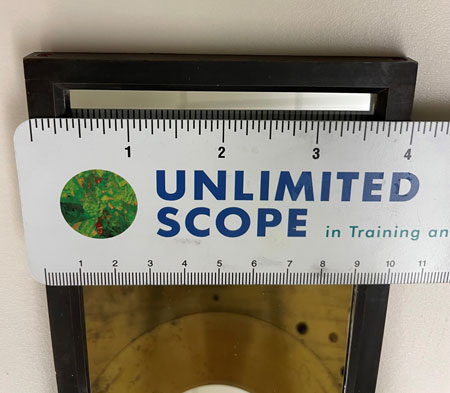
Per Adams’ instructions, an opening of 4-1/8” diameter was cut into the middle of the shutter. This seemed reasonable to us since the mirror of the Kruines solar microscope measures 4” wide.
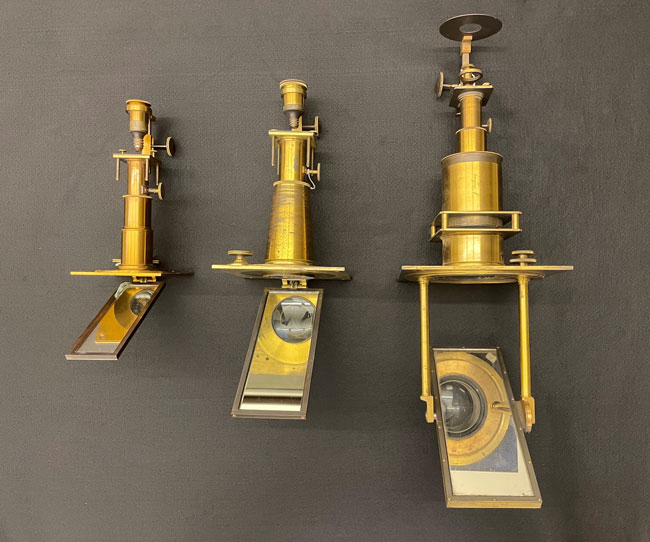
From the photograph below, you can see some of the solar microscopes in the Brooks Collection and how they vary in size; some smaller, and others larger than the Kruines model in the middle. The width of each mirror is different and would influence the diameter of the opening to be cut in the window shutter.
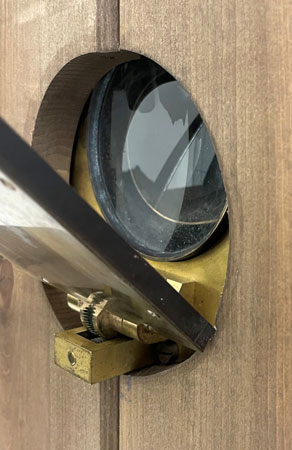
Like most DIY projects, this one wasn’t without its unforeseen problems. In creating our 4-1/8” opening, we soon noticed a misalignment problem when attaching the Kruines solar microscope to the shutter. The mirror passed through the opening without a problem, however, the geared hinge holding the mirror prevented the microscope’s condenser lens from lining up with the opening in the window shutter.
We had a couple of options to fix our shutter opening problem. From a woodworking standpoint, making the diameter of the opening uniformly larger would be difficult; we instead cut a rectangular opening large enough to allow the geared hinge of the mirror to sit down in the opening.
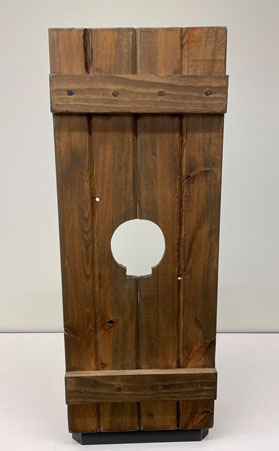
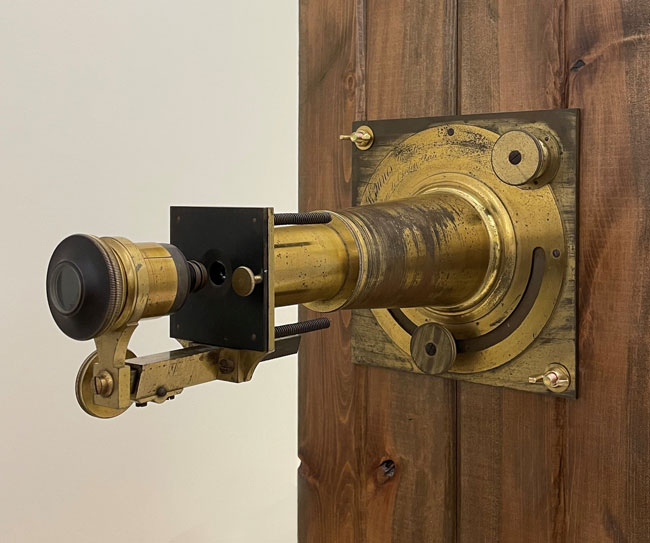
With the opening in our window shutter now fixed, it was time to attach the Kruines solar microscope to the shutter. In the photo of the shutter above, you can see we drilled two ¼” pilot holes to accept the original brass bolts of the solar microscope that pass through the opposing corners of the brass mounting plate. As you can see from the photo below, the original brass bolts were not long enough to pass through our fabricated shutter.

Wanting to stay with all-brass components, longer brass bolts, washers, and wing nuts were purchased to attach the solar microscope to the shutter.

Even On a Cloudy Day
Live displays of the solar microscope were a popular form of entertainment throughout the mid-18th and 19th centuries; however, when a cloud passed in front of the sun, the main attraction would take an unspecified intermission until the sky became clear. In Heering’s “The enlightened microscope” article, he describes the lasting impact these live demonstrations had on the audience, and the occasional inconvenience of a passing cloud:
“…this device creates a new space in which the observer of the microscopic image is no longer looking into the microscopic world. Instead, the…microscopic object…enters the room. The room in which the projection takes place is also no longer part of the macroscopic world. This becomes manifest when the room suddenly gets dark. The reason is obvious: a cloud has moved between the sun and the mirror.”
With the invention of artificial lighting, solar microscopes could be modified and used without relying solely on the sun to produce a projected image. In Fulgence Marion’s book The Wonders of Optics (1868), Marion describes such a setup by passing electricity between incandescent charcoal points, powered by a series of voltaic batteries located on the floor:
“The principle of this instrument is the same as that of the magic lantern and phantasmagoria, of which we shall speak presently…represents the photo-electric microscope, so called from the objects being reflected by the electric light.”

Faced with our inability to harness the sun’s rays, we also turned to artificial lighting to power the Kruines’ solar microscope. Our first choice was a mercury vapor light source, commonly used for fluorescence microscopy, with a rating of about 7,000 lumens.

As mentioned earlier, to hold and stabilize the mercury light source, we constructed a small wooden platform at the top of the window shutter, just above the mirror of the solar microscope.
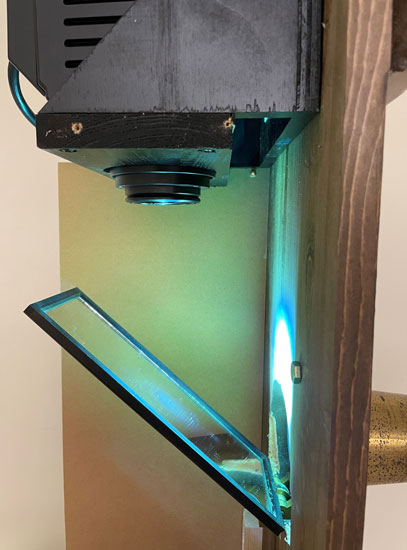
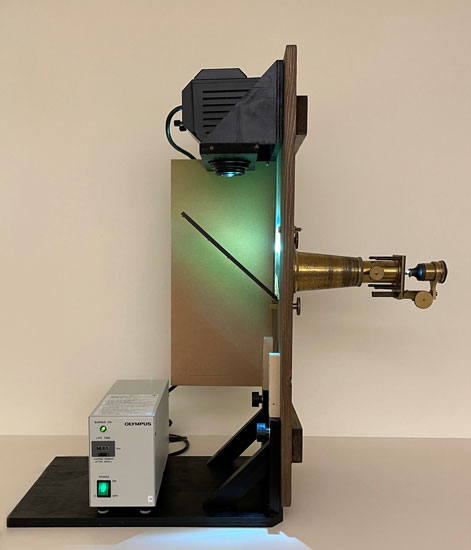
The mercury light source produced a bright and evenly-illuminated image, but there was a concern about the orientation of the light source. Since the light source had to be placed on its side, to direct light down onto the mirror of the solar microscope, there was a possibility that in this orientation the mercury vapor source would overheat and possibly break. We decided a safer option would be the Olympus halogen light source coupled with the TH4-100 external power supply.
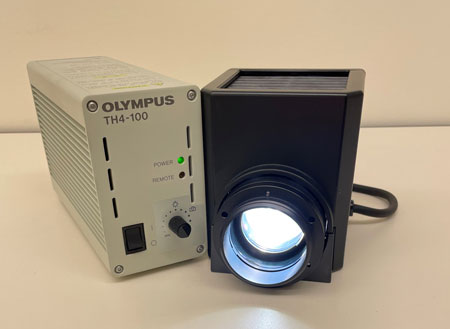
Because the opening for the both the mercury lamp housing and halogen lamp housing are the same diameter, no modification was needed for the shelf above the mirror.
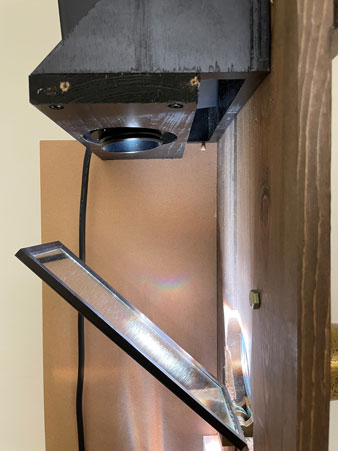
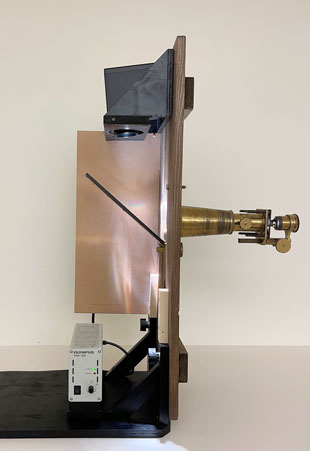
As expected, the halogen light source wasn’t as bright as the mercury lamp and produced a faint image of the filament superimposed over the specimen, resulting in uneven illumination. With some minor tweaks of the lamp house position and the microscope’s condenser lens, we were able to reduce most of the uneven illumination. Overall, we were satisfied with the halogen lamp housing.
Show Time
Going back to Baker’s The Microscope Made Easy, he suggested the solar microscope be used at lower magnifications. In Baker’s time, objectives were commonly numbered as 1through 7, with the higher number being the lowest magnification:
“The Magnifiers most useful in the Solar Microscope are, in general, the fourth, fifth, or sixth.”
So, per Baker’s instruction, we dialed back the magnification of the Kruines’ solar microscope. At low magnification, we would need a large specimen and preferably something moving—perhaps a biological specimen. Accommodating a large biological sample can be tricky, and using a standard microscope slide and cover glass in a vertical orientation makes this a tall order. Instrument makers of the time recognized this challenge and designed a spring-loaded stage for the solar microscope along with a couple of interesting sample holders.

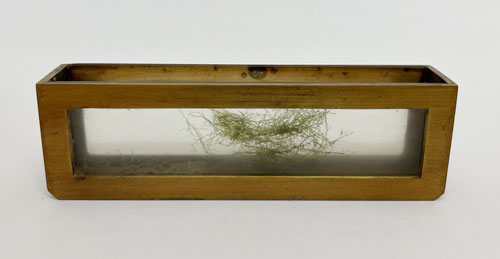
The sample holder pictured on the left is as a live trough, or miniature aquarium. It measures 3-1/2” wide, 1” high, and 1/2” deep, and can accommodate a variety of large specimens. We paid a visit to the small drainage ditch near the office and loaded up the miniature aquarium with a variety of biological material.
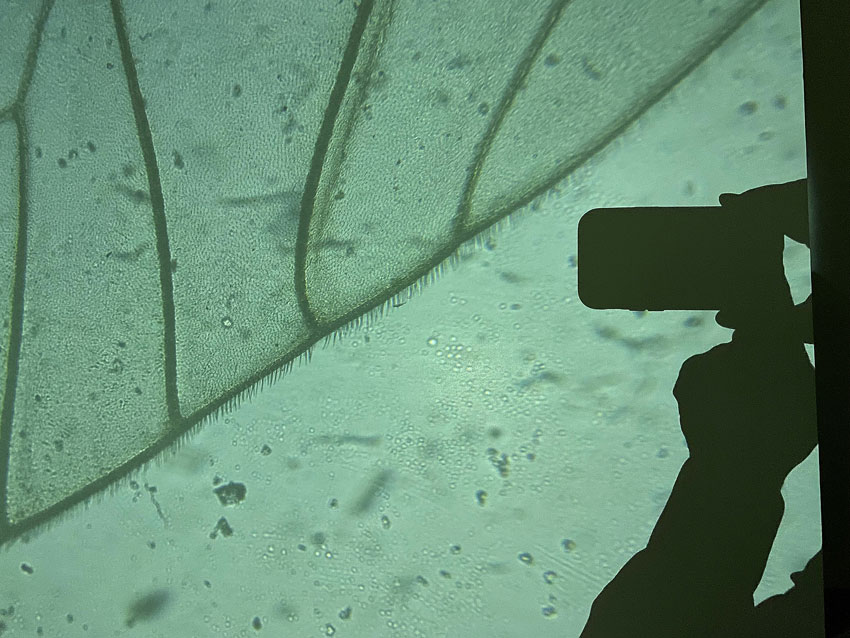
The second specimen holder is likely a variation on the compressorium. A compressorium is used to compress or hold a sample in place between two pieces of glass. Note that the glass slides used for the solar microscope’s compressorium are much smaller than a standard microscope slide, measuring 2-5/8” by 5/8”. A wing of an insect provided the ideal sample for the compressorium.

What our building lacked in access to the sun and window shutters, it made up for with its darkened auditorium. The 175-year-old Kruines solar microscope was brought back to life and the demonstration was a success. All the accounts of the spectacular nature and the images produced by the solar microscope lived up to the hype. Our modified system could throw light more than twenty feet onto a screen, providing for an entertaining demonstration of the insect wing. The detail of the image was incredible; notice the fine hairs along the edge of the insect’s wing.
We had fun traveling back in time, so to speak, using the Kruines solar microscope as it was intended more than 175 years ago. The shared viewing experience appreciating the complexity of the insect wing and watching live organisms dash around the live trough on the screen was a real treat. Although, we think Baker’s sums up our experience best, from The Microscope Made Easy:
“This Microscope is the most entertaining of any; and, perhaps, the most capable of making Discoveries…as it shows them much larger than can be done any other Way. There are also several Conveniences attending it, which no other Microscope can have: for the weakest Eyes may use it without the least Straining or Fatigue: Numbers of People may view any Object together at the same Time, and, by pointing to particular Parts thereof, and discussing what lies before them…”
Comments
add comment