A “Poor” Microscopist’s Hotplate
The title of this little note was inspired by a series of articles on the “poor” microscopist’s hotstage and its accessories that appeared in the journal The Microscope in the eighties of the last century (1, 2, 3). I like to read these kinds of articles where practicing microscopists share their knowledge of how to do things without spending (sometimes) thousands of dollars or more for sophisticated equipment. When I was in need of an easy way to make permanent slides by the use of low-temperature-melting resinous materials (e. g., Cargille Meltmount™), I looked up several catalogs of scientific equipment manufacturers/vendors, and suitable hotplates started at a price near 200 – 300 Euro. That seemed a bit expensive for me, as I am doing most of my microscopy work in the home shop as a hobbyist.
So the idea emerged: wouldn’t it be nice to do this the same way as people at McCrone did similar things? I remembered the articles cited above, read them again, thought a bit about the quotation marks around the word “poor” and decided to build something similar: the “poor” microscopist’s hotplate, or heating plate.
Among the cheapest electrical heaters with built-in temperature regulation are electric irons. So I grabbed one from the collection available at my family’s home and made some tests (please find all data on the equipment used during this work at the end of this note). The accessible temperature range seemed suitable, after some crude preliminary tests with small amounts of substances of precisely known melting points, such as those used to calibrate and qualify analytical hot stages.
The electric iron is constructed to deliver heat in a top-down direction to smooth fabric, clothing etc. on an ironing board. In my intended use, the opposite is needed. So the first necessary thing is: how to fix the electric iron downside-up in a reliable manner that you get a horizontal, flat hotplate?
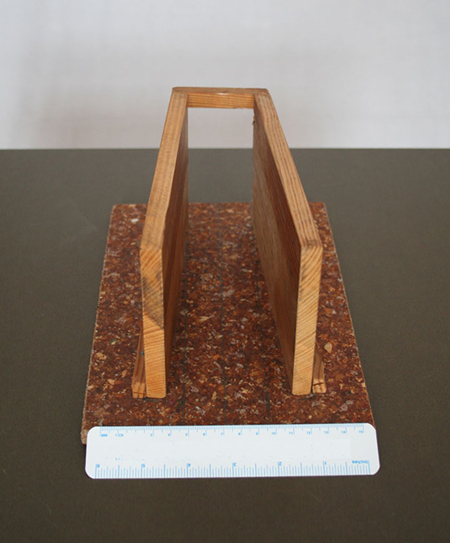
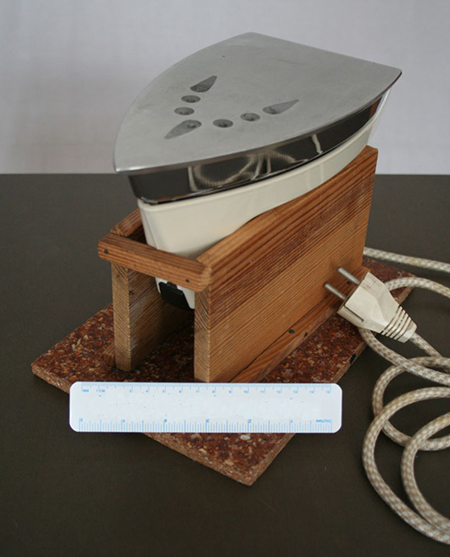
The simplest idea was to construct a little wooden framework, or rack (Figures 1 and 2). This was easily done using some waste wooden boards and battens, nailed together. This framework proved well in the first experiments to make permanent slide mounts for long term storage of microscopic specimens.
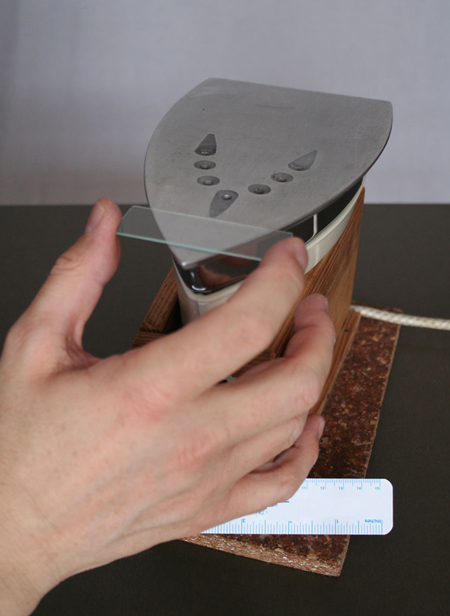
One advantage of this hotplate over the conventional rectangular or circular designs of commercial hotplates is the tapering tip of the iron’s base plate, which can be used with advantage to easily grab slides that are hot in the middle section but cold on both ends, after making permanent mounts. Because of the very poor heat conductivity of glass, it is easy to grab the slides at both ends this way (Figure 3).
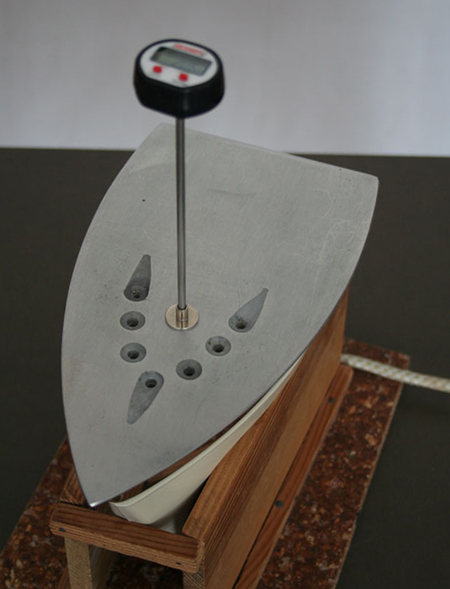
To measure these temperatures, I bought an inexpensive digital surface-temperature probe in a nearby shop for electrical supplies and hobbyist’s needs, (Figure 4). This device was so cheap that I decided to test it first to determine how reliable its temperature readings are. The equipment says on its display label that it is suited for the temperature range “-50°C to +150°C.” It has a digital display showing temperatures with a resolution of 0.1 degrees Celsius. I decided to test it with two easily accessible reference points on the temperature scale, the ice point of water and the boiling point of water, using distilled (desalinated) water of commerce for this purpose. In a crushed ice water mixture, the submerged probe displayed temperatures of + 0.8 to + 1.0°C; in boiling water it showed + 99.2 to + 99.4°C. I decided that for my purposes of getting a first impression of the temperature characteristics of my hotplate, this should be sufficient (thankfully, in my home shop I am not in accredited and permanently inspected/audited surroundings like I am at my workplace in a pharmaceutical laboratory). On the other hand, I would like to avoid the situation that my little hotplate would be called “A poor microscope user’s hotplate,” as Dr. McCrone taught the principle “Know your tools first before you start working.”
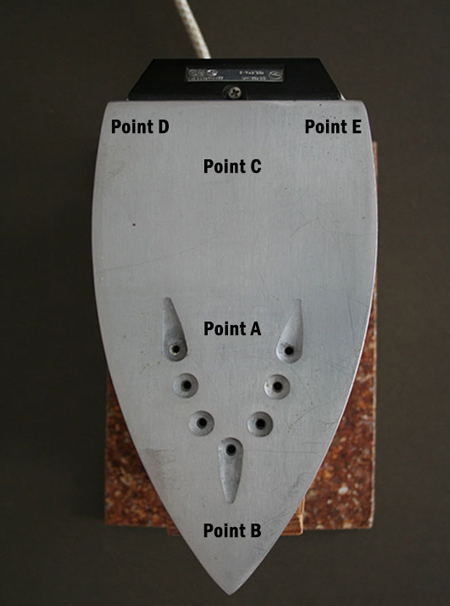
The test spots on the hotplate were selected as indicated in Figure 5 and labeled “A” to “E”.
Measurements were performed over several cycles of switch-on-switch-off of the bimetallic controller of the electric iron. The temperature probe was set on the surface as illustrated in Figure 4. For these tests, I used the regulator position on the iron that proved most suited to work with Cargille Meltmount with a refractive index of 1.662. The following temperatures were recorded:
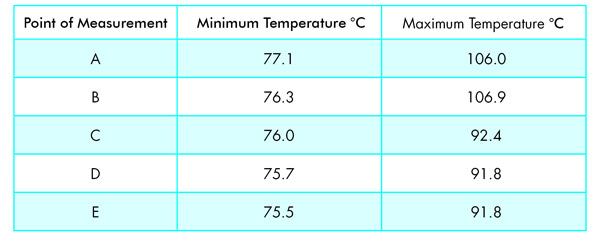
You can see from these data that there is quite a bit of hysteresis in the temperatures. I presume that the electrical heating element beneath the aluminum plate is placed somewhere in the center, near Point A. Also, you can see the variation in hysteresis over the area of the aluminum plate.
Point A is the point I usually use for warming/melting the bottle with Cargille Meltmount, Point B is the one I recommend for warming the middle section of a slide during preparation.
After these measurements, I must say that for critical work where temperature control in your preparation is of importance, don’t use Point B, but prefer to use Points D or E on the hotplate (Figure 6).

To overcome this big hysteresis in the hotplate temperature, especially for work that requires this, I made some additional tests regarding the reproducibility of the switch-on/switch-off-rhythm of the bimetallic temperature controller of this iron. Measured data show the following time regime:

So you see that after a short, intense heating period of approximately 10 seconds, you get the temperature rise documented above, and then a long lag phase of circa 7.5 minutes starts, with an exponential drop in temperature.
This, and the very good reproducibility of the on/off triggering, suggest that for critical work where tight temperature control is a must, it is of advantage to use a stopwatch during your preparations and put the sample material into the molten drop of medium only in the cycle’s last minute or so—when the temperature is in a long exponential skimming/lag phase—just before the next trigger is given to heat the iron up again. Should it be necessary to get an extra degree of control in temperature, you can put your slide at Point E and measure the temperature parallel at Point D, as these two points show corresponding thermal behavior due to the mirror-plane like symmetry of the heat distribution inside the aluminum plate.
Using this home-made “poor” microscopist’s hotplate quite some time, I would like to share two additional practical experiences with the readers of this column:
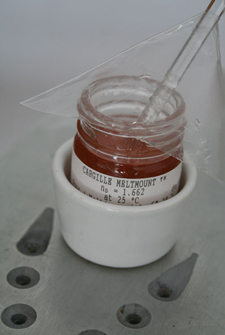
Melting up an original bottle with Cargille Meltmount in the above described setup. Setting the bottle simply on top of Point A takes quite some time because of the bad thermal conductivity of the glass jar and the unmolten resin itself. The melting process can be accelerated to an acceptable rate when you use an additional small jar (jacket jar) made of ceramic/pottery (no porcelain, please!), as sold in tableware shops (Figure 7). Set the original resin bottle inside, and the heated walls of the “jacket jar” help to melt up the contents of the original glass container by thermal conductivity and radiated thermal energy.
The original Meltmount containers/bottles come with a black screw-cap, fitted inside with a cone of polyethylene, as a closure. After closing the bottle in the molten state, I often encountered the problem that the solidification of the resin fixes the cone and/or the screw cap so tightly that you have difficulty to reopen it later on. As I like to use glass rods for the dosage of small amounts of resin during preparation work, I was looking for a cheap solution to the problem of bottle re-closure (I did not like to invest money in the purchase of the expensive balsam bottles available). I found a solution with the design of a little polyethylene foil hat, simply made by cutting off the edge of an ordinary plastic bag made for household use, cutting away the very edge, too, and pulling the glass rod through this small hole. Then I use the hat to cover the opening mouth of the resin’s original bottle when not in use to protect its contents from settling dust and lint (Figure 7).
Some practical (and legal) advice, at last:
-
Never leave the “poor” microscopist’s hotplate unattended if it is switched on or if the iron’s power cord is plugged in!
-
Take care! As the name suggests, the hotplate can get really hot and can cause burns!
-
The author does not take any responsibility with respect to the use of electric irons in the way described here, you are solely at your own risk when using equipment of this type in this manner!
-
The hotplate described herein is intended for a hobbyist’s use, not for use in a professional surrounding / analytical laboratory, et cetera.
NOTE: As an alternative to building a wooden base to support a conventional electric iron, it may be possible to substitute, for both, a travel iron. Electric irons made for traveling usually have a folding handle that would, in many designs, act as its own base when inverted, and at least one elongated design comes in a wooden box, in which the iron can be inverted. Such travel irons are abundant and inexpensive through online auctions.
-
Cargille Meltmount, refractive index of 1.662, item #121779 purchased from McCrone Microscopes & Accessories, Westmont, IL, USA.
-
Digital photographs shot with CANON EOS 350D digital, objective: Canon lens EF-S 18-55 mm, 1:3.5-5.6 11. Copyright for all photographs: Jan Burmeister, 2009.
References
Skirius, Stephen A. (1984): A “Poor” Microscopist’s Hotstage. The Microscope 32, 100 – 102.
Moran, Bruce R.; Moran, John F. (1987): An Inexpensive Digital Temperature Monitoring Device for the “Poor Microscopist’s Hotstage”. The Microscope 35, 291 – 301.
Wilson, L.; McGee, W. W. (1988): Construction and Calibration of a Demountable “Poor” Microscopist’s Hotstage. The Microscope 36, 125 – 132.
Contact the Author:
Jan Burmeister
Mendelssohnstrasse 40
D-06844
Dessau-Rosslau, Germany
jan.burmeister@online.de
Comments
add comment