Robert’s Rules for Contaminant Analysis
April 16, 2018
Presenter: Robert Carlton, Ph.D., Instructor and Consultant, Carlton Microscopy and Consulting
Dr. Robert Carlton shares ten rules for contaminant analysis and identification, based on his 40-year career in R&D:
- Think before you act.
- Get all the information before you start the analysis.
- Clearly establish the goal of the investigation.
- Every experiment should test a hypothesis, and the corollary to that: do no experiment that does not test a hypothesis.
- Start simple and progress to the complex.
- Keep clear distinction between fact and hypothesis.
- Verify conclusions.
- Document as you work.
- Have a clear exit strategy.
- The job isn’t done ‘til the report is done.
Some rules cover the task from the analyst’s viewpoint; others discuss how to collaborate with those requesting the work and with management. It is lighthearted in tone, but serious in content. 40 minutes.
Transcript
Charles Zona (CZ): Okay, I think we are ready to get started. Welcome to another McCrone Group webinar. My name is Charles Zona, and today we welcome Robert Carlton. Robert is going to talk to us about his rules for contaminant identification, but before we get started, I would like to give you a bit of Robert’s background.
Robert has over 40 years of experience in microscopical research and development. His specialty is solid-state analysis with a particular interest in microscopy. Robert’s education is in chemistry, with a Ph.D. from Lehigh University. He has worked for pharmaceutical companies such as Rhone-Poulenc Rorer and GlaxoSmithKline, and has published a book on Pharmaceutical Microscopy in 2011 with Springer. Robert will also be teaching the Thermal Microscopy for Pharmaceuticals course here at Hooke College of Applied Sciences, a member of The McCrone Group.
This webinar is being recorded and will be available on The McCrone Group website under the Webinars tab.
And now I will hand the program over to Robert.
Robert Carlton (RC): Thank you for joining us for this discussion of contaminant analysis and identification. This webinar looks at general principles of analysis without any discussion of nuts and bolts of how you actually do the analysis. Maybe we’ll do a webinar on that subject sometime in the future.
I have nearly 40 years of experience with industrial R&D with fiberglass, with orthopedic implants, and with pharmaceuticals. From the very beginning, I was asked to do contaminant analysis since microscopy is probably the best tool for that work.
I am now semi-retired, but I do still have some interest in the subject, and I also do some consulting.
I probably don’t have to convince you of the importance of accurate, fast contaminant identification. Customers—and in the case of pharmaceuticals, patients—can be hurt, whole production runs of product may need to be destroyed, and company reputations can be lost due to contaminants. Doing this job well can be one of the most important ways that we, as microscopists and as analysts, can directly help the enterprise.
What are the most common contaminants? Here’s one list that’s oriented mainly toward pharmaceuticals. But, really, everything and anything can contaminate our product. Knowing the most common suspects is helpful, because nine times out of ten that’s what we’ll see, but we have to be prepared for the unusual.
Some years ago, I worked with transdermal patches, like the nicotine patches that people use. I was examining them for crystals in the adhesive when I found…diatoms! How would diatoms get into a patch? Transdermal patches are a sandwich of two plastic pieces with an adhesive with the drug in between them. Turns out one of the plastic pieces had a light dusting of diatomaceous earth to keep the rolls of plastic from sticking to itself before being made into the patches. Hence the diatoms in the patch!
Now for the rules. I like making rules, which is sort of odd, since I don’t really much like following rules. In this case, though, I thought I’d make some science humor with a play on Robert’s Rules of Order for conducting meetings. Get the joke? Ha ha.
This is really just a compilation of general principles that I have learned over time, sometimes painfully, for conducting contaminant analysis.
RULE #1: Think before you act.
It’s always seemed odd to me that as scientists, we get paid to think, yet nearly everything in industrial R&D is designed to make it more difficult to think…so very many distractions. Open offices are just the latest in that progression, in my opinion.
It’s said that Ansel Adams would spend up to three months planning how he was going to develop the film and print the image of his very best photographs. Well, you probably don’t have that much time to think, but I do recommend taking a few minutes to work through the process you intend to take, how you plan to collect the sample, etc., before you even begin to do any type of analysis.
As trivial as this rule seems, the pressure to act—and to act now—can be extreme. “The CEO of the company, Cranston Snord, is taking a direct interest in this investigation,” but no pressure, of course.
RULE #2: Get all the information before you start the analysis.
Rule #2 is pretty hard. Seems like it should be easy, but I don’t think I’ve hardly ever started an investigation with all of the information that I eventually needed. Oftentimes, it’s due to the fact that many different people may be involved in the process. There may be the official requester, the quality control person, the line supervisor, the line operator, the person shipping or delivering the samples, among, potentially, half a dozen other people. Each may have a part of the information but not necessarily the whole.
By the way, once or twice I have received the wrong samples for the investigation. Two investigations were going on at once, and the samples got mixed up. Getting all the information first saves a whole lot of time and headaches later.
I favor using a combined sample submission and report form, generally in an electronic format and also in a physical format. I would send the electronic form to the requester, have them fill out as much of the information as is possible, and then I would make a physical copy of that and keep it with the samples in a basket, since that’s a nice way to keep things organized, especially in those times when you get more than one contaminant at a time. By the way, I am sure you probably know, contaminants are feast or famine. You may get five this week, and none for three weeks—makes it really tough to organize and plan your work.
Here’s one example of a contaminant identification and report form. Of course, I don’t think I can show any of the ones that I don’t actually have, any of the ones that I generated when I was in the work world, and so this is one that I just made up, it could be missing a few things. I almost always found that my forms would evolve over time, as I found that, well, I wish I would have had that information when I go to write up the report.
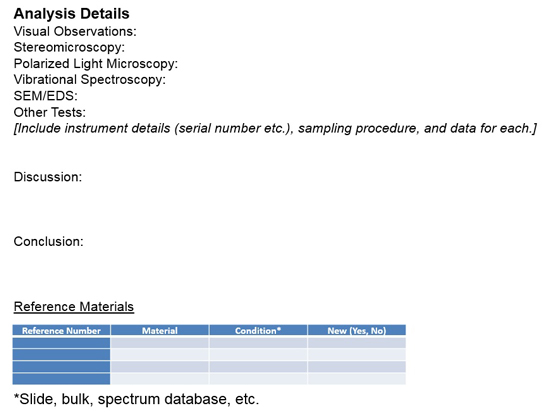
One of the things, as you note here, is the quality investigation number. Some type of number that identifies in that fashion is always a good thing to have. A list of the submitted samples is, I think, a pretty crucial bit of this.
I always like to have the requester send me a couple of reference samples. So, if they suspect that there is a gasket, please send me a couple of those gaskets so I can test against that, and then, of course, the usual information including the analyst’s name, the start date, etc.
On the second page, I would use that as the report form. Obviously, I would have some canned text around what the samples were, what the microscopes were, what the serial numbers were, etc; then I would give the details of all of the tests.
I also think it’s kind of nice if you have your own reference materials that you have a number for those, and that you keep those as your permanent stockpile of standards to test against.
RULE #3: Clearly establish the goal of the investigation.
I have been tripped up now and again assuming that I know why we are identifying the contaminant, only to find out later that I was wrong. Now, I don’t think that the goal of the investigation should necessarily influence the quality of the work that you do; I think that should be the same, pretty much, throughout.
However, the extent to which you operate—how far you take the analysis—and really, the care in which you take in documenting it or reporting it, may, in fact, be dependent on the final result.
I once was asked to verify that a small plastic piece was a bristle from a brush used on the line. I did (mainly using IR microscopy), but I did not take many pains with the report, in fact it was just an informal email note—just like the request to me was an informal email note—everything was informal; all was fine. A year later, I’m asked to provide the full report since the requester had submitted the information to the FDA.
So, at times, it’s probably very good to, at all times, it’s good to get some idea of what the purpose of this analysis will be.
Along those lines, I like this classification scheme from the US Pharmacopeia (USP) for contaminants in parenterals and ophthalmics. It divides contaminants whose origin is outside the process, within the process, or within the product. This information is really useful for those attempting to fix the problem, and can often be done quite quickly. Although positive identification generally has to wait on all the analytical tests, negative information doesn’t necessarily. If you see a piece of plastic in a parenteral vial, you can assume that it is not from the drug product. That information can help focus the investigation, and it can help direct the engineers as to where to look to solve the problem.
RULE #4: Every experiment should test a hypothesis, and the corollary to that: do no experiment that does not test a hypothesis.
I think this rule is probably the most important rule of them all. Working by hypothesis clarifies and organizes the work. Sometimes, you may actually work implicitly using hypotheses, but for really gnarly problems, I find it useful to actually write out the hypothesis and how I am going to test it, and how this particular piece of work will add to confirming (accepting) or rejecting the hypothesis—sort of like diagramming sentences; some truculent sentences need diagramming to help you figure out what you are trying to say.
I list a corollary about doing no experiment that doesn’t test a hypothesis from experience. If the problem is important enough, everyone and their brother will be asked to work on it. You end up with a mass of data, some apparently contradictory, that can require quite a bit of time to unravel. Collecting data that does not test a hypothesis generally just confuses things and frankly, it’s just best not to do it.
I had a manager state one time that we should just do all of the conceivable tests on the samples, then let the data reveal the truth to us. To me, that’s like looking for the meaning of life on Twitter or Facebook. It could be in there, but I bet you won’t recognize it if you find it. By the way, we never did solve the manager’s problem. I guess the data oracle was busy that day!
RULE #5: Start simple and progress to the complex.
It’s just-oh-so tempting to skip a step or two and jump to the wonderful and expensive state-of-the-art gizmo, particularly if the boss says, “Can you run this sample on the gizmo for me“ (of course, there’s no question mark at the end of that since it’s really not a question). Sometimes you’re lucky and it works okay, but it sure is embarrassing for all involved when you get it so very wrong!
So, I recommend working every contaminant methodically, beginning with the simplest, which is just looking at it, going to the more complex, which is your more exotic instruments.
This is a flowchart with the strategy that I use most commonly for my work, although I have to say that over time, it evolved and changed, depending partly on the skills that I have and the instruments that were available to me. By now, this sort of strategy was so ingrained in what I did that I would not often refer to the diagram, although I did have a poster of it hanging on the wall to remind me, at times.

The thinking part of this analysis comes at the very beginning, where we do the visual examination and the stereomicroscopy. This is the part where we actually collect all of our information…the documentation…and then I would nearly always develop my initial hypothesis at this stage, because with the stereomicroscope, you can do at least do a broad class identification. Is this a piece of plastic? Is it a piece of metal? Does it look more like it has a biological origin? Does it look like metal? Then, I would subdivide the work based on whether it was metal or whether it was, evidently, another material. And then, I would go to the polarized light microscope, do my work there, and then end up with the vibrational spectroscopy or the EDS for the confirmation.
I have dozens of stories highlighting this aspect of the analysis, and I’ll mention just one. I received some glass vials containing a contaminant on the inside of the vial walls—or so it was said. In fact, by visual examination, it did look to be particles and there was, apparently, a film on the inside wall. It was clear, though, using the stereomicroscope, that the particles and film were actually on the outside vial wall, which was sort of unusual. Typically, you can see this visually without much trouble. Who knows where the examination might have gone had I not used the stereomicroscope and confirmed that in fact, these particles were on the inside of the vial and were on the vial walls.
For completeness, here are the kinds of microscopy that I use for contaminants.
Of course, you’ll note solid-state NMR down there at the bottom; obviously, that’s not a microscopy technique, but I did list it because it‘s useful for verification if you have access to it.
The workhorses of the work that I would do would be optical microscopy, both with the compound microscope and the stereomicroscope; polarized light microscopy; infrared and Raman microspectroscopy; and then SEM with EDS.
RULE #6: Keep clear distinction between fact and hypothesis.
Actually, I think this is a pretty good rule for life, not just for contaminant analysis. We are bombarded with all sorts of abstract concepts pretty much all of the time. Keeping in mind facts is actually, I think, a pretty good thing. A similar phrase would be “keep in mind the difference between the map and the territory.”
Following on from the example in the slide, I once had a contaminant particle that displayed a conchoidal fracture and did not have evidence of birefringence under crossed polars. Must be glass, right? Nope. No silicon by SEM/EDS. It was definitely plastic by IR microspectroscopy. Unfortunately, I lost track of this, and don’t remember what kind of polymer it was. However, keeping the distinction between the fact and the hypothesis helps sharpen your analytical thinking.
In other words, conchoidal fracture and evidence of birefringence are the facts that I was looking at. The evidence that this conchoidal fracture and the lack of birefringence made it amorphous in glass was a hypothesis.
RULE #7: Verify conclusions.
Verifying your conclusions, to me, is just simply good scientific practice. In my opinion, the best result for the contaminant analysis comes from having three sets of data in agreement that come from three different physical principles. For some samples, of course, that’s just not really very practical.
What I mean by this is if we have evidence from polarized light microscopy, and we have evidence from vibrational spectroscopy, and we have evidence from SEM/EDS, and they all support the hypothesis and the conclusion, then I think we can be pretty comfortable. If we only have one, then it’s going to be somewhat more difficult.
A good example is if you detect bug parts by optical microscopy, there’s not much else out there that’s going to be useful for confirmation that it is, in fact, bug parts. If the project warrants it, you may have to spend some time with the literature looking for confirmatory tests for this type of thing, or some other examples, such as some metals.
RULE #8: Document as you work.
I was just never really able to consistently break myself of the bad habit of not documenting as I worked. I’d do okay for a couple of contaminants, and then I’d get in a rush, or get too curious to know the answer (like skipping to the end of a good book), and rush to the end. The report writing, then, was always painful, and I might even have to repeat some work if it had been a sufficiently long time. So, to myself, and maybe if you have this problem, document as you work—it’s the best policy.
RULE #9: Have a clear exit strategy.
Of course, I appropriated this phrase from Colin Powell regarding military engagements, and don’t get into one if you do not know how you are going to get out. It sort of fits contaminants. What I mean by this is knowing how far you can help and when you have to move on.
I was often asked how many items have to be contaminated before the whole lot is lost. First, there’s no real simple answer to this, and second, I’m not really qualified to make that determination.
More often, I was asked my opinion of the probable source of the contaminant. For gaskets and such, maybe I could help. Most frequently, though, I did not have sufficient access to the manufacturing line to hazard a guess. Finally, the skill set required for analysis is somewhat different than that required for mitigation and re-engineering. It’s, I think, important to know what our own limitations are.
The most awkward questions that I’ve been asked are related to the health consequences of ingesting the contaminant. I have opinions, of course, cellulose fibers in your tablet probably just adds a tiny bit of bulk to your GI tract. But, I’m not a toxicologist–nowhere close! I’m flattered that they would think that I could answer this question ,but, in fact, I can’t.
In that vein, here is a schematic graph illustrating the exponential increase in analysis time with identification specificity. It’s kind of a broad and general type of graph and I’m using it more to illustrate the exponential rise in time, not necessarily to have any kind of exact numbers.
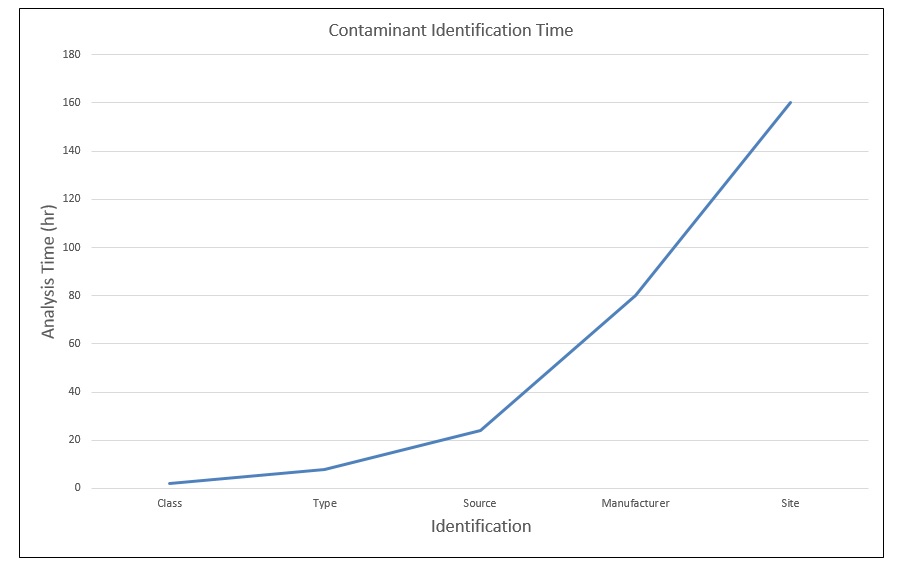
If you take a nylon fiber as an example, identifying it as a fiber and as nylon can generally be done relatively quickly—maybe a few hours at the most. Determining the exact kind of nylon could actually take quite a bit longer, and if we need to know the manufacturer, the mill, the date of manufacture—all of that would add an enormous amount of time to the analysis.
That time may be warranted if it’s a legal matter or has severe implications for the customer, but if the work is just for information, then knowing it is nylon may be sufficient. In many cases, the requester will ask for the maximum information, naturally, so you may need to be the one to limit the time spent and to exit the work appropriately. In my career, the requester never had to account for my time. Since there was no cost to him or her, they could ask for an infinite amount of my time (only a slight exaggeration). It was up to me and my management to manage those requests.
Rule #10: The job isn’t done ‘til the report is done.
Don’t forget the report. That’s one reason I like a combined sample submission and report form, and documenting as you go along. It’s not much of an extra step to add the results to the form once you are done.
Think back to my bristle on the brush that was used on the line. Because I had not written a report (I had only written an email with some of the results), I had to go back and generate it, and that was a painful process to make sure that I got it correct.
So, I like this rule. The job’s not done ‘til the report is done.
Well, that’s the end of the rules, but I do have a couple of stories.
My first contaminant was an eye opener. It should’ve been simple since sample preparation was easy, as was particle sampling. The filters were sent to me, there were particles on the filters, they had been washed, so all I had to do was pick those off and put the onto the microscope. This should have been a really simple job to identify what those contaminants were.
I don’t have access to the original work, and it was done in 1979 or 1980, and so it would have been a physical report at that time; we didn’t use computers to document our work. But here’s an example of what that filter looked like. It had, well, just a little bit of everything. The one thing you don’t see here in this example was the presence of a lot of fiberglass insulation; this was a fiberglass insulation plant.
So, I reported what it looked to be: dirt. And so it was.
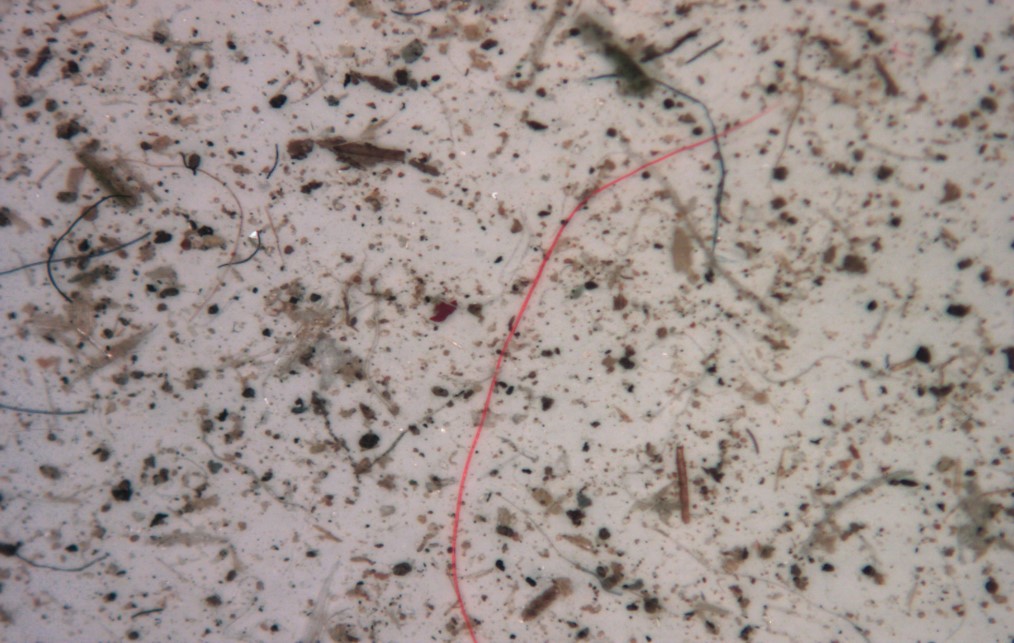
A significant amount of ridicule was heaped upon my head. I didn’t know exactly how to handle that—because it was my first contaminant, it was a bit intimidating. I was assured time and again that this was a completely sealed system;from the time that the train would arrive with the polymer to the time that it was used for spraying on the insulation, it was completely sealed system. There was no way that fiberglass could get in there.It was completely isolated. Well, as I note here, some months later one of the line supervisors, the area supervisor, was walking by the room where the polymer tanks were and happened to notice that there was a janitor who had opened the top and was pouring his waste products—what he had swept up off of the floor—into the tank. Well, that was an eye opener.
As an aside, I was never really given any sort of official acknowledgement that, in fact, I was correct. That it was dirt. But, I did find that I started getting more and more samples.
One thing I learned from that sample was that contaminants can come from anywhere and that no amount of thinking, meeting, arguing, etc., would have helped us to determine the cause of this problem.
This is a metal hip ball and the polyethylene cup that the ball fits into, all used for when you get a replacement hip. I would oftentimes receive metal pieces and plastic pieces that had contaminants, and I would identify those.
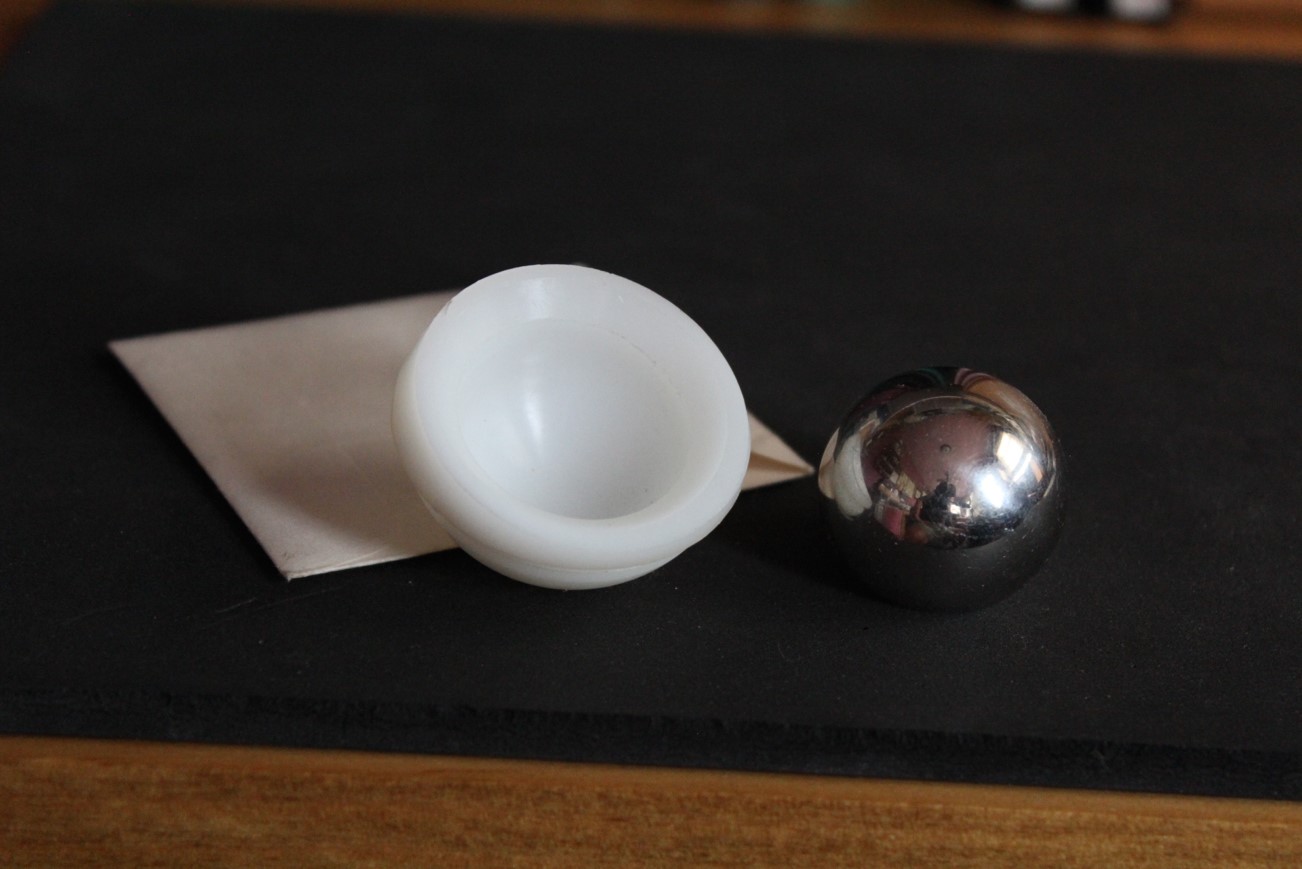
In this case, I received a ball that had a little bit of tape on it to identify where the sample was and to give a little bit of explanation. Being in a rush, like I oftentimes was, I simply stuck it in the SEM, did the analysis, and, well, it looked like, both from the morphology and from the EDS, that this was likely a carbonaceous material as a contaminant.
But wait a minute. I pulled that piece of tape off of the metal ball. So, you guessed it: I analyzed the tape glue and not the impending contaminant. I didn’t examine the sample visually. I didn’t examine the sample by stereomicroscope. I didn’t think before I acted. I just jumped in, hoping to get the job done quickly.
I almost embarrassed myself, or even worse, sent people off on a wild goose chase. I did, in fact, see a small bit of brown, looked at that brown, and it was a piece of metal which had gotten into the ball as part of the polishing process.
So, no matter how tempting it is to skip a step, doing so will eventually bite you in the butt.
Well, that ends the majority of the discussion today. Here are a few concluding thoughts. I’ll let you read those. The third item here, which is patience, humility, and an ongoing dedication to learning the behavior of materials, I think that’s one of the most interesting parts of the job. You’re continuously learning new things.
For instance, when I found out that the diatoms (diatomaceous earth) were used in order to keep the plastic pieces from sticking to itself, I found that a particularly rewarding experience to learn something about that.
So, I found that contaminant analysis was really a rich and rewarding part of my job in R&D, and I hope you find it to be so as well, and I hope that this webinar has helped you.
As an aside, I nearly always padded my contaminant work with an hour or two of skill development. So, if I’m doing something with the IR microscope, I might have spent an extra hour learning a little bit more, testing a few other samples, practicing my sampling skills, etc. What I found is that it’s nearly always easier to justify a little extra time on a particular contaminant than it is to try and devote a whole or half day to building your skills.
Well, that completes the webinar, and if we have time for questions, I would be happy to entertain and answer them. Thank you.
CZ: Looks like we have one from Sue, here: “I occasionally encounter customers who refuse to give me any background info because they don’t want to bias my analysis. Any suggestions on how to deal with this?” Sound familiar?
RC: Sorry, I am just laughing a little bit. Yes, that is familiar. I’ve encountered that. I don’t know. It kind of depends a little bit on the type of analysis that it is. If you look at it and you think it’s pretty simple—say, a nylon fiber or something—I might go along with that.
Otherwise, I think you have to have some information in order to get started. I know it seems a little strange, because people will say, “Well, what would you like the answer to be?” In other words, the analyst or the microscopist will go back and say, “What kind of answer do you think this should be?” I really like the idea of this close communication between the requester and the person doing the test to go back and forth. I think you get the best result like that.
Did I have a lot of success with people who were unwilling to share much information? No. I just pretty much had to do the job as best I could and try to explain to them why I wanted the information. But, I never really was able to satisfactorily figure out how to change their mind.
CZ: Okay, we have one from Joe: “How about when you have to clean a difficult to remove substance from the contaminant, like a silicon grease, for example?”
RC: That is an excellent question, and a difficult process. If I was fortunate and I had multiple specimens, then I would go about it sequentially, after I had done all of my documentation. So, I had looked at the sample, I had taken it to the stereomicroscope. Typically, you can look at it with the polarized light microscopes. Now, I have some information, at least, if I lose the sample, I can come back to it. Then I would begin to try to remove the substance, in a least severe solvent, going up to more severe solvents. Of course, all of that information is quite good because it is telling you something about the material that’s there. I might start with water, although that’s not really a nonsevere solvent, and then move up from there.
One other point, Chuck, before I go on—The question is: do you want to do this if you’ve filtered it, or do you want to do it on a microscope slide? I found it a little bit easier, myself, to do it on a microscope slide. At least if, in fact, I destroyed the specimen through the solvent, I would at least have that material on the slide dry. I might be able to do something with it after that. If, in fact, I have filtered it and it has gone into the wash, I am probably not going to be able to retrieve that at all.
CZ: Okay. Chuck wants to know—not me, one of the attendees here: “How much is PLM used as an early step in the investigation?”
RC: That’s an excellent question. If you’ve followed any of my work in the past that I’ve published—when I published that identification strategy, you’ll find that sometimes I substitute the IR microscope for the PLM. That’s because a good number of the people that I worked with within GlaxoSmithKline, which is where I was at, were much more comfortable using the microspectroscopy than they were using PLM. So I think the answer to the question is: it depends very much on your skill set. In my particular case, I’ve done a great deal of PLM work from the late ‘70s and early 80s; I feel like I have some pretty good skills about recognizing things with that, so I would favor using the PLM first.
Secondarily, one reason I like using the optical microscope to begin with is, for instance, if in fact we’re looking at a biological material, or we’re looking at something like a hair, you know that right away, and there are not too many other ways that you can determine that this is a biological origin, a plant origin, or other origin of such sorts. If you just go directly to spectroscopy, it may be a little bit difficult to backtrack and get to that result.
That means that you do have to have sufficient skills at the PLM to use it early, and I think that just means that if you don’t have those skills, it’s very wise to get them.
You may have a somewhat difficult time convincing people who are not familiar with the process that, in fact, starting from the simplest and going to the more complex instrument is the wisest approach. That may be a battle you can never win. For your own work, I highly advise, based on some of the examples I gave where I didn’t do that, I highly advise that you start from the simple and then work to the more complex.
CZ: Anna is asking if this presentation will be available later, and yes, it will be on our video page—our Webinars tab.
CZ: I think that might do it for the questions, Robert. We just like to thank everyone again for attending today’s webinar. Be sure to check out our Webinars tab for upcoming webinars throughout the year. Thank you.
Comments
add comment