The Collecting, Cleaning, and Mounting of Diatoms
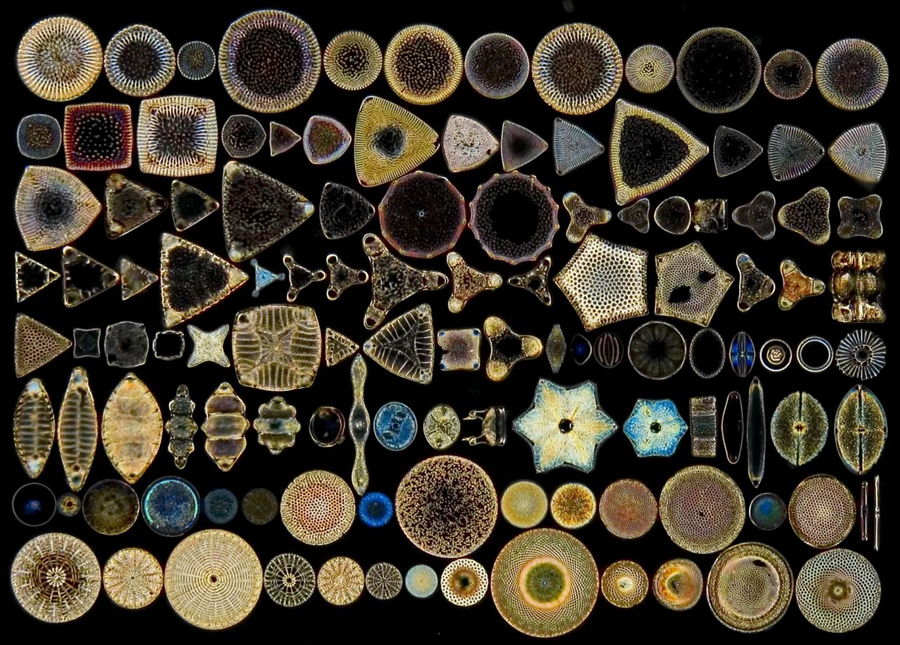
One of the most beautiful objects you can see under the microscope are the diatoms. In the Victorian era the diatoms were, along with radiolaria and foraminifera, the most collected microscopic objects by amateur microscopists.
Diatoms are microscopic aquatic plants found in all fresh, brackish, and salt waters on the globe. Diatoms, after the bacteria, are the most common forms of life on earth. They are generally of a golden-brown color, and many are able to move about. Each diatom, in addition to its vegetable structure, is formed of a beautiful siliceous box, having a lid over the bottom part, and an ornamented rim (girdle). Throughout the world there are thousands of kinds of diatoms with thousands of shapes assumed by their respective boxes. Some are round, like a pill-box, some are triangular, and others are boat-shaped; all are marvelously decorated.
How to Collect Diatoms
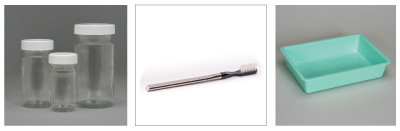
Procuring a large number of diatoms is an extremely easy thing, since they are among the most abundant organisms found on earth. The first thing to do is assemble the right tools:
- Airtight glass jars
- A toothbrush
- A plastic tray
At this point you have to go to places where there is the presence of water, and observing the rocks and plants close to shore, look for those surrounded by the presence of a brown layer or one that is sometimes black. If you see such layers, you are most likely in the presence of diatoms.

With the help of a toothbrush, this golden-brown-to-black substance is collected, and placed in an airtight glass jar with a little of the water. For proper scientific procedure, we also label the sample with the date and place of collection. The only real attention to be taken is to try not to collect sand together with the diatoms, because it will be very difficult to delete it in the later procedural steps.
Cleaning Diatoms
Even though it is very interesting to look at live diatoms under microscope, the most beautiful and decorative part of them to see is the siliceous housing, technically called frustules.
Various methods have been described in the literature for cleaning diatoms, but the most effective ones require the use of very dangerous substances; so, before proceeding with cleaning, remember to take the proper precautions for your own safety and health.
There are specific methods for cleaning the diatoms, depending on whether they are freshwater and marine diatoms, or if you are in the presence of fossil diatoms (diatomaceous earth).
The method I use for cleaning recent freshwater and marine diatoms makes use of several chemicals, including:
- Sulfuric acid H2SO4, concentrated, 97%
- Hydrochloric acid HCl, concentrated, 38%
- Oxalic acid H2C2O4 • 2H2O
- Potassium permanganate KMnO4
When arriving home with the recently collected sample in the jar, follow these steps:
- Let the sample settle to the bottom (two hours)
- After two hours, carefully drain the water above the settled diatoms
- Next, place the material into a test tube or in a measuring cylinder
- Allow the material to settle in the test tube (two hours)
- After two hours, drain the supernatant from the test tube without losing the diatoms
Now you have +/- 3 ml water with diatoms. Add to the same test tube or measuring cylinder 3 ml of 30% hydrochloric acid (HCI 30%) (1:1) (WATER/DIATOMS: HCL 30%). If you have 10 ml diatoms/water, use also 10 ml HCI, 30%. The purpose of the hydrochloric acid is to dissolve any calcium and iron compounds in the sample.
After one day in the HCI 30%, fill the tube with deionized water or distilled water.
- Allow the material to settle in the test tube (two hours)
- After two hours, drain the test tube without diatoms
- Repeat this rinse five times
Remove as much water as possible from the tube, so that you retain mostly diatoms. Now add concentrated sulfuric acid and cook for 20 minutes (Caution: look out for splashing and fumes).
Caution: Now it will be very dangerous to put in the drops of potassium permanganate solution, KMnO4.
After 20 minutes of cooking, very slowly add a drop of KMnO4 (saturated solution of potassium permanganate) in the diatom/sulfuric acid. Repeat the careful addition of little drops of KMnO4 in the diatom/sulfuric acid (about 100 to 200 drops).
Shake the beaker very gently using a circular motion as you add the KMnO4.
When you are finished adding the KMnO4, add oxalic acid dissolved in water until the color changes. If you are finished here, let it cool completely. When cooled, add water slowly (Caution: if it is still hot, the acid can go splashing).
Let it all settle, and pour out the water.
Start now with the water cooling and rinsing technique: Let the sample settle, and then add and drain the water again—at least 10 times.
Prepared Slides
Now is the time to prepare permanent slides of our cleaned diatoms. The best method used by microscopists at the end of the nineteenth century is as follows:
In the following list there is a range of materials that are indispensable for mounting strew slides:
- Microscope slides 3” x 1”
- Round coverslips (16-18 mm diameter)
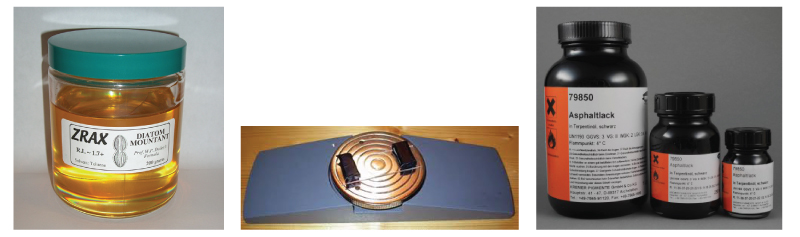
- Mountant with high refractive index, such as ZRAX (ZRAX is made and distributed by Prof. Bill Daily of the University of Pennsylvania http://micrap.selfip.com:81/micrapp/media.htm)
- Alcohol burner
- Plastic droppers (pipettes)
- Slide ringing table
- Asphaltlack for ringing slides (http://kremerpigments.com/shopus/index.php?cat=0202&product=79850)
The mounting of diatoms is an art that requires time to acquire the correct manual skills and dexterity to obtain good results.
There are two types of diatoms slides: the “strew slide” and the “type plate” or “arranged diatoms” that require the use of a micromanipulator attached to the microscope, and a particular procedure to make slides.
The first method, that of the strew slide, is simple if you follow these steps:
- Put a series of coverslips on a table
- Put a little drop of diatoms on the coverslip and allow to dry
- When they are perfectly dry, put a drop of ZRAX on the center of a slide and gently put the inverted coverslip on the slide
- Put the slide over the flame of the alcohol lamp for 20-30 seconds to evaporate the toluene contained in the ZRAX; finally, put the preparation on a hotplate for 3-4 hours at 90-100°C to harden the mountant and to eliminate the eventuality of bubbles
- For aesthetic reasons, you can ring the coverslip border using a 000 brush to apply Asphaltlack diluted in turpentine oil
- Make a label with your computer printer, and the slide is ready to view!
The method of creating arranged diatoms, as I mentioned, requires you to have a manual micromanipulator such as the one illustrated in the photo below. This particular micromanipulator is a model designed by Klaus Kemp, and the model in the figure has been totally fabricated by my great mechanical friend Gianni Vismara, and requires great precision to build.
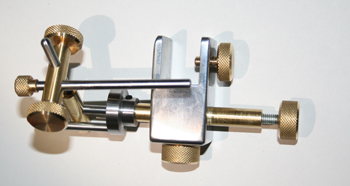
Another important object to use with the micromanipulator is a glass needle, and some fixative for the slides. The procedure to create this type of slide is very difficult, because, first of all, you have to find a micromanipulator, needle, and fixative, and then you need to find the time to acquire the skill in the use of the micromanipulator in the correct way.
For additional information on micromanipulators and micromanipulation, see:
Delly, John Gustav. (2005) Principles of Micromanipulators and Micromanipulation: A Mid-Century SMSI Lecture-Demonstration-Workshop. State Microscopical Society of Illinois. µ•Notes 5 (1) 19-44.
El-Badry, Hamed M. (1963) Micromanipulators and Micromanipulation. Academic Press, New York, and Springer-Verlag, Vienna, 333 p.
Diatoms Ireland: http://www.diatomsireland.com
Contact the Author
Walter Franchini
Milano, Italy
Comments
Josep
Gracie mille for the info! Looking for this for long time...
Thanks!
Replies
Leslie Bolin
Prego, Josep!
add comment